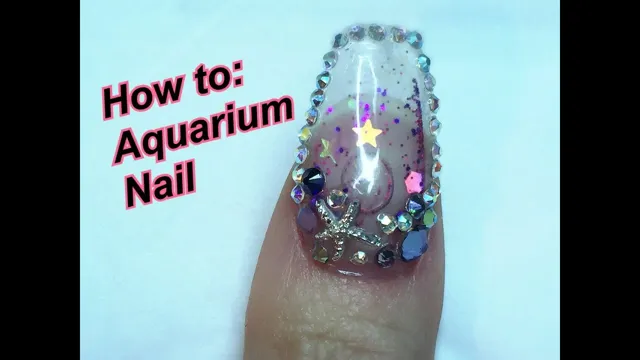
Are you ready to take your nail art game to the next level? Look no further than aquarium nails – the latest trend taking the nail world by storm. These stunning designs, made with a mixture of clear gel and glitter, create the illusion of a mini aquarium on your fingertips. But how do you create these mesmerizing nails at home? It may seem daunting, but with a little patience and some careful steps, you can achieve this Instagram-worthy look in no time.
In this blog, we’ll guide you through the process of creating your own aquarium nails, including the tools you’ll need, the steps to follow, and some tips and tricks along the way. So, get out your nail polishes and let’s dive into the world of aquarium nails. You’ll be amazed at the final result and have everyone asking, “how did you create those stunning nails?”.
What You Need:
Are you looking to try out the latest nail trend? Aquarium nails are all the rage right now, and they’re surprisingly easy to do at home! All you need is a clear acrylic nail kit, some glitter or confetti, and some nail glue. First, apply the clear acrylic onto your nails and wait for it to dry. Then, sprinkle some glitter or confetti onto the nail and gently press it down.
Repeat this process until you achieve the desired effect. Finally, apply a topcoat and admire your stunning new nails! With just a few simple steps, you too can achieve beautiful aquarium nails that are sure to turn heads. Give it a try today!
Gel or Acrylic Nails
When it comes to choosing between gel or acrylic nails, there are a few things you need to consider first. Both options have their own set of unique benefits and drawbacks, and ultimately it comes down to personal preference. Gel nails tend to be more flexible, durable, and natural-looking compared to acrylics.
They are also easier to remove since they can be soaked off without any damage to your natural nails. On the other hand, acrylic nails are stronger and tend to last longer than gel ones. They are ideal for those who need more assistance in length and strength.
However, they do require more upkeep and are harder to remove, often resulting in damage to the natural nail beneath. So, if you are looking for a natural-looking manicure, gel nails might be the better option for you. But, if you want long-lasting strength, acrylics are the way to go.
It’s important to consult with a professional nail technician to determine which option is best for you and your lifestyle.
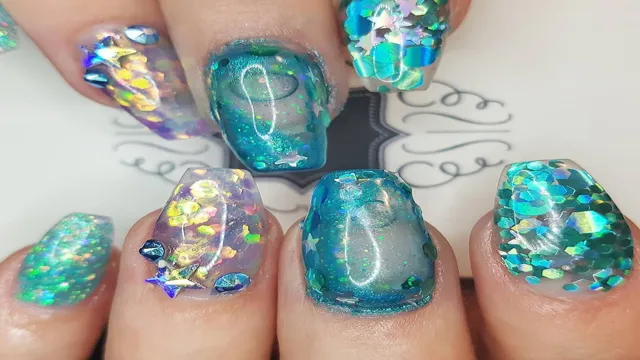
Aquarium Nail Kit
Have you heard of the aquarium nail kit? It’s a unique and creative way to add a little extra to your nails. The kit includes small beads, sequins, and even miniature fish that can be placed onto your nail for a fun and colorful effect. But what do you need to get started? Firstly, you will need nail polish in your preferred color.
Then, you’ll need a clear topcoat, so your design lasts. The aquarium nail kit also includes a glue, which is used to secure the miniature fish and other decorations onto your nail. A small tweezer can also come in handy to help you place the decorations in the right spot.
You can create a fun and personalized aquarium theme with this nail kit, incorporating your favorite colors or even your favorite sea creature. So, if you’re looking for a unique and eye-catching way to jazz up your nails, give the aquarium nail kit a try!
Clear Nail Polish
Clear nail polish is a versatile and indispensable item that can be found in almost every woman’s make-up bag. It is the perfect candidate to give a stylish and sophisticated look to your nails without spending money on expensive manicures. All you need is a clear nail polish, a base coat, and a topcoat.
The base coat is the first layer you apply to the nail bed before painting the nail. It helps to protect your nails from getting discoloured. After the base coat has dried, you can apply your clear nail polish.
Clear nail polish gives your nails a healthy shine and a subtle depth that adds a glow to your overall appearance. It also helps to protect your nails from chipping and wear. Finally, after the nail polish has dried, you can apply the topcoat. (See Also: How to Know if Your Saltwater Aquarium has Cycled: A Beginner’s Guide)
The topcoat helps to lock the nail polish in place and give your nail a long-lasting shine. So, if you want your nails to look good without spending a lot of money, clear nail polish is your go-to option.
Step-by-Step Guide:
Aquarium nails are a fun and unique nail trend that’s making waves in the beauty world. With just a few supplies and some creativity, you can create an aquatic wonderland right on your fingertips. Here’s a step-by-step guide on how to aquarium nails.
Firstly, you will need clear acrylic nails, nail glue, fine glitter, water, small plastic aquarium plants, fish or sea creature charms or beads, and oil or glycerin. Next, apply the clear acrylic nails to your natural nails and let them dry completely. Then, fill the nails with water and add a drop of glycerin or oil to the water to slow down the movement of the glitter.
Add the small plastic plants, and your chosen sea creature charms or beads and sprinkle some fine glitter on top of the water. Finally, seal the nails with nail glue and wait for them to dry. Now your aquarium nails are ready to show off to the world! With this simple guide, you can create your own personalized aquarium nails that are sure to impress.
Prepare Your Nails
Preparing your nails is an essential step that should never be skipped in your manicure routine. The first step is to clean your nails thoroughly with soapy water and a nail brush. Make sure to remove any dirt or debris from under your nails, as this can cause bacteria buildup and lead to infections.
After cleaning, dry your nails thoroughly with a clean towel. Next, trim your nails to the desired length and shape them by filing in one direction to prevent splitting. Push back your cuticles gently using a cuticle pusher or an orange wood stick.
You can also apply some cuticle oil to soften the cuticles and ease the pushing process. Once you’re done with this step, you’re ready to start with the fun part, which is applying your favorite nail polish color! Remember, preparing your nails is crucial for achieving a flawless manicure that lasts longer and keeps your nails healthy.
Apply the Base Coat
When it comes to painting your nails, starting with a base coat is key to ensuring that your manicure lasts as long as possible. Before applying your favorite color, you’ll want to start with a thin layer of base coat. This will not only help the color stick better to your nails, but it will also prevent your nails from staining.
To apply the base coat, start by cleaning your nails and ensuring that they are dry. Then, apply a small amount of the base coat to each nail, starting at the base and working toward the tip. Make sure that the coat is thin and even to avoid clumping or streaks.
Once you’ve finished applying the base coat to all of your nails, wait for it to dry completely before moving on to the next step. So, take your time, and don’t rush the drying process, as it will only lead to a less-than-perfect manicure. By starting with a strong base coat, you’ll be able to enjoy your beautifully painted nails for days to come.
Fill the Aquarium Nail
If you have an aquarium at home, you have likely noticed that the aquarium nail, also known as the bulkhead fitting, is an essential component of keeping your aquarium running smoothly. The aquarium nail is responsible for keeping water in your tank while allowing necessary items like filters and heaters to be added or removed. So, how do you fill the aquarium nail when setting up your tank? First, make sure the bulkhead fitting is screwed in tightly to the aquarium glass or acrylic.
Next, attach a vinyl or silicone hose to the bulkhead fitting and run it to your chosen filter or other device. Once everything is in place, slowly begin to pour water into the aquarium and watch as it fills up. As the water level rises, it will eventually reach the aquarium nail and fill it up, effectively sealing off the hole.
Once your tank is completely filled, turn on your filter or heater and enjoy your new aquarium! Remember, the aquarium nail is an essential part of keeping your aquarium running smoothly, so take care when filling it to avoid leaks or other issues. (See Also: How to Position Aquarium Heater for Optimal Performance: Tips and Tricks)
Seal the Aquarium Nail
Sealing the aquarium nail is an essential step when setting up an aquarium. If you miss this step, you risk having the aquarium water leak, which can be disastrous for your fish and other aquatic life. Here we present you a step-by-step guide to seal your aquarium nail.
Firstly, ensure that the nail is dry and free from any debris. Next, apply a bead of aquarium sealant around the base of the nail using a caulking gun. Make sure to spread the sealant evenly to create a watertight seal.
Once you have applied the sealant, allow it to dry according to the manufacturer’s instructions. After the sealant has dried, fill the aquarium with water and check for any leaks. If you do find any leaks, turn off the filter and remove the water.
Then, dry the nail and apply another layer of sealant, repeat the process until the nail is sealed properly. With these tips, you can be confident that your aquarium is adequately sealed, and your aquatic life is safe and secure. Remember, the key to a successful seal is to follow the instructions accurately and give the sealant enough time to dry.
Tips and Tricks for Perfect Aquarium Nails:
If you’re looking to create a unique and eye-catching nail design, aquarium nails could be just the thing for you! With a bit of patience and the right tools, you can create a stunning underwater scene on your fingertips. To start, you’ll need a clear acrylic base, some small decorations like shells or tiny plastic fish, and some glitter or confetti to mimic the look of bubbles. Apply the acrylic to your nails and let it dry completely before adding your decorations.
Use tweezers to carefully place your decorations in the wet acrylic, taking care not to overcrowd your nails. Once your decorations are in place, add a bit of glitter or confetti around them to create a bubbly effect. Don’t forget to seal your design with a topcoat for added durability! With these simple tips, you’ll have beautiful aquarium nails in no time.
Use Quality Aquarium Nail Kits
When it comes to achieving the perfect aquarium nails, it’s essential to start with using quality nail kits. The right kit can make a significant difference in the outcome of your manicure. Look for kits that include high-quality nail polish, tools, and accessories to make the process much more manageable.
Also, consider tools that are specifically designed for aquarium nails, such as fine-tipped brushes and glitter that won’t dissolve in water. By using a high-quality aquarium nail kit, you’ll achieve the best possible results, and your nails will look stunning for a long time. So invest in quality for beautiful and long-lasting nails.
Don’t Overfill the Nail
When it comes to creating the perfect aquarium nails, it’s essential not to overfill the nail. Overfilling the nail can result in clumps of acrylic or gel sticking out from the nail, which can look unsightly. To avoid this, it’s crucial to use the right amount of product and to ensure that it’s evenly distributed across the nail.
One way to do this is to apply the product in thin layers, allowing each layer to dry completely before applying the next. This not only helps to prevent overfilling but also ensures that the nail is strong and durable. So, the next time you’re creating aquarium nails, remember to take your time, be patient, and avoid overfilling the nail, and you’ll be sure to achieve the perfect look!
Seal it Properly and Securely
When it comes to setting up an aquarium, ensuring that it is properly sealed and secure is critical to keeping your fish and other aquatic creatures safe and healthy. One of the key components of achieving this are the nails used to hold the tank together. But finding the right nails and using them effectively can be a challenge.
Look for nails specifically designed for aquariums and make sure they are securely attached to the tank corners. Don’t use too few nails, as this can leave the tank vulnerable to leaks and breakages. On the other hand, too many nails can cause the glass to crack. (See Also: How to Get Rid of Staghorn Algae in Freshwater Aquariums: Tips and Tricks)
Strike a balance by spacing the nails evenly and using just enough to hold the tank together. It is also important to make sure the nails are flush with the tank’s surface to avoid any sharp edges that could injure your fish. Keeping these tips in mind will help you achieve a perfectly sealed and secure aquarium for the long-term enjoyment of all its inhabitants.
Conclusion
In conclusion, mastering the art of aquarium nails takes patience, precision, and a steady hand. These mesmerizing, underwater-inspired nail art designs require a bit of finesse and creativity, but the end result is well worth the effort. With the right tools and techniques, you too can create a stunning underwater world on your nails and impress all your friends.
So dive in, experiment, and let your creativity swim free – the possibilities are endless with aquarium nails!”
FAQs
What are aquarium nails?
Aquarium nails are a type of nail art that involves embedding small items, such as gems or beads, in a clear or tinted acrylic layer to create the appearance of an underwater scene.
How are aquarium nails made?
Aquarium nails are typically made by applying a base coat, adding small decorations and encasing them in acrylic, and then shaping and filing the nails to the desired shape.
Can I do aquarium nails at home?
Yes, you can do aquarium nails at home with the right tools and materials. However, it may take some practice to perfect the technique.
What materials do I need for aquarium nails?
Materials needed include a base coat, acrylic powder and liquid, small decorations, a brush, and a UV lamp.
How long do aquarium nails last?
Aquarium nails can last anywhere from 2-4 weeks depending on your nail care routine.
Are aquarium nails safe for my nails?
As long as you properly remove the acrylic and avoid any harsh chemicals, aquarium nails are safe for your natural nails.
Can I add colors to my aquarium nails?
Yes, after you have created the acrylic base, you can tint it with a variety of colors to enhance the underwater effect.

