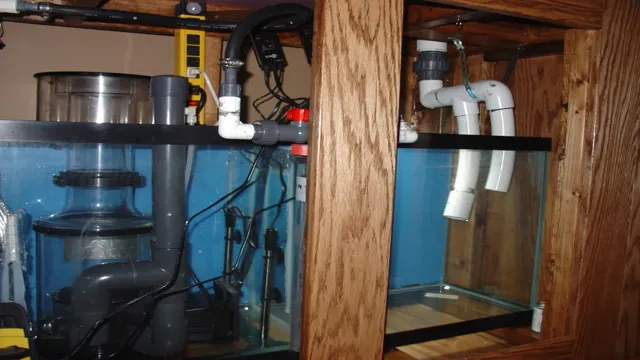
If you’re setting up an aquarium, one of the most critical steps is installing the plumbing unions. These unions enable you to connect different parts of your aquarium’s filtration system, ensuring everything runs smoothly and effectively. But how do you install plumbing unions properly? Don’t worry; we’ve got you covered.
In this article, we’ll guide you through the process, step by step. From selecting the right materials to connecting the unions, we’ll show you everything you need to know to get your aquarium up and running in no time. So, let’s dive in!
Understanding Aquatic Plumbing Unions
Aquatic plumbing unions are a crucial component in aquarium plumbing. They are threaded connectors used to join two sections of pipes together, providing a secure and leak-proof seal. Plumbing unions make it easy to disassemble and reassemble any part of the plumbing system, which is essential for maintenance.
These unions also allow for easy removal of equipment and adjustable water flow control. The installation of plumbing unions in your aquarium can save you time and money because you won’t have to replace the entire plumbing system if you need to replace a piece of equipment or do maintenance. They come in various sizes and materials, so it’s essential to ensure you select the correct size and material based on your aquarium system’s needs.
Knowing how to install and use aquatic plumbing unions can be extremely helpful for aquarium owners and can make their lives much easier.
What are plumbing unions?
If you are new to the world of plumbing, you may have heard the term “plumbing unions” being thrown around, but what exactly are they? Plumbing unions are connectors used to join two pieces of pipes or tubing. They are designed to allow for easy assembly and disassembly of pipes, which is helpful for maintenance and repairs. Aquatic plumbing unions are specific types of unions used in swimming pool and spa applications.
They are made of strong, durable materials that can withstand the harsh chemicals and high pressures involved in aquatic environments. With their secure connections and easy removal capabilities, plumbing unions have become an essential component in the plumbing industry.
Why are they important for aquariums?
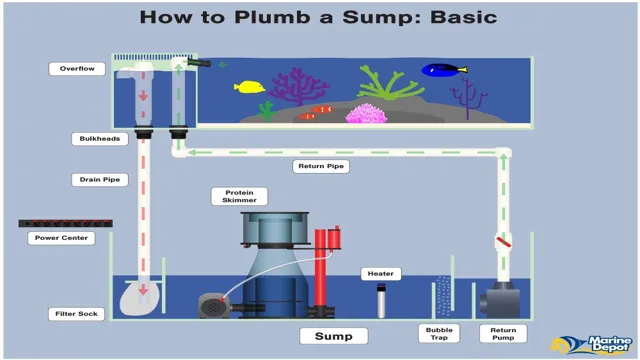
Aquarium plumbing unions are essential components for the proper functioning of aquariums. They allow for the convenient removal and replacement of equipment without the need for complicated disassembly. They also prevent leaks and ensure that water flows smoothly through the aquarium’s plumbing system.
Understanding how to use and install plumbing unions is crucial for any aquarium owner. It enables you to make necessary repairs or upgrades without disrupting the ecosystem in the tank. Plumbing unions come in different sizes and materials, and it’s essential to choose the appropriate type for your system.
By incorporating plumbing unions in your aquarium setup, maintaining and upgrading equipment becomes more accessible and less time-consuming.
Different Types of Plumbing Unions
When it comes to aquarium plumbing, unions are an essential component that allow for easy disassembly and maintenance of the water filtration system. There are several types of plumbing unions that you can use, each with its advantages and disadvantages. One type of union is the slip union, which features a loose fitting that allows for easy removal.
Another common type of union is the threaded union, which screws together for a more secure fit. However, it can be challenging to remove without damaging the threads. A third type of union is the compression union, which uses a compression fitting to create a tight seal.
These unions are ideal for aquarium plumbing, as the compression fitting provides a strong and secure connection that can withstand the pressure of the filtration system. Overall, the type of union you choose will depend on your specific needs and preferences, so it’s important to consider all options before making a decision.
PVC unions vs. threaded unions
When it comes to plumbing unions, there are two main types that you need to consider, PVC unions, and threaded unions. PVC unions are made of PVC materials, which makes them ideal for connecting PVC pipes. On the other hand, threaded unions, as the name suggests, have threaded ends that allow you to twist them and easily connect them to threaded pipes.
Both of these unions serve the same purpose, which is to provide a quick and easy way of joining pipes, and they are both available in various sizes. However, PVC unions are more versatile and work perfectly for most plumbing jobs, whereas threaded unions are relatively easy to install and can be removed easily without the need for complex tools. So, whether you are looking to connect PVC pipes or threaded pipes, choosing the right type of union is crucial to getting the job done right. (See Also: How to Make a Aquarium Liquid Filter: Step by Step Guide and Tips for Beginners)
Barbed or slip-on unions
Barbed or slip-on unions are commonly used in plumbing to connect pipes or fittings. A barbed union features a tapered barb that is inserted into the pipe or fitting to create a secure and tight seal. Slip-on unions, on the other hand, consist of a sleeve that is slid over the end of the pipe and tightened onto the fitting using a threaded nut.
Both of these types of unions are relatively easy to install and provide a leak-tight seal that is essential in plumbing applications. In addition, they are removable and reusable, making them a convenient choice for those who need to make changes to their plumbing system. When choosing the type of union to use, it is important to consider factors such as the size and material of the pipes, as well as the maximum pressure and temperature that they will be exposed to.
Regardless, whether you choose a barbed or slip-on union, you can rest assured that your plumbing system will be reliable and efficient.
Stainless steel unions
Stainless steel unions are vital components in plumbing systems that help connect pipes together to facilitate the flow of fluids. They are available in different types, including compression, flare, solder, and thread unions. Compression unions consist of two parts that are tightened by a nut and a sleeve, creating a leak-proof seal.
Flare unions, on the other hand, use a flaring tool to connect two pipes together securely. Solder unions use a soldering torch to create a permanent bond between pipes. Threaded unions connect two pipes with threads wrapped around the ends, which are then tightened with a wrench.
The choice of union depends on the type of pipes used and the application. Stainless steel unions offer excellent resistance to corrosion, which makes them ideal for use in plumbing systems. They also provide a high level of durability and strength, which ensures that they do not easily break or wear out.
Overall, selecting the right type of stainless steel unions can help ensure that your plumbing system is reliable, efficient, and long-lasting.
Step-by-Step Guide to Installing Plumbing Unions
If you’re looking for a DIY project for your aquarium, installing plumbing unions is a great place to start. A plumbing union is a device that allows for easy disconnection and reconnection of pipes, making maintenance and repairs much simpler. The first step is to ensure that you have the appropriate size and type of plumbing unions for your aquarium.
Then, you’ll need to drain the water from the system and remove any fittings that may be in the way. Once you have access to the pipes, you can install the unions by threading the nut and compression ring onto the pipe and connecting the other end to the corresponding union. Make sure to tighten the nut securely and test for any leaks.
With these simple steps, you’ll have a much easier time maintaining your aquarium’s plumbing system.
Preparing the pipes
Installing plumbing unions is an essential task when it comes to joining pipes together. The unions allow easy access to the pipes and make it easy to replace a damaged section without having to replace the entire length. The first step in installing plumbing unions is to prepare the pipes.
Make sure the pipes are clean, dry, and free of any debris. Use a pipe cutter to cut the pipes to the correct length and ensure the ends are smooth and straight. Then, apply a liberal amount of pipe thread sealant to the male threads and wrap the tape clockwise in a neat spiral around the threads.
Finally, use a pipe wrench to tighten the union onto the pipes. Remember not to overtighten the union, as this may cause damage to the pipes or fittings. With these steps, you can safely and easily install plumbing unions and enjoy the benefits of easy access to your pipes.
Applying Teflon or thread sealant
Installing plumbing unions can be a bit tricky, especially when it comes to applying Teflon or thread sealant. To help simplify the process, we’ve put together a step-by-step guide to walk you through the installation process. First, make sure that you have all of the necessary tools and supplies on hand, including your plumbing unions, Teflon tape or thread sealant, and any necessary wrenches or pliers.
Then, start by cleaning and preparing the surface where you will be installing the union. Next, apply a thin layer of Teflon tape or thread sealant to the threads of the male end of the union, being careful not to over-apply. Insert the male end of the union into the female end and twist them together by hand until they are snug. (See Also: How to disinfect aquarium plants with bleach – a step-by-step guide)
Use a wrench or pliers to tighten the union an additional 1/4 to 1/2 turn, being careful not to overtighten and damage the threads. Finally, turn on the water supply and check for any leaks. With these simple steps, you can be sure that your plumbing unions are installed correctly and securely.
Joining the union to the pipes
Plumbing unions are essential components in plumbing systems as they allow for easy disconnection and reconnection of pipes. Joining the union to the pipes may seem like a daunting task, but it is a straightforward process and can be achieved with the right tools and knowledge. Here is a step-by-step guide to installing plumbing unions.
Firstly, turn off the water supply to the area where the union will be installed. Next, use a pipe cutter to cut the pipes to the desired length. Then, clean the ends of the pipes with a pipe cleaner or sandpaper to remove any debris or corrosion.
Apply a small amount of Teflon tape to the threads of the union, and then thread it onto the pipe by hand until it is snug. Finally, use two adjustable wrenches, one to grip the pipe and the other to tighten the union securely. And voila! Your plumbing union is successfully installed.
Remember, if you encounter any difficulties during the installation process, it is best to consult with a professional plumber for guidance.
Testing for leaks
If you’re installing new plumbing fixtures or repairing an existing system, you’ll likely need to install plumbing unions. These are special fittings that allow you to connect two pipes together without having to cut and splice them. This can save you a lot of time and hassle, but it’s important to ensure that you install them correctly to prevent leaks.
To get started, gather all the necessary tools and materials, including a pipe cutter, emery cloth, Teflon tape, and the plumbing union itself. Then, follow these steps: 1) Cut the pipe to the correct length and use the emery cloth to smooth down any rough edges; 2) Wrap the threads of the union with Teflon tape in a clockwise direction; 3) Screw the union onto the pipe until it’s hand-tight; 4) Use a wrench to tighten the union one full turn; 5) Turn on the water and check for leaks. By following these steps, you can ensure a tight and leak-free connection that will last for years to come.
Tips for Maintaining Aquarium Plumbing Unions
Maintaining aquarium plumbing unions can be a tedious task, but it’s essential to keep your fish happy and healthy. One of the most crucial tips is to regularly check for leaks and clean the junctions. Leaks not only waste water but also allow harmful toxins to accumulate in the water.
To prevent leaks, ensure that the unions are appropriately tightened and don’t overtighten them as it may cause damage. Also, lubricate the union O-rings regularly with silicone grease to ensure they don’t dry out and crack. When it comes to cleaning, use vinegar or a mild cleaner to remove any buildup in the unions.
Avoid using harsh chemicals as they can damage the O-rings and cause leaks. By regularly maintaining your aquarium plumbing unions, you can provide a safe and healthy environment for your fish to thrive.
Regular inspections and cleanings
Regular aquarium maintenance is key to keeping your aquatic pets healthy and happy. When it comes to maintaining plumbing unions, there are a few tips to keep in mind. First and foremost, regular inspections and cleanings are essential.
Buildup of algae, debris, and other materials can clog the plumbing, leading to reduced water flow and potential leaks. Checking the unions for cracks or damage is also important, as even small defects can lead to larger problems over time. Additionally, using appropriate cleaners and tools can help keep the unions in good working order.
When maintaining your aquarium plumbing unions, it’s also important to stay aware of the overall health of your aquatic environment and make adjustments as needed to ensure optimal conditions for your fish and plants. By following these tips and staying on top of regular maintenance, you can help ensure a healthy and thriving aquarium for years to come.
Replacing old or damaged unions
Aquarium plumbing unions are an essential component of any aquarium system. They connect pipes and help regulate the flow of water throughout the tank. Over time, these unions can become damaged or worn out, leading to leaks or reduced water flow. (See Also: How to Clean Aquarium Using Suction Tube: Essential Tips and Tricks)
The good news is that maintaining aquarium plumbing unions is easy and can help extend their lifespan. One tip is to regularly inspect them for any signs of wear or damage. You should also clean them periodically to remove any debris or buildup that can affect their performance.
It’s also important to replace old or damaged unions promptly to prevent further damage to your aquarium system. By following these tips, you can ensure that your aquarium plumbing unions remain in good working order, helping your aquarium thrive.
Conclusion
In summary, aquarium plumbing unions can seem intimidating at first, but with the right tools and techniques, they are a piece of cake to install. Remember to always use proper measurements, thread tape, and pipe cement to ensure that your connections are secure and leak-free. With a little bit of practice and patience, you’ll be a pro at plumbing your aquarium in no time.
So go ahead, dive into the world of aquarium plumbing unions and enjoy the beauty of your aquatic oasis without any worries!”
FAQs
What is an aquarium plumbing union?
An aquarium plumbing union is a connector that allows for easy disconnection and reconnection of plumbing pipes in an aquarium system.
How do I install an aquarium plumbing union?
To install an aquarium plumbing union, turn off the flow of water, cut the pipe to the desired length, install the union onto both ends of the pipe, and tighten the nuts with a wrench.
What are the benefits of using aquarium plumbing unions?
The benefits of using aquarium plumbing unions include easier maintenance and cleaning, the ability to remove or replace equipment without cutting pipes, and reducing the risk of leaks.
Can aquarium plumbing unions be used with different pipe materials?
Yes, aquarium plumbing unions can be used with different pipe materials as long as the size and type of union matches the size and type of pipe being connected.
How often should I check the tightness of aquarium plumbing union nuts?
It is recommended to check the tightness of aquarium plumbing union nuts at least once every three months to prevent leaks.
Can aquarium plumbing unions be reused after disconnecting pipes?
Yes, aquarium plumbing unions can be reused after disconnecting pipes as long as they are not damaged or worn out.
What should I do if an aquarium plumbing union leaks?
If an aquarium plumbing union leaks, turn off the flow of water, disconnect the union, check for any cracks or damage, replace any damaged parts, reassemble the union, and turn on the flow of water.

