Are you a beginner aquarist looking to learn how to properly set up your aquarium air pump AQT 3001? Adding an air pump to your aquarium is essential for providing oxygen to your fish and plants. However, figuring out how to attach the pump to your tank can be a bit confusing at first. No need to fret! In this article, we will provide you with step-by-step instructions on how to attach your AQT 3001 air pump to your aquarium.
By the end of this article, you will have the knowledge and confidence to set up your air pump and keep your aquatic pets healthy and happy. So, let’s dive in!
Gather Required Materials
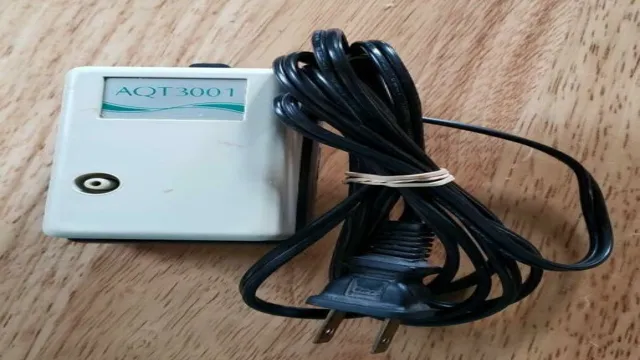
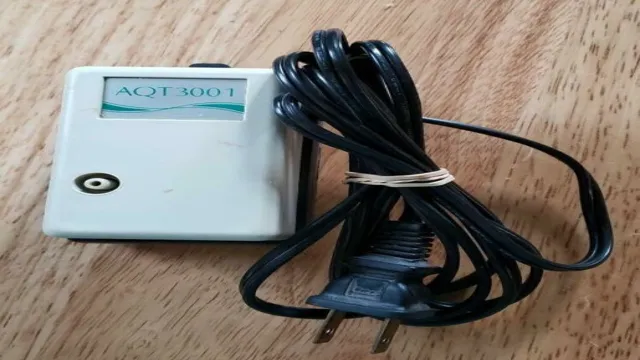
If you’re wondering how to attach an aquarium air pump AQT 3001 to your tank, the first step is to gather the required materials. To successfully attach your air pump, you’ll need a few essential items. First, you’ll need the air pump itself, which is the AQT 3001 in this case.
Ensure that it is the correct model and is in working order. You’ll also need airline tubing, which will connect the air pump to the air stone. The air stone is the third item you’ll need and is the component responsible for releasing air bubbles into the water.
Lastly, you’ll need suction cups or clips, which will hold the airline tubing in place and attach the air stone to the bottom of the tank. Make sure you have all these items in hand before proceeding with attaching the air pump to your aquarium.
Air pump AQT 3001, air tubing, check valve, suction cups, screwdriver
When it comes to setting up an aquarium, the first step is always to gather the necessary materials. For your air pump system, you’ll need an air pump AQT 3001, air tubing, a check valve, suction cups, and a screwdriver. The air pump AQT 3001 is an essential piece of equipment that will help to oxygenate the water in your aquarium, providing your fish with the crucial element they need to thrive.
Air tubing is also necessary to connect the air pump to the check valve and the air stone. The check valve helps to prevent water from entering the air pump, prolonging its lifespan. Suction cups are used to attach the air pump and tubing to the inside of your aquarium, while a screwdriver will come in handy when it’s time to secure everything in place.
By gathering all of these materials, you’ll be well on your way to setting up a perfect environment for your aquatic pets.
Locate a Suitable Spot for the Air Pump
When it comes to setting up an aquarium air pump like the AQT 3001, the first step is to find a suitable spot for it. The ideal location should be close to the tank, but not in direct sunlight or near any heat sources like heaters or light fixtures. It’s also important to make sure the spot is sturdy enough to support the weight of the pump.
Some people like to attach their pumps to the side of the tank, while others prefer to rest them on a shelf or platform nearby. Whichever option you choose, make sure the pump is easily accessible for routine maintenance like cleaning and replacing filters. By taking the time to find the perfect spot for your air pump, you can ensure that it functions properly and keeps your fish happy and healthy.
Near the tank, but not directly above it to prevent water from splashing on the pump
When setting up an aquarium, it’s important to find a suitable spot for the air pump. You want to position it near the tank, but not directly above it to prevent water from splashing on the pump. The ideal location would be somewhere nearby that still offers some distance to prevent the pump from getting wet.
Keep in mind that the air pump needs to be plugged into an electrical outlet, so make sure it’s easy to access. You also want to avoid placing the pump near any heat sources or in direct sunlight to prevent overheating. Another consideration is noise level.
While air pumps can be noisy, you can minimize the sound by placing the pump on a soft surface such as a rubber mat or towel. With the right location, your air pump can function effectively and efficiently, promoting a healthy and vibrant aquarium ecosystem.
Attach Suction Cups to Air Pump
If you’re wondering how to attach the aquarium air pump AQT 3001 to your tank, you’re in the right place. One critical step is to attach suction cups to the pump so that it stays in place. To do this, start by soaking the suction cups in warm water for a few minutes. (See Also: How to Build a 48 x 24 x 24 Aquariums: Tips to Create Your Dream Aquatic Habitat at Home)
This will make them more pliable and easier to stretch over the pump’s base. Once they’re soft enough, slide them onto the base of the air pump. Make sure you place them evenly, so the pump isn’t lopsided or off-balance.
Then, press the suction cups against the glass of your aquarium tank. Be sure to press them firmly, so they attach securely and won’t fall off. With the suction cups in place, your air pump is now ready to provide much-needed air to your aquarium’s inhabitants.
Align the suction cups with the designated holes on the air pump and secure them tightly to the tank’s surface.
Attaching the suction cups to an air pump is a crucial step in maintaining a healthy aquarium environment. To do so, it’s essential to align the suction cups with the designated holes on the air pump and secure them tightly to the tank’s surface. The reason for securing the suction cups tightly is to prevent the air pump from wobbling around, which could cause it to malfunction or become damaged over time.
When attaching the suction cups, it’s important to ensure that the air pump is sitting at the correct depth in the water, as this will impact the amount of air it can circulate. A good rule of thumb is to keep the air pump within six inches of the surface of the water, as this will provide optimal aeration for your aquarium. Overall, attaching suction cups properly is a relatively simple process that can make a big difference in the health and well-being of your aquarium’s inhabitants.
Connect Air Tubing to the Air Pump
If you’re looking to set up an aquarium, you’re likely going to need an air pump to keep your fish happy and healthy. The AQT-3001 air pump is one popular option, but how do you attach it to your tank? First, make sure you have everything you need, including air tubing, check valves, and an airline control valve. Next, locate the air pump’s air outlet and connect one end of the air tubing to it.
Attach the other end of the tubing to the airline control valve and then connect the check valve to the other end of the valve. Finally, attach the check valve to the airline tubing, making sure to check that everything is secure. Once you’ve double-checked everything, plug the air pump in and watch as it begins to aerate the water in your aquarium.
Using the AQT-3001 air pump to attach your air tubing to your tank is easy and efficient, providing great results for both you and your aquatic friends.
Insert one end of the tubing into the designated hole on the pump and ensure it is well-fitted and secure.
Connecting the air tubing to the air pump is crucial to ensure an efficient aeration system in your aquarium. Here’s how to do it. First, locate the hole designated for the tubing on the air pump.
It should be visible and easily accessible. Then, take one end of the tubing and insert it into the hole. Make sure it fits properly and is secure.
Any loose fitting can result in air leaking out of the pump, decreasing its efficiency. Once the tubing is fitted properly, you’re ready to plug in the air pump and turn it on. The bubble rate can be adjusted by adjusting the airflow on the pump.
It’s crucial to make sure the tubing is securely fitted to the pump to avoid any malfunction that could harm your aquatic life. Remember, a well-aerated tank promotes healthy fish and plant growth!
Attach Check Valve to the Other End of the Air Tubing
Now that you’ve successfully connected your aquarium air pump, it’s time to attach a check valve to the other end of the air tubing. This is an essential step to prevent water from siphoning back into the air pump and potentially damaging it. You can easily attach the check valve by screwing it onto the end of the air tubing and ensuring it is secure.
The check valve will allow air to flow in one direction only, preventing any water from entering the pump. Make sure to position the check valve outside of the tank to avoid any accidental spillage. With this simple step, you can rest easy knowing your aquarium air pump is properly installed and protected, allowing your fish and plants to thrive. (See Also: How to Make a Succulent Aquarium: A Step-by-Step Guide to Creating a Stunning Succulent Terrarium)
Attach the check valve to the free end of the air tubing and secure it tightly using a screwdriver.
Once you have attached the air pump to the air stone, it’s time to attach the check valve to the other end of the air tubing. This little device is critical for ensuring the safety of your fish as it prevents any water from flowing back into the air pump and damaging it. To attach it, first, make sure the tubing is cut to the correct length so that it can reach the bottom of your tank or pond.
Then, slide the check valve onto the end of the tubing and use a screwdriver to tighten it in place. Be sure to secure it tightly to avoid any air leakage. Once it’s securely attached, you can go ahead and plug in your air pump and watch as your fish swim happily with a constant supply of oxygen.
Remember, the check valve is an inexpensive but critical piece of equipment for any aquarium or pond. Don’t skip on it!
Connect the Check Valve to an Air Stone or Air Diffuser
Attaching an aquarium air pump AQT 3001 to your tank is a simple and straightforward process that requires only a few steps. After plugging the air pump into an electrical outlet, you’ll need to connect the check valve to an air stone or air diffuser to ensure that the air is properly distributed throughout the tank. The check valve is an important component because it serves as a one-way valve that prevents water from flowing back into the air pump.
To attach the check valve to the air stone or air diffuser, simply insert one end of the airline tubing into the check valve and the other end into the air stone or air diffuser. Then, connect the check valve to the air pump by placing the check valve in between the air pump and the airline tubing. Finally, adjust the airflow using the control knob on the air pump to achieve the desired level of aeration in your aquarium.
By following these simple steps, you’ll be able to enjoy a healthy and thriving aquarium ecosystem.
Attach an air stone or air diffuser to the other end of the check valve and ensure it’s securely fitted.
When setting up your aquarium, it’s important to remember that your fish need more than just a tank and water. They also need oxygen to survive. This is where an air stone or air diffuser comes in handy.
These devices help to increase the oxygen levels in the water and keep your fish healthy. Once you’ve installed a check valve to prevent water from backflowing into your air system, it’s time to connect it to the air stone or air diffuser. This can be done simply by attaching the other end of the check valve to the device and ensuring it’s securely fitted.
Doing this not only adds necessary oxygen to the water but also creates a mesmerizing display of bubbles that your fish will love. So, don’t forget to connect your check valve to your air stone or air diffuser to keep your fish happy and healthy!
Turn on the Pump and Enjoy your Bubbling Aquarium!
If you’ve recently purchased an aquarium air pump, like the AQT 3001, and need to attach it to your tank, don’t worry – it’s easier than you may think! First, make sure your pump and all necessary tubing is assembled correctly. Once you’ve done that, locate the air stone or diffuser you’ll be using. Attach it to one end of the tubing, and then attach the opposite end to the air pump’s output nozzle.
Take care to ensure all connections are secure and tight, so you don’t experience air leaks. Now you’re ready to place the air stone or diffuser in your aquarium and turn on the pump. Depending on the size of your tank and the pump’s output, you may need to adjust the flow rate.
But once you do – sit back, relax, and enjoy the beautiful bubbles pumping into your aquarium. It’s that simple! So, go ahead and attach that AQT 3001 air pump to your tank, and enjoy the benefits of a healthier and more beautiful aquarium.
Double-check all connections and turn on the air pump to enjoy a lively, bubbling aquarium.
Ah, the moment has come – it’s time to turn on the air pump and watch your aquarium come alive! But before you do that, make sure to double-check all your connections to avoid any pitfalls. There’s nothing more disappointing than realizing something’s gone wrong when you’re about to enjoy the fruits of your labor. So, take a few deep breaths and go over everything once more. (See Also: How to Keep Aquarium Sump from Overflowing: Simple and Effective Tips)
Once you’ve done that and are satisfied with all your connections, it’s time to turn on the air pump and let it work its magic. Get ready for some bubbling goodness! And just like that, you’ll be transported to an underwater world where fish swim amongst the bubbles – peaceful and serene. The sound of the bubbles popping at the surface can be comforting in its own way, too – like raindrops on a windowsill or a fireplace crackling on a cold night.
Overall, nothing completes an aquarium setup quite like a reliable air pump. It not only adds aesthetic value but helps maintain the health of your fish by keeping water oxygenated and circulating. So sit back, relax, and enjoy your bubbling aquarium – you deserve it!
Conclusion
In conclusion, attaching the AQT 3001 aquarium air pump to your tank is a breeze! With just a few simple steps, you can ensure that your aquatic pets are getting the oxygen they need to thrive. And the best part? You’ll be the envy of all your fish-keeping friends with your impeccable DIY skills. So go ahead and give it a try – your fish (and your ego) will thank you!”
FAQs
What type of tubing is compatible with the AQT 3001 aquarium air pump?
The AQT 3001 aquarium air pump is compatible with standard aquarium air tubing with an inner diameter of 3/16 inch.
How do I attach the AQT 3001 air pump to the aquarium tank?
The AQT 3001 air pump can be attached to the aquarium tank using suction cups included in the package. Simply attach the suction cups to the bottom of the air pump and then press onto the outside of the aquarium tank.
Can the AQT 3001 aquarium air pump be used in saltwater tanks?
Yes, the AQT 3001 aquarium air pump is suitable for both freshwater and saltwater tanks.
Is it safe to leave the AQT 3001 air pump running continuously?
Yes, it is safe to leave the AQT 3001 air pump running continuously. However, it is recommended to unplug the air pump during water changes.
How do I adjust the air flow rate of the AQT 3001 aquarium air pump?
The air flow rate of the AQT 3001 aquarium air pump can be adjusted using the dial located on the top of the pump.
Can the AQT 3001 air pump power multiple air stones?
Yes, the AQT 3001 air pump can power multiple air stones by attaching a gang valve to the tubing and adjusting the airflow accordingly.
Is the AQT 3001 aquarium air pump noisy?
No, the AQT 3001 aquarium air pump’s noise level is minimal and should not disturb the fish or other inhabitants of the tank.

