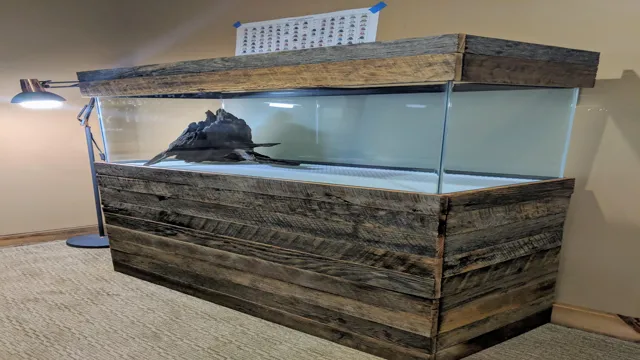
Do you have an acrylic aquarium that’s lost its luster? Over time, scratches and scuffs can make your aquarium look dull and worn. Not to worry though, there’s a simple solution! Buffing your acrylic aquarium can restore it to its former beauty. Think of it like polishing your car – it’s amazing what a little elbow grease and the right tools can do! In this blog, we’ll walk you through how to buff your acrylic aquarium so that you can enjoy it for years to come.
From start to finish, we’ll cover everything you need to know to make your aquarium shine like new again. So, let’s dive in!
Materials Needed
If you want to keep your acrylic aquarium looking clean, transparent, and scratch-free, you’ll need to know how to buff it properly. Buffing acrylic aquariums is a pretty simple process, but there are a few materials that you’ll need to get the job done. The first thing you’ll need is a good quality polish specifically designed for acrylic surfaces.
You’ll also need a soft cloth or sponge and a clean bucket for mixing the polish with water. A rotary buffer or a handheld buffer equipped with buffing pads is also necessary for smoothing out any scratches and restoring the acrylic’s shine. It’s important to avoid using any abrasive pads or rough cloths, as these can actually create even more scratches on the surface.
With these materials in hand, you’ll be ready to get started on transforming your cloudy and scratched acrylic aquarium into a sparkling, crystal-clear masterpiece.
Acrylic-safe buffing compound
If you’re looking for an acrylic-safe buffing compound, you’ll need to gather a few materials to get started. First and foremost, you’ll need the actual compound itself – it’s important to look for one that specifically states it’s safe for use on acrylics to avoid any damage or marring to the surface. In addition to the buffing compound, you’ll also need a buffing wheel to apply it with – softer, fluffier wheels tend to work best for acrylics, as they won’t create too much friction or heat.
Finally, you’ll need a clean microfiber cloth to wipe away any excess compound and give the surface a final polish. Gathering these materials before getting started will ensure that your buffing experience goes smoothly and safely.
Microfiber cloth
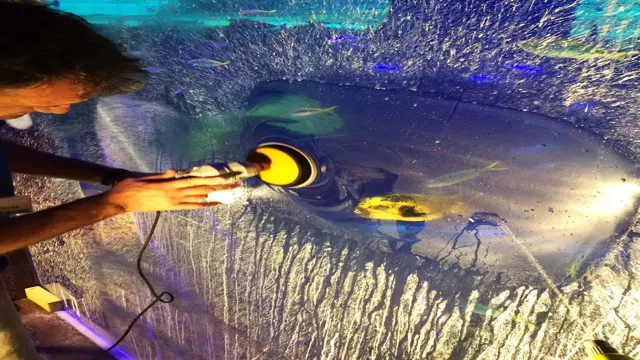
When it comes to cleaning, a microfiber cloth is an essential tool to have in your arsenal. Microfiber cloths are made up of incredibly tiny fibers, which makes them incredibly effective at cleaning and dusting surfaces without leaving any streaks or residue behind. To use a microfiber cloth, all you need is the cloth itself and some water.
Simply wet the cloth, wring it out, and use it to clean any surfaces you desire. The tiny microfibers on the cloth will attract and trap dirt and dust particles, leaving your surfaces looking clean and shiny. Whether you’re cleaning your kitchen counters, dusting off your electronics, or wiping down your car, a microfiber cloth is the perfect tool to have on hand.
So next time you’re stocking up on cleaning supplies, don’t forget to grab a few microfiber cloths – your surfaces will thank you!
Preparation
If you’re looking to buff your acrylic aquarium, there are a few things you need to do to prepare first. The most important thing is to make sure your aquarium is completely empty before you start. This means removing all of the water, fish, plants, and decorations.
Next, you’ll want to clean your aquarium thoroughly to remove any dirt, debris, or algae that may have built up over time. Use a sponge or soft cloth with a mild soap solution to gently scrub the inside walls of your tank. Make sure you rinse the tank well with water to remove any soap residue.
Once your aquarium is clean and dry, you can begin buffing. Using a polishing agent designed for acrylic and a buffing pad, work in circular motions to remove any scratches or scuffs from your tank’s surface. Be sure to follow the instructions on your polishing agent carefully and work slowly and carefully to avoid damaging your tank further.
With a bit of preparation and careful work, your acrylic aquarium will be looking as good as new in no time!
Remove all debris and buildup from the aquarium
Before setting up your new aquarium, it’s important to ensure that you have properly prepared the tank. The first step is to remove all debris and buildup from the aquarium. This means thoroughly cleaning the tank, substrate, and any accessories such as filters or decorations.
Debris and dirt can not only make your aquarium look unappealing, but it can also lead to harmful bacteria growth and negatively impact your fish’s health. Start by removing any large debris with a net or scoop, and then use an algae scraper or sponge to clean the walls and floor of the tank. Be sure to also clean any accessories thoroughly and check for any damage or wear.
Once everything has been cleaned and inspected, set up your tank with fresh water and allow it to run for a few days to stabilize the water parameters. Overall, a clean and well-prepared aquarium will provide a healthy and happy home for your fish.
Clean the acrylic surface with warm soapy water
When it comes to cleaning acrylic surfaces, preparation is key. The first step in proper preparation is to clean the surface with warm soapy water. This simple yet effective method can help rid the surface of any dirt or grime that may have accumulated over time. (See Also: How to Dose Liquid Carbon in Planted Aquarium for Optimal Growth and Health)
Start by mixing a few drops of mild dish soap with warm water and applying it to the surface using a soft cloth or sponge. Gently scrub the surface, taking care not to use any abrasive materials that may scratch or damage the surface. Once you have thoroughly cleaned the surface, rinse it with clean water and dry it with a soft, lint-free cloth.
This will ensure that the surface is clean and free of any debris before moving on to the next step in the cleaning process. So, whether you are cleaning an acrylic countertop or a picture frame, remember to start with warm soapy water to properly prepare the surface for cleaning.
Dry with a soft cloth
“Soft Cloth” When it comes to cleaning and maintaining your belongings, using the right materials and techniques can make a big difference. It’s important to prepare properly before getting started. One key aspect is ensuring that you have a soft cloth on hand.
A soft cloth can be used for a variety of purposes, from wiping down delicate surfaces to buffing up stainless steel. Make sure to choose a cloth that will not scratch or damage your belongings. Synthetic microfiber cloths are a good option as they can be washed and reused, and they are gentle on surfaces.
It’s also important to ensure that the cloth is dry before using it. Moisture can cause damage to many materials, so make sure to dry the cloth thoroughly before getting started. By using a soft, dry cloth, you can help to keep your belongings looking their best for years to come.
Buffing Process
If you’re looking to buff your acrylic aquarium, there are a few things you should know before diving in. First off, make sure that the surface is clean and dry before starting. You don’t want any dirt or debris to get in the way of the buffing process.
Next, you’ll need some specialized polishes and buffing equipment. It’s important to use the right products and tools to prevent any damage to the acrylic surface. Begin by using a coarse polishing compound applied in circular motions to remove any scratches or blemishes.
Next, switch to a fine polishing compound for a smooth and even finish. Take your time and use gentle pressure, making sure not to overheat the acrylic which can cause it to warp or crack. With some patience and careful attention, you can achieve a beautiful, shiny finish for your aquarium.
Remember to always follow proper safety precautions and wear protective gear when buffing to avoid any injuries.
Apply a small amount of buffing compound to the surface
Buffing is an essential process for restoring the shine and gloss of your car’s paint. However, to achieve the desired results, you need to use the right products and techniques. After washing and drying your vehicle, it’s time to start buffing.
Begin by applying a small amount of buffing compound to the surface. You can use a foam or wool pad, depending on the severity of the scratches or swirls. Make sure to work in small sections to prevent the compound from drying out.
Move the pad in a circular motion, applying a moderate amount of pressure. This will help remove the imperfections on the paint, and restore its shine. Once you’ve completed the first section, wipe it off with a clean microfiber towel before moving on to the next area.
Remember to apply the right amount of buffing compound to avoid damaging the clear coat. With the right techniques, you can achieve a showroom-like finish on your car.
Using small circular motions, buff the surface of the acrylic aquarium
The buffing process is an essential step in maintaining the quality and clarity of your acrylic aquarium. To begin, you will need a microfiber cloth and some acrylic polish. Make sure the aquarium is completely dry before starting.
Apply a small amount of the polish to the cloth and begin buffing the surface in small circular motions. Be sure to work in small sections at a time to ensure an even buff. The key is to apply light pressure and continue buffing until the surface is smooth and clear.
You may need to do multiple passes to achieve the desired level of clarity. It’s important to note that buffing should only be done after cleaning the aquarium and removing any scratches from the surface. Regular buffing will not only improve the aesthetic of your aquarium but will also extend its lifespan. (See Also: How to Safely Introduce Shrimp to Your CO2 Aquarium: Tips and Tricks)
So, give your aquarium some TLC with regular buffing to enjoy the beauty of your aquatic friends.
Continue until the entire surface has been buffed
When it comes to buffing a surface, it’s important to go about the process in the right way to get the best results. First, choose a buffing compound that’s appropriate for the material you’re working with. Then, attach the buffing pad to your machine and apply the compound evenly to the surface.
Move the pad in a circular motion, applying pressure as needed to remove any scratches or imperfections. Continue until the entire surface has been buffed, being careful to avoid overheating the material. Buffing is a great way to restore a shiny, polished finish to your surfaces, but it’s important to take your time and do it right to avoid any damage.
Remember to always wear protective gear and work in a well-ventilated area to stay safe. With a little bit of practice, you can achieve professional results and make your surfaces look like new again.
Wipe away excess compound with a microfiber cloth
When it comes to buffing your car, it’s important to have the right tools and techniques to achieve a smooth and glossy finish. After applying the polishing compound, it’s essential to wipe away any excess with a microfiber cloth. This step ensures that the compound doesn’t leave behind unsightly streaks or marks.
A microfiber cloth is gentle enough to prevent scratches and is absorbent enough to soak up excess polish. It’s the perfect tool to use during the buffing process, as it helps to blend the compound evenly across the surface. By wiping away the excess, you’ll reveal the true shine of your car.
So take your time and ensure you’re using a good quality microfiber cloth to complete this crucial step in the buffing process.
Finishing Touches
If you have an acrylic aquarium, chances are you want it looking its best. One way to do this is by buffing it to a high shine. The first step is to gather all the necessary supplies.
You will need a buffing wheel, polishing compound, and a drill. It’s also important to wear gloves and safety goggles to protect your hands and eyes. Once you have everything you need, attach the buffing wheel to the drill and apply a small amount of polishing compound to the wheel.
Turn on the drill and begin buffing the acrylic surface. It’s important to keep the wheel moving in a circular motion to avoid creating any uneven spots. Once you have buffed the entire surface, inspect it for any areas that may need extra attention.
Repeat the process as needed until you achieve the desired level of shine. With a little bit of effort, you can have a beautiful, polished acrylic aquarium that will impress all who see it.
Clean the acrylic surface with warm soapy water
Cleaning and maintaining your acrylic surroundings may seem like a daunting task, but it doesn’t have to be. One of the most important steps in the finishing touches of acrylic surfaces is cleaning them with warm soapy water. You want to make sure you’re using a mild soap that won’t damage the surface.
Gently scrub the surface with a soft cloth or sponge, making sure to get rid of any dirt or debris. Once you’ve thoroughly cleaned the surface, rinse it off with water, making sure all the soap is gone. Avoid using any abrasive materials or harsh chemicals as they can cause damage to the surface.
By taking these simple steps, you can keep your acrylic surfaces looking like new and extend their life span.
Dry with a soft cloth
When it comes to completing a task, the finishing touches are what make all the difference. When drying your items, it’s important to remember that the drying process isn’t complete until everything is fully dry. Once you have successfully dried your item, don’t forget to give it that final touch of drying it with a soft cloth to remove any remaining moisture.
This step is crucial, especially if you are dealing with delicate items like glass or fine art. Using a soft cloth ensures that no scratches or damage is done, and it also gives your item that polished look which is the perfect finish. So, when you fished drying your items, remember to wipe it with a soft cloth for a flawless finish that you can be proud to show off to others.
Inspect the surface for any missed spots or scratches
When you’re finished buffing and polishing your vehicle, the last thing you want to discover are missed spots or noticeable scratches. That’s why it’s essential to take the time to inspect the surface thoroughly after you’re done. One useful tip is to shine a bright light across the paint to reveal any uneven spots that might be hard to see otherwise. (See Also: How to Make a Hydroponic System Out of an Aquarium: A Step-by-Step Guide)
Another is to use a microfiber cloth to gently run your fingers over the surface and feel for any imperfections. If you do discover a missed spot or scratch, don’t panic. There are plenty of products on the market that can help touch up these areas, so you can easily correct the issue and get your car looking flawless.
The key is to catch these mistakes early and take care of them promptly so that your vehicle can maintain its showroom shine.
Buff any remaining imperfections
When it comes to perfecting your look, the finishing touches matter. After applying your makeup, take a close look in the mirror and buff out any remaining imperfections. This could include a little extra concealer on blemishes or dark circles, powder to reduce shine, or even a swipe of highlighter on your cheekbones.
By taking the time to address these small details, your overall look will appear polished and put-together. Don’t be afraid to experiment a little with your finishes, either – different products and placement techniques can help you achieve different effects, whether you’re going for a dewy glow or a more matte finish. Remember, sometimes it’s the smallest touches that make the biggest impact.
So take your time, enjoy the process, and have fun playing with your makeup!
Enjoy your newly polished acrylic aquarium
Congratulations! Your acrylic aquarium is now polished and looking beautiful. But before you fill it up with water and your fishy friends, let’s add some finishing touches to make it even safer and more functional. First, check the silicon seals around the edges of the aquarium and make sure there are no cracks or gaps.
If you find any imperfections, remove the old silicon and replace it with a new one. This will prevent any water leaks and ensure the longevity of your aquarium. Next, add a good quality water heater to maintain a constant temperature in your aquarium.
This is especially important if you’re planning on keeping tropical fish which require warm water. You can also add an aquarium thermometer to monitor the temperature and keep it within a safe range. Lastly, add some artificial plants or decorative elements to make the aquarium more visually appealing.
Not only will this enhance the aesthetic appeal of your aquarium, but it will also provide hiding places for your fish. Fish, even those bred in captivity, still have natural instincts to hide when they feel threatened. By providing these hiding places, you’ll help your fish to feel safe and comfortable in their new home.
With these finishing touches, your newly polished acrylic aquarium is ready for use. Just remember to add water slowly and treat it with a water conditioner before adding your fish. Take care of your aquarium with regular maintenance and enjoy the vibrant and beautiful underwater world that it provides!
Conclusion
In conclusion, buffing an acrylic aquarium is a delicate art that requires patience, precision, and a few handy techniques. If you want your aquarium to shine like a diamond, follow these steps: start with a thorough cleaning, use the right tools and materials, apply the compound with gentle circular motions, and finish with a protective coating. But remember, don’t rush the process – buffing is all about taking your time and enjoying the transformation.
Just like a good fish tank, the results will be worth the effort!”
FAQs
Q: How often should I buff my acrylic aquarium? A: You should buff your acrylic aquarium every 6-12 months, depending on how much wear and tear it experiences. Q: What materials do I need to buff my acrylic aquarium? A: You will need a buffing wheel, buffing compound, a drill or polishing machine, sandpaper, and a microfiber cloth. Q: Can I buff deep scratches out of my acrylic aquarium? A: It’s possible to buff out some shallow scratches, but deep scratches require professional repair. Q: Will buffing my acrylic aquarium affect its clarity? A: If done correctly, buffing won’t affect the clarity of your acrylic aquarium. In fact, it can restore its original clarity. Q: How do I prep my acrylic aquarium before buffing it? A: Clean the aquarium thoroughly with a non-abrasive cleaner, and dry it completely before buffing. Q: Is buffing an acrylic aquarium safe for my fish? A: Yes, as long as you thoroughly clean the aquarium beforehand and don’t use any harmful chemicals during the buffing process. Q: What should I do if I have trouble buffing my acrylic aquarium? A: If you’re unsure about how to buff your acrylic aquarium or are having difficulty, it’s best to seek professional assistance.

