If you’re a passionate aquarium owner, you understand the importance of maintaining a healthy and thriving underwater world for your fish. One essential component of a well-equipped tank is a sump tank, which is a separate reservoir for biofiltration, protein skimming, and even additional space for the heater and pump. Building a sump tank may sound daunting, but trust us, it’s not as complicated as it may seem.
With the right tools, basic knowledge, and a dash of creativity, you can create a sump tank that will improve your aquarium’s efficiency and overall health. In this blog post, we’ll discuss the benefits of having a sump tank, the necessary tools and materials, and step-by-step instructions on how to build one. So, whether you’re a seasoned aquarium owner or a novice hobbyist, read on to learn how to build a sump tank that will take your aquarium to the next level.
What is a Sump Tank?
If you’re serious about maintaining a healthy aquarium, a sump tank might be just what you need. So, what exactly is a sump tank? Essentially, it’s an additional filtration system that’s installed beneath your main aquarium. A sump tank is particularly useful for larger aquariums where traditional filtration methods may not be as effective.
By creating an overflow system that drains water down into the sump tank, you can increase the amount of water in your aquarium and keep the water in your main tank cleaner for longer. To build a sump tank, you’ll need a few key components including an overflow box, a return pump, and various plumbing fixtures. While it may seem like a daunting project, building a sump tank for your aquarium is certainly manageable with a little bit of planning and preparation.
By optimizing your filtration system, you’ll be able to ensure the health and longevity of your aquatic pets.
Definition and Purpose of a Sump Tank
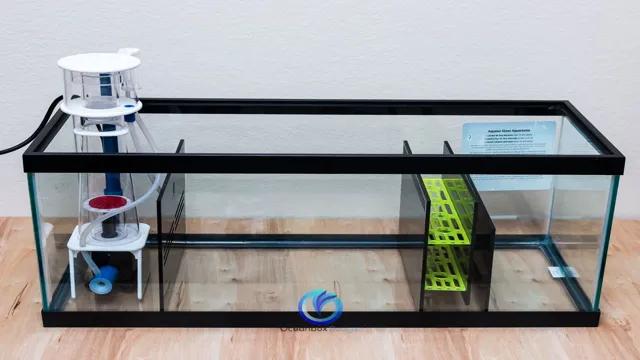
A sump tank is a type of aquarium filter that is used to maintain the water quality in a fish tank. It consists of a large container, usually placed under the aquarium, that’s filled with water. The water is pumped from the tank into the sump tank, where it passes through various filter materials, such as foam, ceramic rings, and activated carbon, which help to remove unwanted particles and chemicals.
The filtered water then flows back into the aquarium through a return pump. Sump tanks are often used by aquarists to provide extra space for equipment, such as heaters, skimmers, and reactors. They are also used to hide unsightly equipment and to increase the water volume of the aquarium, which helps to stabilize water parameters and reduce stress on fish and other aquatic creatures.
Overall, a sump tank is an essential component of a healthy and thriving aquarium ecosystem, providing efficient filtration and maintaining water quality for the benefit of aquatic life.
Benefits of Having a Sump Tank
If you’re looking to create a thriving aquarium in your home, one of the best investments you can make is building a sump tank. A sump tank is a secondary tank that works in conjunction with your main aquarium to improve the overall health of your aquatic environment. By taking advantage of gravity, a sump tank can filter, aerate and even heat your aquarium water.
This means that you can keep your main aquarium cleaner for longer, reduce the amount of noise from equipment inside your tank, and provide a more stable environment for your fish and plants. Now, I know you’re probably wondering how to build a sump tank for an aquarium – don’t worry, it’s easier than you might think! With a little bit of research and some handy DIY skills, you can easily build a sump tank that is tailored to meet the specific needs of your aquarium. By doing so, you’ll be taking the first step towards a healthier and happier aquatic ecosystem.
Improved Filtration and Water Quality
Having a sump tank in your aquarium setup has numerous benefits, including improved filtration and water quality. A sump tank works by adding extra water volume to your system, which allows for improved filtration. This is because it provides additional surface area for beneficial bacteria to grow and thrive, which in turn helps break down waste and reduce nitrate levels in the tank.
A sump tank also allows you to use various types of filtration media, such as activated carbon or bio-balls, that can effectively remove impurities from the water. With improved filtration and water quality, your fish and other aquatic creatures will be healthier and happier, and your aquarium maintenance will be much easier. Overall, a sump tank is an excellent investment for any aquarium enthusiast looking to improve the health and longevity of their aquatic pets.
So, why not consider adding one to your setup today?
Increased Water Volume and Stability
One of the major benefits of having a sump tank in your aquarium is increased water volume and stability. A sump tank can hold extra water that would not fit in the main tank, thus increasing the overall water volume. This is particularly important in larger aquariums where the fish produce a lot of waste that needs to be diluted to avoid spikes in ammonia and other toxins.
In addition, a sump tank also allows for the placement of additional filtration media, such as protein skimmers or refugiums, which can further improve water quality by removing excess nutrients and encouraging beneficial bacteria growth. Overall, having a sump tank can greatly enhance the health and well-being of your aquatic pets by providing a stable and healthy environment for them to thrive in. So, if you’re looking for a way to boost the health of your aquarium, consider adding a sump tank to your setup.
Hiding Equipment and Reducing Noise
A sump tank is a worthwhile investment for anyone looking to keep their aquarium equipment out of sight and reduce noise. The benefits of having a sump tank do not stop there, however. It also helps to maintain stable water levels, reduces the need for frequent water changes, and allows for additional filtration options.
As a bonus, it can even provide added space for your aquatic pets to explore and swim. Having a sump tank hidden beneath your aquarium also adds to the aesthetic appeal of your setup, making it look sleek and tidy. So, if you’re looking to take your aquarium game to the next level, consider adding a sump tank to your setup – you won’t regret it!
Things to Consider Before Building a Sump Tank
If you’re thinking about building a sump tank for your aquarium, it’s important to consider a few things first. The size of your tank is one of the most important factors to consider, as a sump tank should be large enough to accommodate all of the water from your main tank. You also need to consider the type of equipment you’ll be using, as certain types may require specific types of sump tanks.
Additionally, you’ll need to determine the flow rate of your pump, which will impact the size of your sump tank. It’s also important to consider the overall design of your sump tank, as this can impact its functionality and effectiveness. By taking the time to carefully consider these factors, you can ensure that your sump tank will provide the best possible environment for your aquatic pets. (See Also: How to Drill and Setup an Overflow on an Aquarium: Tips and Techniques)
So if you’re ready to take your aquarium to the next level, start researching how to build a sump tank today!
Tank Size and Design
When it comes to building a sump tank, there are a few things you need to consider before diving in. One major factor is the size and design of the tank. You’ll want to carefully determine the appropriate size for your tank based on factors such as the size and number of aquatic animals you plan to keep, as well as your filtration system.
The design of your tank also plays a crucial role in its success. Consider the shape, materials, and overall layout to ensure proper water flow and ease of maintenance. It’s important to think through these factors before jumping into the building process, as they will greatly impact the health and well-being of your aquatic inhabitants.
So take the time to plan and design your sump tank carefully, and your aquatic animals will thank you for it.
Equipment Needed
When building a sump tank, there are a few things to consider before diving in. First and foremost, you will need the necessary equipment to get started. This includes a sump tank, overflow box, return pump, and plumbing materials.
It’s important to choose the right size sump tank for your specific needs. You will want to ensure that it fits comfortably in your cabinet and can handle the volume of water you intend to filter. Additionally, the overflow box and return pump should be compatible with your sump tank to ensure proper water flow and filtration.
Don’t forget to consider the placement of your plumbing materials, as they need to be easily accessible for maintenance. With the right equipment in hand, you’ll be on your way to building a successful sump tank for your aquarium.
Plumbing and Installation
Before building a sump tank, it is essential to consider several factors to ensure maximum functionality and efficiency. Firstly, you need to determine the size of the sump tank, which should be proportional to the aquarium’s size. The sump tank should be at least three times larger than the aquarium volume to hold sufficient water for filtration.
Secondly, you need to consider the type of filtration system to use in the sump tank. You can use mechanical, chemical, or biological filters in the sump tank, depending on your preference. Thirdly, you need to decide on the sump tank’s location, ensuring that it is easily accessible for maintenance purposes.
Additionally, it would help if you considered building a skimmer in the sump tank to remove excess organic waste from the water. By considering these factors, you can build a sump tank that adequately filters the aquarium water and provides a conducive environment for your aquatic pets.
Steps for Building Your Sump Tank
Looking to build a sump tank for your aquarium? Here are the steps to follow. First, gather all the necessary materials, including a sump tank, overflow box, plumbing equipment, and return pump. Next, determine the location and size of the sump tank in proximity to your aquarium.
Install the overflow box on the back of your tank and connect it to the sump tank with the plumbing equipment. Then, add your return pump to the sump tank and connect it to your aquarium. Once the equipment is properly installed, fill the sump tank with water and turn on the pump to check for any leaks.
It’s important to regularly monitor the water level in your sump tank and perform routine maintenance to keep the equipment functioning properly. Building a sump tank can improve the overall health and clarity of your aquarium, making it a valuable addition to any setup.
Step 1: Measure and Cut Your Glass Sheets
When it comes to building your sump tank, one of the first steps is to measure and cut your glass sheets. This can seem like a daunting task, but with the right tools and guidance, it can be done easily. Start by measuring the dimensions of your tank and calculating the size of glass sheets needed.
Once you have your measurements, use a glass cutter to score the glass along the lines you want to cut. Then, snap the glass along the score line using a pair of pliers. Remember to use safety equipment such as gloves and eye protection to prevent any accidents.
Taking the time to properly measure and cut your glass sheets will ensure a custom fit and a seamless build. So, take your time and have patience throughout this process to create the perfect sump tank for your aquatic creatures.
Step 2: Assemble the Tank with Silicone Adhesive
If you have followed our previous post, you will now have all the necessary materials to build your sump tank. Let’s move on to the next step: assembling the tank with silicone adhesive. This is a crucial step, as it will ensure that your tank is watertight and able to withstand the weight of the water and equipment. (See Also: How to Kill Parasites in Aquarium: Proven Methods and Tips)
To begin, lay out all the tank pieces and ensure that they are clean and free of debris. Apply a bead of silicone adhesive along the edges of the first piece, making sure to cover all the seams and crevices. Carefully place the second piece on top of the first, ensuring that the edges are aligned.
Use clamps to hold the pieces together while the adhesive dries. Repeat this process until all the pieces are assembled. Once the tank is fully assembled, it’s a good idea to give it a test run before you fill it with water.
Fill the tank with tap water and let it sit for a few hours to ensure that there are no leaks or cracks. If everything looks good, drain the water and let the tank dry completely before adding your equipment. Remember, the key to a successful sump tank is taking your time and being careful during the assembly process.
Don’t rush and don’t cut corners, and you’ll end up with a sturdy, reliable tank that will provide years of use. So grab your adhesive and get to work!
Step 3: Install Baffles for Filtration
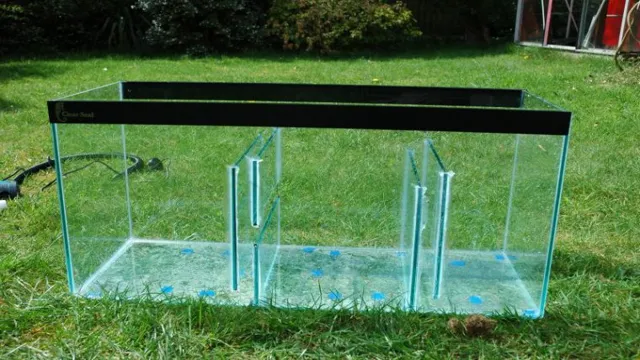
When setting up a sump tank, it is essential to install baffles for filtration. Baffles are partitions inside the sump tank that help to direct and control water flow as it enters and exits the tank. These baffles also serve as a filtration system, trapping any debris or waste in the water and allowing clean water to flow out.
Without proper baffling, water can stagnate and become a breeding ground for harmful bacteria that can harm your aquarium’s inhabitants. Therefore, it is crucial to ensure that the baffles are properly installed to provide the best filtration for your tank. By installing the baffles correctly, you can ensure a clean and healthy environment for your aquatic creatures to thrive.
So, don’t forget this step when building your sump tank!
Step 4: Add Bulkheads for Plumbing
When building your sump tank, adding bulkheads for plumbing is a crucial step to ensure proper water flow throughout the system. Bulkheads are fittings that create a watertight seal between the plumbing and the tank walls. They are installed on the sides or bottom of the tank and come in various sizes and configurations to fit your specific plumbing needs.
It is important to choose the right size and type of bulkhead based on the water flow rate and the diameter of the pipes you are using. Once installed, you can connect the plumbing to the bulkheads using PVC or other suitable materials. Adequate water flow through the bulkheads is essential for the efficient operation of your sump system, making it important to ensure they are properly installed and sealed.
By adding bulkheads for plumbing, you can ensure your sump tank functions optimally and maintains a healthy aquatic environment for your fish or other aquatic creatures.
Step 5: Install Equipment and Test for Leaks
Now it’s time to move on to Step 5, the exciting stage of building your sump tank: Installing the equipment and testing for leaks. After constructing and preparing your sump tank, it’s crucial to install the necessary equipment such as a return pump, a protein skimmer, heaters, and chiller. Ensure that the equipment is correctly placed and connected to the power source.
Once installed, fill the sump tank with water and check for any leaks. Leaks can be disastrous, destroying everything in the tank, so it’s essential to test thoroughly before adding any corals or fish. It’s better to be safe than sorry! Finally, check that all your equipment is in working order, particularly the pump and skimmer.
If all is well, congratulations! Your sump tank is almost ready to become the new home for your aquatic pets.
Maintaining Your Sump Tank
If you’re wondering how to build a sump tank for your aquarium, you’re in the right place! A sump tank is a separate tank that sits underneath your main aquarium and is used to maintain a stable environment for your fish and other aquatic creatures. To keep your sump tank in good condition, it’s important to regularly clean it out and check all the components. This includes cleaning the skimmer cup, replacing filter media, and checking the water levels.
Maintaining your sump tank will help ensure that your aquarium stays healthy and your fish stay happy. So, if you’re looking to build a sump tank for your aquarium, don’t forget to make maintenance a top priority!
Regular Cleaning and Water Changes
Regular cleaning and water changes are essential for maintaining a healthy sump tank. It is recommended to perform a 10-20% water change every two weeks to remove accumulated waste and replenish necessary nutrients. During water changes, it is also important to vacuum debris and clean filters, sponges, and skimmers.
Regular maintenance keeps the water parameters stable, providing a stable environment for your marine life. Neglecting cleaning routines can potentially lead to hazardous living conditions, such as high nitrates and phosphates levels, which can cause illness or even death to your marine pets. Remember to keep your sump tank clean to provide a healthy and safe environment for your marine life to thrive.
Monitoring Water Parameters
Maintaining your sump tank is essential to ensure a healthy aquarium environment for your marine pets. One crucial aspect of maintaining your sump tank is monitoring your water parameters regularly. You should test your water parameters for pH, dissolved oxygen, nitrates, nitrites, and ammonia at least once every week. (See Also: How to Get Nitrates Down in Saltwater Aquarium: Top Strategies and Tips)
Additionally, keep an eye on the temperature of the water, salinity levels, and water flow rate through the sump. Maintaining optimal water parameters will prevent your aquarium from experiencing sudden changes that could harm fish, plants, and invertebrates. One way to maintain your water parameters is by investing in high-quality testing kits and regularly cleaning the equipment in your sump tank.
By doing this, you’ll be able to keep your sump tank running optimally and maintain a healthy environment for your aquarium inhabitants.
Replacing Equipment When Necessary
Maintaining Your Sump Tank is crucial to ensure the efficacy of your equipment and the cleanliness of your aquarium. As a responsible fish owner, it’s your duty to examine your sump tank regularly and immediately replace any equipment that no longer functions correctly. This may include your pump, filters, and other components like the protein skimmer.
When you detect a decrease in flow or any strange noises, corrosion, or leaks, it’s time to swap out the old gear for new. Not replacing worn-down equipment can have detrimental effects on your fish’s health and the overall condition of your aquarium. This can lead to an accumulation of harmful bacteria, dirty water, and an imbalance in the nutrient levels.
You can also consider upgrading your equipment every once in a while for better performance, efficiency, and a safer aquatic environment for your beloved fish. Remember to ensure proper maintenance of your sump tank and replace any faulty equipment to ensure the longevity of your aquatic ecosystem.
Conclusion
Congratulations, my dear reader! After reading this guide, you are now armed with the knowledge to build your own sump tank and take your aquarium game to the next level. From choosing the right size and equipment, to measuring and drilling your holes – you’ve got it covered. Just remember, the key ingredients to creating a successful sump tank are patience, precision, and a bit of creativity.
So go ahead, start building your dream aquarium sump tank today and give your finned friends the home they deserve! Just don’t blame us when you start spending all your free time staring at your new masterpiece.”
FAQs
What is a sump tank?
A sump tank is an additional tank used to filter and house equipment in an aquarium setup.
Why should I use a sump tank for my aquarium?
Sump tanks can increase water volume, improve water quality, and provide a space to hide equipment in an aquarium setup.
What size should my sump tank be for my aquarium?
The size of the sump tank depends on the size of your aquarium and the equipment you plan to house in it. It is recommended to have a sump tank that can hold at least 10% of the total water volume of your aquarium.
What equipment do I need for a sump tank?
Typically, a sump tank will require a protein skimmer, heater, return pump, and filter media such as mechanical and biological filtration.
How do I set up a sump tank for my aquarium?
First, create a drainage system from your aquarium to the sump tank. Install your equipment in the sump tank such as the protein skimmer, heater, and return pump. Install filter media and adjust water levels within the sump tank. Finally, connect the return pump to the aquarium.
How often should I clean my sump tank?
It is recommended to clean your sump tank at least every 6 months or as needed if debris is accumulating within the tank.
Can I use a DIY sump tank for my aquarium?
Yes, as long as the sump tank is properly sized and constructed with appropriate equipment installed, a DIY sump tank can be a cost-effective and customizable option for aquarium enthusiasts.

