Do you find yourself struggling with excess water in your aquarium? Overflow siphon holes are a common problem that can lead to a messy and stressful situation for both you and your aquatic pets. Luckily, there’s a quick fix for this issue: capping the overflow siphon holes. In this blog post, we’ll guide you through the simple steps you can take to cap the holes and prevent any further water overflow.
So whether you’re a seasoned aquarium owner or a beginner enthusiast, keep reading to learn how to cap overflow siphon holes in your aquarium.
Understanding Overflow Siphon Holes
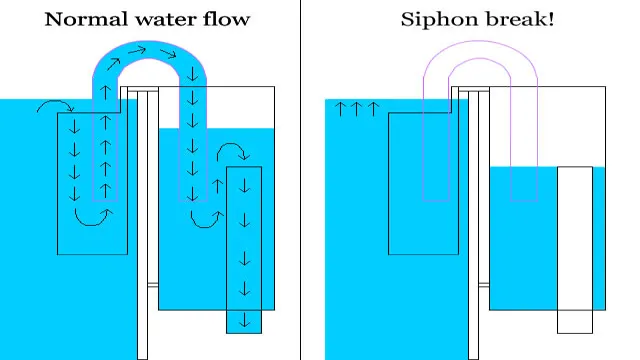
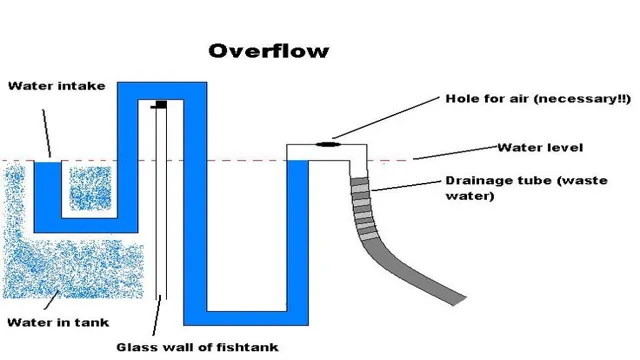
If you’re new to aquariums, you may have come across the term “overflow siphon holes” and wondered what they are and how they work. These holes are found in the aquarium’s overflow box, which acts as a safety feature to prevent the tank from overflowing. The overflow siphon holes function by generating a siphon when the water level in the tank reaches a certain height.
This siphon draws excess water from the main tank into the overflow box, preventing the water from spilling over the sides. However, some aquarium keepers might want to cap the overflow siphon holes to reduce noise or keep certain critters from crawling in. To do this, you can use a silicone sealant to seal the holes shut.
Just remember that if you do cap the overflow siphon holes, make sure you have an alternative method of preventing your tank from overflowing. Overall, understanding how overflow siphon holes work can help you troubleshoot any issues with your aquarium’s maintenance and ensure your tank stays healthy and happy.
What Are Overflow Siphon Holes?
Overflow siphon holes are drainage systems designed to prevent overflow and flooding in aquariums and ponds. These holes are usually located near the top of the tank or pond, allowing excess water to be removed from the system before it reaches the surface. The principle behind an overflow siphon hole is that the water level in the tank is maintained by gravity, with water flowing from the high water level to the outlet where it is released.
This helps to prevent stagnant water and toxins from building up, which can be harmful to aquatic life and cause unwanted algae growth. Properly installed and maintained overflow siphon holes are essential to maintaining a healthy and thriving aquatic environment.
Why Do You Need to Cap Them?
Overflow siphon holes are essential in aquariums as they play a crucial role in regulating the water levels. However, it’s equally important to cap them for numerous reasons. First, it helps to prevent accidents that might end up spilling water all over the place.
Secondly, capping the overflow siphon holes helps to keep the aquarium looking neat and organized by preventing debris, particles, and even pests from entering the aquarium space through the overflow siphon hole. Thirdly, it helps to maintain the temperature of the aquarium water, as water lost through the overflow siphon hole can result in a sudden drop in temperature, which can hurt aquatic animals. Fourthly, capped overflow siphon holes are vital in preventing the entry of harmful substances like chemicals, which can negatively impact aquatic life.
To ensure a healthy and well-functioning aquarium, ensure you cap the overflow siphon hole on your aquarium.
Materials and Tools Required
If you want to cap overflow siphon holes in your aquarium, you’ll need a few basic materials and tools. First, you’ll require a silicone sealant that’s safe for fish and aquatic plants. Make sure to choose a sealant that’s specifically designed for aquariums, so you can be assured it won’t harm your aquatic life.
Next, you’ll need to clean the area around the siphon holes thoroughly. Use a scrape or razor blade to remove all dirt and debris around the holes. Once it’s clean, dry the area completely before beginning the process of capping the holes.
A great tool to have on hand is a sealant gun, which makes applying the silicone much easier. It’s also recommended to have gloves and a mask on hand to protect yourself from any fumes from the sealant. With these materials and tools, you’ll be well equipped for capping overflow siphon holes in your aquarium.
Required Materials
When it comes to DIY projects, having the right materials and tools is crucial to ensure success and safety. For this particular project, you will need a few items before you can begin. Firstly, you’ll need gloves to protect your hands, especially if you will be handling sharp objects.
An adjustable wrench will also be necessary to tighten and loosen bolts securely. Additionally, a saw will be needed to cut the wood into the sizes you require. You’ll also need a measuring tape to measure the wood accurately. (See Also: Which Aquariums Have Whales: Exploring the Top Destinations for Whale Watching in Captivity)
For drilling holes into the wood, an electric drill with different-sized drill bits is necessary. Sandpaper will be used to smooth the surfaces of the wood after you’ve cut and drilled the holes. And finally, you’ll need wood screws to connect the segments of the project together.
Remember, it is important to use high-quality materials that will hold up over time and make your project last longer. By having everything you need before you start, the project will go more smoothly, and you’ll be proud of the finished product.
Tools You Will Need
When it comes to DIY projects, having the right tools and materials is crucial for success. For this particular project, you’ll need a few key items. First and foremost, you’ll need a saw for cutting the wood to the proper measurements.
A drill will also come in handy to create holes for screws and to attach any hardware needed. You may also need a sander for smoothing out rough edges and giving the wood a polished finish. In terms of materials, you’ll obviously need wood planks of the desired size, but you may also need screws, wood glue, and paint or stain.
With all of these tools and materials in hand, you’ll be well-equipped to tackle your DIY project and create something you can be proud of.
Step-by-Step Guide to Capping Overflow Siphon Holes
If you’re struggling with an overflowing aquarium, you may need to cap the overflow siphon holes. Fortunately, it’s a simple process that you can do in just a few easy steps. First, gather the necessary materials, including silicone sealant and a cap that fits snugly over the siphon hole.
Next, turn off all equipment and drain the water from the overflow box. Then, clean the siphon hole thoroughly to remove any dirt or debris. Apply the silicone sealant generously around the edge of the cap, then press it firmly over the hole.
Finally, let the sealant dry completely before re-filling the aquarium. It’s important to note that capping the siphon holes will prevent the water from flowing through the overflow system, so make sure your aquarium is properly filtered, and the water level is monitored. Overall, capping the overflow siphon holes is a simple solution to common aquarium overflow problems.
Just follow these steps, and you’ll be enjoying a healthy and happy aquarium experience in no time!
Step 1: Drain the Water Out of the Tank
If you’re experiencing problems with your overflowing toilet, one possible solution is to cap the overflow siphon holes. This step-by-step guide will walk you through the process to fix this issue. The first step is to drain the water out of the tank.
Simply turn off the water supply, flush the toilet, and use a sponge or cloth to get rid of excess water. This is important because you don’t want water to spill out while you’re working on the siphon holes. Once the tank is empty, you can start working on capping the holes.
By following these steps, you can fix the problem and have a fully functioning toilet again.
Step 2: Clean the Siphon Hole Surfaces
Now that you have lifted the overflow cap from the siphon hole, the next step is to clean the surfaces thoroughly. It would be best to use a brush or a scrubber to clean away any debris or dirt that may have accumulated. Taking time to clean the surface is crucial because if there is any remaining debris, it can clog the hole or obstruct water flow, which may cause a chain reaction of overflowing and flooding. (See Also: How to Add Baking Soda to Aquarium for Healthy pH Levels: A Step-by-Step Guide)
You want to ensure that all surfaces are clean, including the edges of the siphon hole, where the cap goes, and the underside of the cap itself. Once you have thoroughly cleaned all surfaces, you can now replace the cap and proceed to the next step. Remember, it’s essential not to rush this process; taking your time will prevent any future complications and ensure everything runs smoothly.
Step 3: Apply the Cap Material
Now that the overflow siphon holes have been drilled and cleaned, it’s time to apply the cap material. The cap material can be any water-tight substance, such as silicone or epoxy. Before applying it, make sure that the holes are completely dry.
Apply the cap material generously over the holes, and smooth it out with a putty knife or your finger. Make sure that the material covers the entire surface area of the hole, and that it is evenly distributed. Allow the cap material to dry completely before testing the overflow siphon.
It’s important to note that if you’re using silicone, it may take up to 24 hours to fully cure. Once the cap material is dry, fill the tank with water and look for any leaks around the overflow siphon. If there are no leaks, congratulations, you’ve successfully capped your overflow siphon holes!
Step 4: Allow the Cap Material to Dry
Step-by-Step Guide to Capping Overflow Siphon Holes – Step 4: Allow the Cap Material to Dry Once you have applied the cap material to cover the overflow siphon hole, it’s important to give it time to dry before testing it. The drying time will depend on the type of cap material you used. If you used a silicone caulk, you’ll need to wait at least 24 hours before testing it.
If you used an epoxy, you’ll need to wait at least 1 hour. Make sure to follow the manufacturer’s instructions for the specific product you used. During this waiting period, it’s important not to disturb the cap material.
Avoid touching it or using the sink, tub, or shower that you’re working on. If you need to use the bathroom, use a different one until the cap material is completely dry. Once the cap material is dry, it’s time to test the overflow siphon hole to make sure it’s sealed properly.
Fill the sink, tub, or shower with water and let it run for a few minutes. Then, check around the overflow plate and the drain to see if any water is leaking. If there is no water leaking, then congratulations! You have successfully capped the overflow siphon hole and prevented any future water damage.
Testing Your Cap
Controlling the water level in your aquarium can be a delicate balancing act, and one key component of that is capping the overflow siphon holes to prevent water from escaping. Thankfully, it’s a straightforward process that anyone can do. For starters, you’ll need to locate the siphon holes and ensure they’re clean and free from debris.
Then, cut a small piece of sponge or foam to fit snugly over the hole, being careful not to obstruct the water flow. This cap will help reduce any noise caused by the rushing water, as well as keep the water level consistent. It’s essential to test your cap after installation to ensure it’s working correctly, as any leaks could result in water damage or loss of fish.
One way to do this is by filling the tank to the overflow level and observing the cap for a few minutes to see if any water seeps through. If all is well, you can relax knowing you’ve successfully capped your overflow siphon holes and can enjoy a beautiful, peaceful aquarium.
Checking for Leaks
Checking for leaks in your home’s plumbing system is a crucial task that should be done regularly. One way to test for leaks is to check your cap. The cap is a small fixture that can be found on most pipe systems in your house.
To test your cap, you will need to turn off all water sources and then watch the cap for any signs of water leakage. If there are visible signs of water leaks, it may indicate that there is a problem with the cap or the surrounding pipes. It’s important to address any leaks as soon as possible to prevent water damage and potentially costly repairs.
Don’t let a small leak turn into a larger issue – take a few minutes to check your cap and give yourself peace of mind. (See Also: How to Make Cucumbers for an Aquarium: A Complete Guide to Cucumber Feeding for Healthy Fish)
Conclusion
In conclusion, capping overflow siphon holes in an aquarium is an important step in maintaining a healthy and clean aquatic environment. Not only does it prevent unwanted debris from entering the tank, but it also ensures that the water level remains consistent. So, whether you’re a seasoned aquatic enthusiast or a newbie to the hobby, capping those overflow siphon holes is a clever solution to keeping your tank vibrant and thriving.
Just make sure to use the right materials and techniques to ensure a functional and secure seal. After all, with great power comes great responsibility..
.to your fish!”
FAQs
What are overflow siphon holes in an aquarium?
Overflow siphon holes are small openings in the aquarium that allow water to flow out if the water level rises too high.
How can I cap overflow siphon holes in an aquarium?
You can cap the overflow siphon holes in the aquarium with silicone sealant or with purpose-made caps that fit over the holes.
Why would I need to cap overflow siphon holes in an aquarium?
You may need to cap overflow siphon holes in an aquarium if you want to reduce noise from flowing water or if you want to prevent small fish or other creatures from getting sucked into the overflow.
Is it safe to cap overflow siphon holes in an aquarium?
Yes, it is safe to cap overflow siphon holes in an aquarium as long as you do it properly and use materials that are safe for aquarium use.
What other ways can I control water flow in an aquarium besides capping overflow siphon holes?
You can control water flow in an aquarium by adjusting the flow rate of the filter, using a water pump with adjustable flow, or by adding water deflector attachments to the filter or pump.
Can capping overflow siphon holes cause any negative effects on the aquarium ecosystem?
Capping overflow siphon holes can disrupt the natural flow of water in the aquarium and may cause dead spots or stagnant areas that can be harmful to fish and other aquatic animals. It is important to carefully monitor water parameters and make adjustments as necessary if you cap overflow siphon holes in your aquarium.
Are there any alternatives to overflow siphon holes in an aquarium?
Yes, you can use other types of overflow systems such as overflow boxes or internal overflow filters to control water flow in an aquarium without relying on overflow siphon holes.

