Are you tired of dim or flickering lights in your aquarium? It may be time to change the ballast. The ballast is an essential component of your aquarium lighting system, regulating the flow of electricity to the bulbs and ensuring that they operate correctly. A malfunctioning ballast can lead to decreased light output and even damage to your bulbs.
But don’t worry, changing the ballast is a relatively simple process that can be completed in just a few steps. Think of it like changing the battery in a flashlight. In this blog, we’ll walk you through the steps of how to change aquarium light ballast, so you can go back to enjoying a well-lit and healthy aquarium.
Understanding the Basics
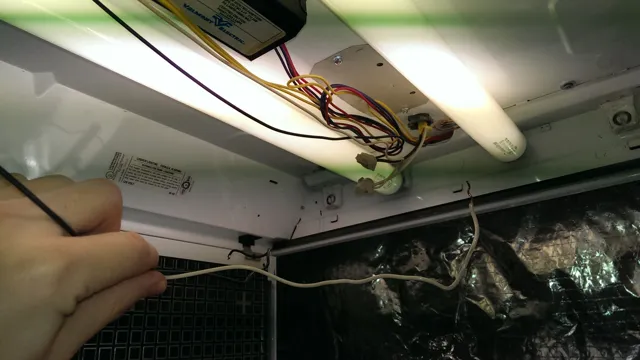
Changing the ballast in your aquarium light may seem like a daunting task, but it’s actually fairly simple. First, you’ll want to turn off the power to the aquarium and disconnect the light fixture from the tank. Next, locate the ballast, which is usually located inside the fixture, and carefully remove it.
Take note of how the wires are connected to the ballast so that you can reconnect them later. You can then replace the old ballast with a new one and reconnect the wires in the same way they were connected before. Once the new ballast is securely in place, you can reattach the light fixture to the tank and turn the power back on.
With these easy steps, you can change the ballast in your aquarium light and keep your aquatic pets happy and healthy.
Identify the Type of Ballast Needed
When it comes to purchasing ballast for your lighting system, it’s important to identify the type of ballast that you need in order to ensure that it functions properly. There are two main types of ballast: magnetic and electronic. Magnetic ballasts are older technology and operate using electromagnetic induction to regulate the electrical current.
Electronic ballasts, on the other hand, are more modern and utilize solid-state electronic circuitry to regulate the current. To determine which type of ballast is needed, you’ll want to take a look at the lighting fixture’s bulb type and wattage. Different types of bulbs require different ballasts in order to function properly and safely.
Additionally, you’ll need to consider the voltage of your electrical system. Most ballasts are designed for a specific voltage, so it’s important to choose one that matches your system’s voltage. Overall, understanding the basics of ballast types and how they work can help you choose the right ballast for your lighting system.
By doing so, you’ll ensure that your bulbs operate at their optimal efficiency and lifespan. Don’t hesitate to reach out to a professional if you need assistance in identifying the right ballast for your needs – they’ll be able to guide you in the right direction and help you make an informed decision.

Turn Off the Power
Turning off the power should always be the first step before working on any electrical appliance or wires. It might seem like an obvious step, but it’s easy to forget, especially when you’re in a rush to get something fixed quickly. The consequences of forgetting to turn off the power can be fatal, so it’s crucial to remember this basic yet essential step.
When you turn off the power, you’re essentially removing the electrical current from the wires or appliance you’re working on, meaning there’s no danger of getting electrocuted. Think of it like unplugging a hairdryer before cleaning it. Turning off the power is that extra layer of safety that can prevent accidents and injuries from happening.
So the next time you’re working on electrical equipment or wires, remember to turn off the power first. It only takes a few seconds, but it could save your life. (See Also: How to Cartridge Filter Aquarium Water: A Beginner’s Guide to Clean and Healthy Fish Tank)
Remove the Old Ballast
When it comes to upgrading or replacing your lighting fixtures, it’s important to know how to safely remove the old ballast. The ballast is the component that regulates the current in the circuit, and it’s crucial to ensure that it’s disconnected properly to avoid electrical hazards. Before starting the process, make sure to turn off the power to the fixture, and use a voltage detector to confirm that there’s no current flowing.
Once you’ve done that, you can identify the ballast and take note of its wiring and connections. Take a photo or make a diagram if necessary, to help you remember how to reconnect everything when you install the new ballast. Then, use a wire stripper to remove the wires from the ballast, and discard it safely according to local regulations.
With that out of the way, you’ll be ready to install your new ballast or lighting fixture knowing that you’ve done the first step safely and correctly.
Installing the New Ballast
If you are wondering how to change your aquarium light ballast, worry not, the process is not as daunting as it seems. First, ensure that you have turned off all the power supply to the aquarium. Proceed to remove the bulb and the reflector screen to access the ballast.
Next, you need to disconnect the wiring from the old ballast. Identify the wires and their corresponding connectors and disconnect them. Remember to take note of where each wire was connected.
You can now remove the old ballast. Install the new ballast by connecting the wires to their appropriate connectors in the same way you disconnected them. Double-check to ensure that all connections are secure.
Finally, put back the reflector screen and bulb before turning on the power supply. Your aquarium should now shine bright as ever, thanks to your new ballast!
Connect the Wires
One crucial step in installing a new ballast is connecting the wires. This might seem like a daunting task, but it’s actually simpler than you might think. First, make sure to turn off the power supply to the fixture.
Then, locate the wires from the ballast and the wires from the fixture. You may need to refer to the wiring diagram that came with your ballast to ensure you make the correct connections. Once you’ve determined which wires should be connected, use wire nuts to connect them securely.
It’s essential to ensure that each wire is properly connected, as any loose wires could pose a safety hazard. A useful tip is to use electrical tape to secure the wire connections, preventing any accidental disconnections. With all wires connected securely, you can safely turn the power supply back on and test the fixture to ensure it’s working correctly.
By following these steps, you can easily connect the wires and install your new ballast without any problems. (See Also: How to Make a Shoe Box Aquarium: A Fun and Creative DIY Project for Kids)
Install the New Ballast
The next step in replacing your fluorescent light ballast is installing the new one. Before doing so, make sure that the new ballast matches the specifications of your old one. A ballast that doesn’t match can produce different voltages, leading to shorter lifespans for your bulbs or even damaging them.
Once you have the correct ballast, start by turning off the power to the fixture at the circuit breaker. Remove the wires from the old ballast and make note of their colors and where they were connected. Then, connect the wires from the new ballast to the same locations, ensuring that the wire colors match up.
Once you’ve finished the connections, tuck the new ballast back into the fixture and turn the power back on at the circuit breaker. Your new ballast is now successfully installed and ready to go!
Replace the Cover and Turn On the Power
Installing a new ballast in a light fixture can seem intimidating, but it’s actually a fairly straightforward process. Once you have removed the old ballast and wired in the new one, it’s time to replace the cover and turn on the power. Before you do this, it’s important to ensure that all of the wiring is securely connected and that there are no loose screws or exposed wires.
Once you have double-checked everything, carefully replace the cover and turn on the power. If everything was done correctly, the light should turn on without any issues. It’s important to note that when installing a new ballast, safety should always come first.
Make sure to turn off the power at the circuit breaker and use a voltage tester to confirm that there is no electricity flowing to the wires before you begin working. Additionally, if you are not comfortable working with electricity or the wiring involved, it’s always best to consult a professional electrician to avoid potentially dangerous situations. Overall, installing a new ballast may seem daunting at first, but with the right tools and preparation, it’s a task that can be accomplished by anyone.
Just remember to prioritize safety, double-check all of the wiring, and follow the manufacturer’s instructions carefully. Before you know it, you’ll have a fully functioning light fixture and the satisfaction of a job well done.
Final Thoughts
Changing the ballast in your aquarium light may seem daunting, but with a few easy steps it can be done with ease. First, make sure to purchase the correct ballast for your specific light fixture. Turn off the power to the light and detach any wires connecting it to the ballast.
Remove the old ballast and install the new one in its place. Connect any wires as needed, ensuring they are secured tightly. Finally, turn on the power and test your new ballast.
By following these simple steps, you can easily change the ballast in your aquarium light and ensure your aquatic pets have proper lighting for healthy growth. Remember, maintaining proper lighting is an important aspect of aquarium care, and a functioning ballast is key to achieving this.
Conclusion
In conclusion, changing the ballast in your aquarium light may seem like a daunting task, but it’s really quite simple. Just remember to turn off the power, remove the old ballast, and install the new one according to the manufacturer’s instructions. And if you’re feeling fishy about it, don’t hesitate to call in a professional. (See Also: How To Keep Your Aquarium Crystal Clear: Tips and Tricks for Clear Water)
With a little effort, you’ll soon have a tank full of happy and well-lit aquatic friends. So go ahead, take the plunge and brighten up your underwater world!”
FAQs
What is an aquarium light ballast?
An aquarium light ballast is an electrical device that regulates the current to the fluorescent bulbs in your aquarium light fixture.
Why would I need to change my aquarium light ballast?
You may need to change your aquarium light ballast if your bulbs are flickering or not turning on at all. This could be a sign that the ballast is faulty.
How often should I change my aquarium light ballast?
It is recommended to change your aquarium light ballast every two to three years, as they can wear out over time and lose their effectiveness.
Can I replace my aquarium light ballast myself?
Yes, if you are comfortable working with electrical components, you can replace your aquarium light ballast yourself. However, if you are unsure or inexperienced, it is best to consult a professional.
What tools do I need to change my aquarium light ballast?
You will need a screwdriver, wire cutters, wire strippers, and electrical tape to change your aquarium light ballast.
How do I know which ballast to buy for my aquarium light fixture?
You will need to know the wattage and voltage of your current ballast, as well as the number of bulbs in your fixture. This information should be listed on the current ballast.
Can I use a different brand of ballast in my aquarium light fixture?
It is best to stick with the same brand of ballast when replacing it in your aquarium light fixture, as different brands may not be compatible with your fixture.


