Who doesn’t love a beautifully decorated fish tank? Aquariums are a mesmerizing addition to any home, adding a touch of tranquility that can be enjoyed by all. However, in order to maintain that serene environment for your fish, it’s important to keep up with cleaning and maintenance. One crucial element in your aquarium’s upkeep is changing the gravel.
While it may seem like a daunting task, it’s actually quite easy to do with a little bit of guidance. In this step-by-step guide, we’ll show you how to change your aquarium gravel so that your fish can continue to swim in crystal-clear waters. Let’s dive in!
Why Change Your Aquarium Gravel?
If you’ve had the same aquarium gravel for a while, it may be time to consider changing it. Over time, debris and waste can become embedded in the gravel, which can make it difficult to keep the aquarium clean. Changing your aquarium gravel may seem like a daunting task, but it’s actually not as difficult as you might think.
First, you’ll need to remove the fish from the tank and place them in a temporary holding tank. Next, use a siphon hose to remove the old gravel and any debris from the bottom of the tank. Once the old gravel has been completely removed, rinse the new gravel thoroughly and add it to the tank.
Finally, carefully replace the fish in the tank. It’s important to note that changing your aquarium gravel can temporarily disrupt the water chemistry, so it’s a good idea to test the water afterwards to make sure everything is balanced. Overall, changing your aquarium gravel can help keep your tank clean and healthy for your fish.
Improved Water Quality
Improving water quality in your aquarium is essential for the health and happiness of your aquatic pets. And one way to do that is by changing your aquarium gravel. Over time, the gravel can accumulate debris, uneaten fish food, and waste, leading to a buildup of harmful bacteria and toxins in the water.
By replacing the gravel, you can get rid of these harmful substances and improve water circulation, which helps keep the water clean and healthy for your fish. New and clean aquarium gravel can also enhance the aesthetics of your aquarium, making it more attractive and enjoyable to look at. So, if you want to give your fish a healthier and more beautiful home to live in, it’s time to change your aquarium gravel!
Better Aesthetic Appeal
If you’re looking to enhance the aesthetic appeal of your aquarium, then one simple change you can make is to switch out your gravel. Aquarium gravel is not just functional for providing a surface for beneficial bacteria to grow on, but it also plays a vital role in creating an appealing look for your underwater world. The color, size, and shape of your gravel can drastically change the overall look of your aquarium.
For instance, if you want a more natural look, you can use earthy tones like brown or tan gravel. Conversely, if you prefer a more vibrant and eye-catching display, you could opt for colorful gravel. Additionally, changing the texture of your gravel can also make a significant difference.
Smaller, smoother gravel can create a more polished look, while larger, rougher gravel can mimic the look of a natural riverbed. By simply changing your aquarium gravel, you can easily create a brand new style and aesthetic for your underwater world.
Removal of Waste and Toxins
Aquarium gravel is an essential element in any aquarium setup, and it serves a critical function in maintaining the overall health of your aquatic pets. One of these functions is waste removal. Over time, organic waste such as uneaten food, excess fish waste, and dead plant matter will accumulate on the aquarium floor and become trapped in the gravel.
If left unchecked, these waste products can decompose and release harmful toxins into the water, which can cause a range of health problems to your aquatic pets if not properly addressed. Changing your aquarium gravel regularly will, therefore, help to keep your tank clean and minimize the build-up of waste and toxins. It’s essential to choose the right type and size of gravel for your aquarium, depending on the type of aquatic life you have, to ensure optimal waste removal and overall health of your aquatic pets.
By doing this, you can guarantee a healthy and thriving aquatic environment for your pets to grow and thrive.
Materials Needed
Changing the gravel in your aquarium is an essential task for maintaining a healthy environment for your fish. Before you get started, you will need a few things to make the process as smooth as possible. Firstly, you will need to empty your tank, so make sure you have a clean bucket or container to transfer your fish and water into.
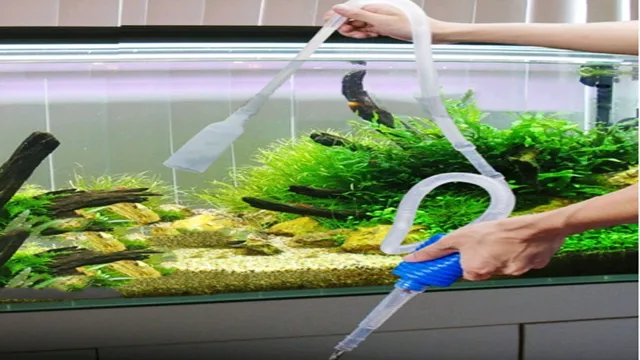
Secondly, you will need a siphon or gravel vacuum to remove the old gravel and debris from the bottom of the tank. Thirdly, you will need new gravel to replace the old and a strainer to rinse it thoroughly before adding it to the tank. A scraper or brush may also come in handy to clean any algae or build-up on the sides of the tank.
With these items in hand, you’re ready to get started on changing your aquarium gravel!
New Aquarium Gravel
If you’re thinking about updating the look of your aquarium, changing the gravel can be a quick and easy way to do so. To get started, here are the materials you’ll need: a siphon, a bucket, your new aquarium gravel, and a net. The first step is to remove your fish from the tank and replace any old gravel with new.
Use the siphon to remove the old water and to make it easier for you to scoop out the old gravel. Once you’ve removed all of the old gravel, rinse the new gravel with water to remove any dust or debris. Then, gently pour the new gravel into your tank, making sure to distribute it evenly.
You may need to use your hands to adjust the gravel around plants or other decorations. Finally, add fresh water to your tank and return your fish back to their home. Remember to monitor the water levels over the next few days to ensure it remains healthy for your aquatic pets.
With these simple steps, you can give your aquarium a fresh new look in no time.
Gravel Vacuum
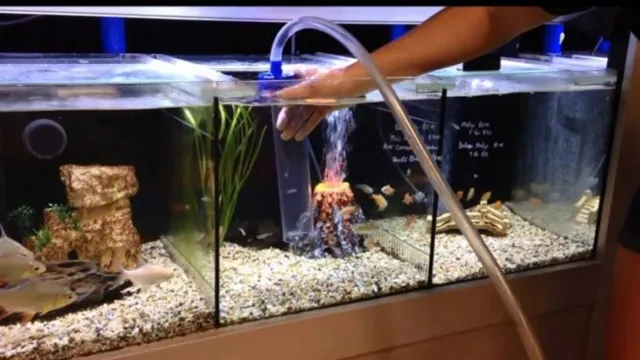
When it comes to maintaining a healthy and thriving aquarium, regular cleaning is imperative. One tool that can help make the process a lot easier is a gravel vacuum. A gravel vacuum is a long tube that is attached to a hose and used to siphon out debris and waste from the substrate of the aquarium.
It’s an essential tool for any aquarium owner to ensure that the water in their tank remains clear and free of harmful pollutants. To use a gravel vacuum, you’ll need the device itself, a bucket, a hose, and a sink or spigot to attach the hose. Before using the vacuum, it’s crucial to ensure that the water you’re removing matches the temperature and chemical composition of the water in the tank.
With these materials, you can keep your aquarium looking its best and provide a clean and healthy environment for your aquatic pets. (See Also: How Often to Run Water Filter in Aquarium: Expert Guide for Optimal Filtration)
Bucket
When it comes to making a DIY bucket, you don’t need a lot of materials. In fact, if you have a spare plastic container lying around, you’re already off to a good start! To turn it into a functional bucket, all you really need is a sturdy handle and something to cut a hole in the top large enough for it. For the handle, you can use anything from an old belt or rope to a metal wire or plastic tubing.
Just make sure it can support the weight of the bucket when it’s filled up. As for cutting the hole, a sharp utility knife or drill will do the trick. You can also use sandpaper to smooth out any rough edges.
And that’s it! With just a few simple materials, you can create a practical and versatile bucket for all your household or gardening needs. So why not give it a try and see how handy it can be? It’ll save you money and be a fun project to work on!
Net or Strainer
When it comes to making your own tea or coffee, having a good strainer or net can make all the difference in achieving the perfect cup. For a net, you’ll need to purchase some fine mesh fabric, such as food-grade nylon or cotton muslin. You’ll also need a sewing machine, thread, and a pair of fabric scissors.
Measure and cut the fabric into two equal squares, then place the edges together and sew around the perimeter, leaving a small gap to turn it right-side out. Once turned, sew the gap shut and your net is ready to use. If you prefer a strainer, there are several materials you could use, including stainless steel, mesh, or even cheesecloth.
Simply cut the material to size and place it over a cup or pot, then pour your hot liquid through. Both methods have their benefits, so it’s worth experimenting to find what works best for you and your brewing preferences.
Preparation
Changing your aquarium gravel can be a daunting task, but with the right preparation, it can be a smooth and easy process. Before you start, you need to gather all the necessary equipment. This includes a siphon, a bucket, and the replacement gravel.
To ensure that your fish are safe during the process, you should also have a separate temporary tank available. Start by removing any rocks or decorations from your aquarium. Next, using the siphon, remove as much water as possible, being careful not to suck up any fish or debris.
Then, remove the old gravel and replace it with the new gravel. After adding the new gravel, fill the tank halfway with fresh water and add back in your rocks and decorations. Finally, use the siphon to add the remaining water and check the temperature and pH levels.
With these steps, you’ll be able to change your aquarium gravel without harming your fish.
Turn Off All Equipment
When it comes to setting up for any type of audio or visual project, it’s essential to properly prepare all of your equipment beforehand. One of the most important steps is turning off all of the equipment before beginning any setup or adjustments. This may seem like common sense, but it’s easy to forget in the excitement of setting up and getting started.
Not only does turning off all equipment prevent any accidents or damage that can occur when handling electronic devices, but it also ensures that you don’t miss any important steps or settings when configuring your gear. Think of it like preparing a recipe or baking a cake – you wouldn’t skip a step or leave the oven on while preparing the batter. Same goes for setting up for any audio or visual project – take the extra few seconds to turn off all equipment before beginning.
By doing so, you’ll avoid any potential mishaps or technical difficulties and be better equipped to get the job done efficiently and with high quality results.
Drain Water into Bucket
When looking to drain water into a bucket, there are a few steps you should follow to ensure you do so efficiently and safely. First, make sure you have a sturdy container that will not tip over or spill. It’s also important to wear gloves and protective footwear in case of any splashing or spills.
Next, locate the drain valve and position the bucket underneath it. Open the valve slowly, ensuring that the water flows evenly into the container without splashing or overflowing. If the water stops flowing before the bucket is full, simply close the valve and empty the contents into another container before returning it to its original position.
By taking these simple precautions and following the correct steps, you can safely and easily drain water into a bucket without any hassle. So, whether you’re cleaning a fish tank or repairing a leaky faucet, you can rest assured that you’ll be able to handle the task with ease and peace of mind.
Remove Aquarium Decorations
Preparing to remove aquarium decorations can seem like a daunting task, especially if you have a lot of decorations to take care of. The first step is to gather all the necessary tools, including a net, clean towels or a soft sponge, and a cleaning solution. Next, you’ll need to remove any fish or other aquatic life from your tank and place them in a temporary holding tank.
Once your tank is empty, you can begin removing the decorations. Be sure to clean them thoroughly before storing them away. It’s important to be gentle with your decorations, especially if they are fragile or sensitive to rough handling.
With a little patience and care, you can successfully prepare your aquarium decorations for storage and ensure that they will be ready for use again when you need them.
Removing Old Gravel
Changing the gravel in your aquarium is an important task for maintaining a healthy environment for your fish. Removing old gravel can be a bit of a challenge, but with a few helpful tips, it can be done quickly and easily. The first step is to remove any fish, plants, or decor from the tank and place them in a separate container of aquarium water to keep them safe.
Then, using a gravel siphon or vacuum, begin to vacuum up the old gravel. Be sure to work in sections and remove as much debris as possible. Once all of the old gravel has been removed, it’s time to clean the tank thoroughly. (See Also: How to Check Water pH in Aquarium: A Step-by-Step Guide for Healthy Fish)
This is a great opportunity to scrub the tank and any decor clean, eliminating any build-up of algae or other debris. Finally, it’s time to add new gravel to the tank. Be sure to rinse the new gravel thoroughly before adding it to the tank, to remove any dust or debris.
Slowly add the new gravel to the tank, making sure to distribute it evenly. With these steps, your aquarium will look and function better than ever before!
Use Gravel Vacuum to Suck Up Old Gravel
Removing old gravel from your fish tank is an essential task that must be performed to maintain the cleanliness and hygiene of the aquarium. One of the best methods to remove the old gravel is by using a gravel vacuum. A gravel vacuum is a simple tool that sucks up the old gravel from the aquarium floor, along with the debris and dirt that has accumulated in it.
It works by creating a suction that pulls the old gravel into the vacuum’s chamber, while the debris and dirt are filtered out and held back in a separate container. To use a gravel vacuum, you will need to attach it to a water hose and place the end of the hose in a nearby sink or bucket. Once attached, submerge the vacuum into the aquarium, ensuring that it is deep enough to reach the bottom of the tank.
Next, turn on the water flow and move the vacuum across the gravel bed slowly, allowing it to suck up the old gravel. As you move the vacuum, keep an eye on the gravel level and stop once you have removed the desired amount. By using a gravel vacuum to remove the old gravel from your aquarium, you can ensure that your fish stay healthy and your tank remains clean and beautiful.
Remove Any Remaining Debris or Waste
Removing old gravel can be a messy task, and it’s important to remove any remaining debris or waste to ensure a clean and efficient installation process. Depending on the severity of the debris, you may need to use a variety of tools to effectively remove it. For large pieces of gravel, a shovel or wheelbarrow may be necessary.
For smaller debris, a broom or rake can do the trick. It’s important to take your time and be thorough when removing the old gravel, as any leftover debris can affect the performance and longevity of the new gravel. By taking the time to properly remove any remaining debris, you can ensure a successful installation that will last for years to come.
Adding New Gravel
If you’re looking to change up your aquarium’s scenery, adding new gravel can be a great way to do so. But before you start, make sure to prepare your tank. Begin by removing any fish or plants and placing them in a temporary tank filled with aquarium water.
Drain the old gravel and wash any decorations or equipment that will be going back in the tank. Once you’re ready to add new gravel, make sure you choose an appropriate size and color for your tank’s aesthetic. Wash the new gravel thoroughly before adding it to your tank.
To prevent any cloudiness in the water, use a plate or towel to gently pour the new gravel into the tank. Once it’s added, refill the tank with clean water, add back your decorations and equipment, and acclimate your fish before placing them back into their newly refreshed home. By following these steps, you can safely and easily change up your aquarium’s look by adding new gravel.
Thoroughly Rinse New Gravel with Water
When adding new gravel to your aquarium, it’s essential to thoroughly rinse it with water before placing it in the tank. This may seem unnecessary, but freshly purchased gravel can contain dust, debris, and other unwanted particles that can harm your fish and negatively impact the water quality. By rinsing the gravel, you will remove any dirt, dust, or debris that could potentially cloud your aquarium water or disrupt the ecosystem.
It’s a simple step that will ultimately benefit the health and well-being of your aquatic pets. Think of it like washing your hands before eating; it’s a small chore that can make a big difference in keeping your aquarium healthy and clean. So, take the extra few minutes to rinse off your new gravel before adding it to the tank, and your fish will thank you for it.
Add New Gravel to Aquarium
Adding new gravel to your aquarium is a beneficial task for both you and your fish. Not only does it add a fresh aesthetic to your tank, but it also enhances the quality of your aquarium’s environment. Before adding new gravel into your aquarium, it’s important to rinse it thoroughly with clean water to remove any dust or debris.
This is to ensure that the gravel doesn’t cloud the water and potentially harm your fish. Once the gravel is rinsed, you can begin adding it to your tank. Start by adding a few inches of gravel to the bottom of the tank and spread it out evenly.
Remember not to overcrowd the tank with too much gravel as this can also harm your fish. Adding new gravel also helps to prevent harmful bacteria build-up in the aquarium and creates a healthy and natural environment for your fish to thrive in. So why not switch up the look of your aquarium and enhance the quality of your fish’s living space by adding new gravel today!
Smooth Out Gravel Bed
If you’re looking to spruce up your driveway or pathways, adding new gravel is a simple and effective way to do so. However, before you lay down the new gravel, it’s important to smooth out the existing gravel bed. This will not only help create a more level surface, but it will also help prevent the new gravel from shifting and sinking in certain areas.
To smooth out the gravel bed, first remove any weeds or debris that may be present. Then, use a rake to even out the surface and remove any large bumps or uneven areas. If your gravel bed is particularly uneven, you may want to consider using a special tool called a gravel rake, which is specifically designed to level out gravel.
Once your gravel bed is evened out, you can begin adding your new gravel. Make sure to lay it down in even layers, and use a tamper or roller to compact it as you go. This will help create a more stable and durable surface that will stand up to foot traffic and weathering.
Overall, adding new gravel can be a great way to improve the appearance and functionality of your outdoor spaces. By taking the time to smooth out your existing gravel bed, you can ensure that your new gravel stays in place and creates a beautiful, level surface for years to come.
Re-Assembling Your Aquarium
Changing the gravel in your aquarium can be a daunting task, but re-assembling it doesn’t have to be. Once you’ve removed the old gravel and added the new substrate, it’s time to start putting everything back together. Start by rinsing off any decorations or plants that were removed during the gravel change.
Next, place them back into the tank where you want them to go. Then, slowly pour in the new gravel, making sure to distribute it evenly across the bottom of the tank. Once all the gravel is in place, it’s time to fill the tank up with water.
Before adding any fish, make sure to let the water filter and aerate for at least a day or two until it’s clear and odorless. With your new gravel in place, your aquarium will have a fresh start and a brand new look. Just remember to always research how to properly care for your fish and their habitat, as different types of fish and plants have different needs. (See Also: How to Make Driftwood Aquarium Safe: A Step-by-Step Guide)
Replace Decorations
As you assemble your aquarium after cleaning it, one way to give it a fresh new look is to replace decorations. Sometimes, adding new plants, stones, or driftwood can make a tremendous difference in the overall appearance of your tank. You can go for a subtle look with a few simple plants and stones or make a bold statement with a new ornament or piece of driftwood.
The possibilities are endless, but keep in mind the needs of your fish and other inhabitants. While your aquarium’s look is important, so is the well-being of your aquatic friends. Consider their natural habitat when selecting new decorations.
For instance, if they are from a river with lots of rocks, you can incorporate some stones into your design. If they come from a densely planted area, you may want to add more plants to their home. Don’t be afraid to get creative and experiment with different designs until you find one that suits both you and your aquatic buddies.
Replacing decorations is a fantastic way to enhance the aesthetic appeal of your aquarium while keeping your fish’s health in mind.
Refill with Water
When it comes to re-assembling your aquarium after cleaning or maintenance, it’s important to refill it with water properly to ensure the safety and health of your aquatic pets. Start by adding a dechlorinator to the water to remove any harmful chemicals that may be present. Then, begin filling the tank slowly to prevent any rocks or decorations from shifting and causing damage to your tank or inhabitants.
You may want to use a plate or plastic bag to diffuse the flow of water and prevent any disturbances. Keep an eye on the water level as you fill, and stop when it reaches the recommended level for your tank. Once your tank is filled, turn on your filtration system and heater and allow the water to circulate for several hours before adding any fish or other inhabitants.
By taking care to properly refill your aquarium with water, you can ensure a safe and comfortable environment for your aquatic pets.
Turn on All Equipment and Monitor Water Quality
When it comes to re-assembling your aquarium, one of the most important steps is to turn on all equipment and monitor water quality. This is crucial in ensuring that your fish and other aquatic creatures have a healthy and suitable environment to thrive in. Before adding any fish, plants, or decorations, turn on your filter, heater, and any other necessary equipment.
Check the water parameters using a test kit to ensure that the levels of ammonia, nitrite, nitrate, pH, and temperature are within the appropriate range for your specific species of fish and plants. If anything is outside of the desired range, make the necessary adjustments before introducing any aquatic creatures. Remember, taking the time to properly set up your aquarium will pay off in the long run by promoting the health and well-being of your aquatic pets.
Conclusion
Changing your aquarium gravel can be a daunting task, but with a little patience and some know-how, it can be done with ease. Remember to choose the right type of gravel for your fish and make sure to clean it properly before adding it to your tank. Just like organizing your closet, changing your aquarium gravel can give your tank a fresh, new look and keep your fish happy and healthy.
So grab your gloves and get ready to rock your aquarium maintenance game!”
FAQs
Why should I change my aquarium gravel?
Changing your aquarium gravel is important for maintaining water quality and removing accumulated waste and debris.
What supplies do I need to change my aquarium gravel?
To change your aquarium gravel, you will need a siphon or gravel vacuum, a bucket, and new gravel to replace the old substrate.
How often should I change my aquarium gravel?
It is recommended to change your aquarium gravel every 6-12 months. However, if you have a heavily stocked tank, you may need to change it more frequently.
Can I reuse my old aquarium gravel?
It is not recommended to reuse old aquarium gravel as it may contain harmful bacteria or accumulated waste. It is best to replace it with new gravel.
How do I clean my aquarium gravel before changing it?
You can clean your aquarium gravel by rinsing it with warm water and using a gravel vacuum to remove any debris. Alternatively, you can soak it in a solution of water and aquarium-safe cleaner.
How much new gravel should I add to my aquarium?
It is recommended to add 1-2 pounds of gravel per gallon of water in your aquarium. Make sure the gravel is evenly distributed and not piled up in one area.
Do I need to remove my fish from the tank to change the gravel?
It is not necessary to remove your fish from the tank when changing the gravel, but it can make the process easier. If you do leave the fish in the tank, be careful not to disturb them or stress them out with too much activity.

