Do you have a cloudy acrylic aquarium? If so, then you understand the frustration that comes with trying to clean it. It’s important to keep your aquarium clean not just for aesthetic reasons but for the health of your aquatic pets. Unclear water can negatively impact their wellbeing and even lead to disease.
But don’t fret, cleaning a cloudy acrylic aquarium is easier than you might think. With a few simple steps and some handy tips and techniques, you can have a clear and healthy tank in no time. So, let’s dive in and learn how to clean your cloudy acrylic aquarium like a pro.
What Causes Cloudy Acrylic Aquariums?
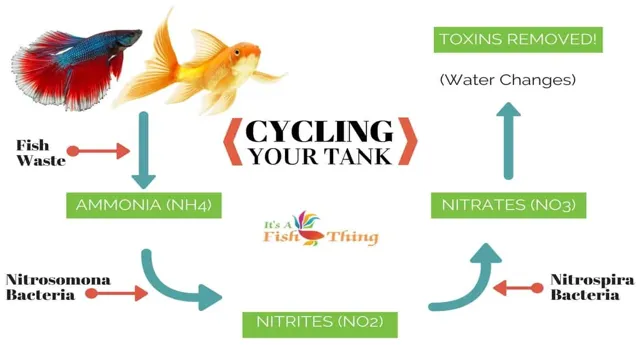
Cleaning a cloudy acrylic aquarium can be a frustrating and challenging task for many fish tank enthusiasts. The primary cause of cloudy acrylic aquariums is a build-up of organic waste, such as uneaten food, fish excrement, and decaying plant matter. High levels of nitrates and phosphates in the water can also lead to algae growth, making the water murky.
To clean a cloudy acrylic aquarium, one should start by removing any debris from the tank and replacing dirty or clogged filters. One can also consider using a water clarifier or algae remover to improve water clarity. It is important to avoid using abrasive cleaning tools, as they can scratch and damage the acrylic, making it even more difficult to clean.
Regular water changes can also help prevent the build-up of organic waste and keep the water clean and clear. By following these simple steps, one can maintain a healthy and beautiful aquarium for their aquatic pets to thrive.
Excess Food or Organic Waste
Excess food or organic waste are common causes of water cloudiness in acrylic aquariums. When too much uneaten food and waste products accumulate in the tank, they break down and release various compounds that cloud the water. This can be harmful to the aquatic life in the tank, as the reduced clarity can hinder light penetration and diminish the effectiveness of biological filtration systems.
To address this issue, it is important to feed the fish in moderation and remove any uneaten food immediately after feeding. Additionally, performing regular water changes and using a high-quality filtration system can help eliminate excess organic waste and prevent cloudy water in your aquarium. By taking these measures, you can maintain a clean and healthy environment for your fish to thrive in.
Improper Filtration
Improper filtration is one of the leading causes of cloudy acrylic aquariums. When the filtration system is not able to keep up with the waste produced by fish and plants, it can lead to an excess of debris circulating in the water. This can cause the water to become murky and cloudy, making it difficult to see inside the aquarium.
To prevent this issue, it is important to ensure that the filtration system is properly sized for the aquarium and that the filter media is regularly cleaned and replaced. Additionally, regular water changes and proper feeding habits can also help to reduce waste and keep the water clear. By taking these steps, aquarium owners can keep their acrylic tanks crystal clear and their fish healthy and happy.
Mineral Buildup
Acrylic aquariums are a popular choice for fish enthusiasts due to their crystal-clear visibility. However, over time, mineral buildup can cause cloudy water, which hinders the view of the fish inside. Mineral buildup occurs due to the accumulation of calcium and phosphate deposits, which are commonly found in tap water.
When these minerals mix with other organic matter in the aquarium, they form a white film that adheres to the walls and equipment of the tank. This film slowly builds up over time, eventually obstructing clear visibility into the tank. To prevent this, it’s necessary to conduct routine water changes and maintenance to remove any excess minerals from the aquarium water.
In addition, regular equipment cleaning can help reduce the accumulation of mineral buildup. By taking these simple preventative measures, you can help maintain your acrylic aquarium’s crystal-clear view and your fish’s wellbeing.
Tools You’ll Need
If you’re battling a cloudy acrylic aquarium, there are a few tools you’ll need to get started. First and foremost, you’ll need a clean aquarium scrubber or sponge to tackle the grime. It’s important to avoid using any harsh chemicals or abrasive materials that could damage your acrylic panels.
A small bucket or basin can be handy to mix and hold your cleaning solution. You’ll also want to gather some warm water and clear dish soap to help break down the dirt and oil buildup. In addition, a clean cloth or paper towel can help dry and buff the aquarium after cleaning.
For particularly stubborn areas, a specialized aquarium cleaner or polish may be necessary. Overall, with a little elbow grease and the right tools, you can restore your aquarium to its crystal clear glory.
Large Bucket
If you’re planning on doing some serious gardening or landscaping, then a large bucket is a must-have tool. This versatile piece of equipment can be used for everything from hauling dirt to transporting plants. But before you start using it, there are a few essential tools you’ll need to have on hand.
Firstly, a sturdy pair of gloves is a must-have to protect your hands from any sharp or rough edges on the bucket. You’ll also need a scoop or shovel to help fill the bucket with soil, gravel or whatever you need to transport. Another handy tool is a funnel, which can be used to easily fill the bucket with water or transport liquids.
Finally, consider investing in a dolly or cart to help move the bucket around without straining your back. With these tools on hand, you’ll be able to make the most of your large bucket and tackle any gardening or landscaping project with ease.
White Vinegar
When it comes to using white vinegar for cleaning, you don’t need a lot of fancy tools. In fact, most of the items you’ll need are probably already sitting in your cleaning supply bin. First and foremost, you’ll need a good spray bottle.
Look for one that has a fine mist setting so that you can evenly distribute the vinegar solution on whatever surface you’re cleaning. You’ll also want a few clean, lint-free cloths or rags to wipe away any dirt or grime. A scrub brush or toothbrush can be useful for tougher stains, and a bucket of warm water will help you rinse away any leftover vinegar residue. (See Also: How to Decorate Your Aquarium with Driftwood: Tips and Ideas)
With these simple tools, you’ll be able to tackle just about any cleaning task with ease, thanks to the power of white vinegar.
Sponge or Non-Abrasive Scrubber
When it comes to cleaning dishes, having the right tools is essential. One of the most important tools you’ll need is a sponge or non-abrasive scrubber. The type of sponge or scrubber you choose will depend on the type of dishes you’re cleaning and how dirty they are.
If you’re dealing with stubborn grease and grime, you may want to opt for a non-abrasive scrubber. These are usually made from nylon or polyester and are gentle enough to use on delicate surfaces. On the other hand, if you’re dealing with dishes that are not heavily soiled, a sponge would suffice.
A sponge is a more versatile tool and can be used to clean a variety of surfaces. The key to using a sponge or scrubber correctly is to use them with the right cleaning solution. Always make sure to apply enough detergent or dish soap to help break down grease and other residue.
Remember to rinse your sponge or scrubber thoroughly after use to prevent the growth of bacteria and mildew. By using the right tools, you can ensure that your dishes are always clean and hygienic.
Soft Towels
Soft towels are a must-have in any bathroom. They provide a cozy feeling and offer a gentle touch that can make any shower or bath feel luxurious. However, to ensure that your towels stay soft, you need to take some steps to keep them fresh and fluffy.
To start with, you need to invest in the right towel washing tools. This includes a gentle laundry detergent that won’t damage the fabric, and fabric softer to maintain their softness. Additionally, it’s essential to use the right washing machine settings.
A lower spin speed will prevent your towels from getting tangled, which also helps to maintain their softness. Lastly, avoid drying your towels on high heat as this can damage the fibers and make them feel scratchy. Set the dryer to a low heat setting or better yet, hang them out to dry in the sun.
By following these simple tips, you can be sure that your soft towels stay that way for a long time.
Step-by-Step Cleaning Process
Have you ever looked into your acrylic aquarium and realized it’s looking a bit cloudy? Cleaning an acrylic aquarium might seem daunting, but with a step-by-step process, it can be easily done. The first step is to remove all decorations, plants, and gravel from the tank and put them in a clean bucket. Next, use an algae scraper or magnetic cleaner to remove any algae buildup on the walls and bottom of the tank.
Then, using a clean cloth or sponge and warm water, wipe down the tank’s interior to remove any leftover debris. Once this is done, fill the tank with fresh water and add a specific acrylic-safe aquarium cleaner, following the instructions on the bottle carefully. After letting the cleaner sit for the recommended amount of time, drain and give the tank a thorough rinse.
Don’t forget to rinse the decorations, plants, and gravel before adding them back into the clean tank. With these simple steps, your acrylic aquarium will shine like new, and your fish will thank you!
Remove Fish and Water from Tank
When it comes to cleaning your fish tank, it’s important to have a step-by-step process to ensure everything is done correctly and efficiently. The first and most crucial step is to remove the fish and water from the tank. You don’t want to risk hurting your fish or damaging any equipment in the tank during the cleaning process.
Start by placing your fish in a temporary holding tank with fresh water that is of the same temperature and pH level as their original tank. This will ensure that they stay safe and healthy during the cleaning process. Once the fish are removed, it’s time to remove the water from the tank.
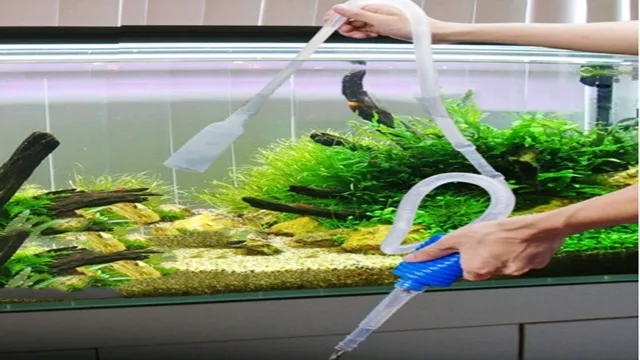
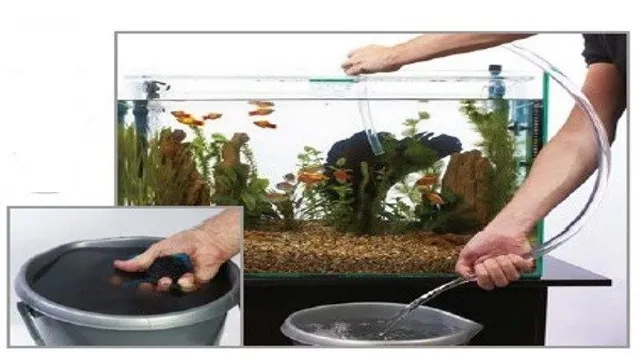
Make sure you have the necessary equipment to do this, such as a siphon or a water pump. This will help you remove the water quickly and efficiently without the need for a bucket or any strenuous effort. Once you have removed the water, you can move on to cleaning the tank and equipment before adding fresh water and returning your fish to their home.
By taking these necessary steps, you’ll ensure that your fish are safe and happy in a clean and healthy environment.
Mix Water and Vinegar in a Bucket
When it comes to cleaning, vinegar and water are an unbeatable combination. Follow these simple steps to create your own cleaning solution. First, find a bucket that is large enough to hold all the supplies you need.
Fill it with water and add vinegar in a ratio of 1: Mix the two ingredients well until they are fully combined. This mixture, unlike some other cleaning products, is safe to use on most surfaces and won’t damage the finish.
Once you have your cleaning solution ready, it’s time to get to work. Dip a cloth or sponge into the solution and wring out any excess liquid. Then, start wiping down surfaces like countertops, floors, and bathroom fixtures. (See Also: How to Convert an Aquarium into a Crested Gecko Terrarium: A Step-by-Step Guide)
For tough stains and grime, let the solution sit for a few minutes before wiping it clean. When you’re finished, rinse the surface with water to remove any remaining vinegar residue. By using vinegar and water, you’re not only saving money, but you’re also avoiding harmful chemicals that can harm both you and the environment.
Plus, vinegar is a natural disinfectant that kills bacteria and viruses, making it an ideal cleaning solution for households with kids and pets. So next time you need to clean and disinfect your home, consider using this simple and effective vinegar and water mixture. Your home will smell fresh, be free of harmful chemicals, and you’ll feel good about helping the environment.
Soak Scrubber in Mixture and Clean Tank Walls
When it comes to cleaning your tank, it’s essential to follow a step-by-step process to ensure everything is done correctly. One crucial step is to soak the scrubber in the mixture and clean the tank walls thoroughly. This step helps get rid of dirt and grime that may have accumulated over time.
To do this, mix warm water with a cleaner solution, such as vinegar or bleach, in a container. Ensure that the mixture is strong enough to clean the tank walls effectively, but not too strong that it harms any fish or plants in your tank. Then, take the scrubber and dip it into the mixture.
With gentle yet firm strokes, scrub the walls of the tank in a circular motion. Be sure to pay extra attention to areas that may be particularly dirty, such as corners or where the filter is located. Once you are done, rinse the tank walls thoroughly with clean water.
This step is crucial as it helps remove any residue left behind by the cleaning solution. By following this step-by-step process, you can rest assured that your tank is clean and safe for your fish to swim in.
Rinse Tank Thoroughly with Clean Water
After completing the initial cleaning process of your rinse tank, it’s crucial to maintain its hygiene by rinsing it with clean water. This step may seem simple, but it’s necessary to avoid contamination and ensure the longevity of your tank. You don’t want any residue or cleaning solution to be left behind, as this could potentially harm your fish or plants.
So, take some time to fill up your tank with fresh water and vigorously rinse it out. Be sure to pay attention to the corners, edges, and any other hard-to-reach areas. A good rinse should take care of any remaining debris.
Once you’ve finished, take a moment to double-check that your tank is free of any soap or cleaning solution before refilling it with fresh water. This step is a small but essential part of keeping your rinse tank in excellent condition for long-term use.
Maintenance Tips to Keep Your Acrylic Aquarium Clean and Clear
Keeping your acrylic aquarium clean and clear requires a bit of maintenance effort, but it doesn’t have to be a daunting task. One of the most common issues aquarium owners face is cloudy water, which can be caused by a variety of factors such as overfeeding, poor filtration, and inadequate cleaning. To start, ensure you are feeding your fish the appropriate amount of food and not overdoing it.
Additionally, it’s crucial to have a reliable and efficient filter system that can handle the size of your aquarium and remove any excess debris. Regular cleaning is also essential and involves removing any debris and algae buildup from the tank walls and decorations. When cleaning, avoid using harsh chemicals or abrasive scrubbers that could scratch the acrylic surface.
Instead, use a designated aquarium cleaner recommended for acrylic tanks. Lastly, consider the placement of your aquarium. Direct sunlight or a heat source can cause temperature fluctuations and encourage the growth of algae.
With proper care and maintenance, you can keep your acrylic aquarium looking clear and beautiful for years to come.
Avoid Overfeeding Fish
If you’re a proud owner of an acrylic aquarium, then you know how important it is to keep it clean and clear. To avoid problems in the future, it’s essential that you maintain your tank regularly. One of the things you should keep in mind is not to overfeed your fish.
While it’s tempting to give them more food, it can lead to a buildup of waste, which can cause algae formation and cloudiness in your tank. Additionally, overfeeding can lead to obesity and health problems for your fish, just like it would for humans. Make sure to feed them small amounts of food several times a day rather than one large feeding.
This technique prevents any excess food from settling at the bottom and causing issues. By taking small steps to ensure a healthy and clean environment, your fish will thrive, and you’ll get to enjoy watching them for years to come.
Invest in Proper Filtration System
Acrylic aquariums are an exquisite addition to any household, providing a fascinating insight into the underwater world. However, keeping them clean and clear requires some effort on your part. One of the essential factors to consider is investing in a proper filtration system.
These systems help to maintain a healthy environment for your aquarium’s inhabitants by removing waste, toxins, and bacteria from the water, leaving it clean and clear. Proper filtration helps to reduce the number of harmful pollutants present in the water, extending the lifespan of your aquarium’s inhabitants. An essential feature of filtration systems is the size of the filter; for instance, a larger aquarium would require a more extensive filter to keep up with the water volume. (See Also: How to Breed Aquarium Sharks: Essential Tips for Successful Shark Breeding)
Remember to clean your filter regularly to ensure it functions efficiently, preventing clogs that may affect the water quality. Investing in a quality filtration system will help you maintain the clarity and cleanliness of your acrylic aquarium, allowing you to enjoy it throughout the year.
Regular Water Changes and Algae Cleaning
Regular water changes and algae cleaning are crucial for maintaining the health and clarity of your acrylic aquarium. Algae growth can quickly turn your aquarium into a murky mess, detracting from the beauty of the fish and plants living inside. To prevent this from happening, you should clean the aquarium glass regularly.
For moderate algae growth, monthly cleanings should suffice. However, if you begin to see excessive buildup, you may need to clean it more frequently. A scraper designed for acrylic tanks and a soft cloth will do the job without causing any damage.
In addition to cleaning the glass, you should perform regular water changes to replace old water with fresh, clean water. This simple maintenance tip is key to keeping the water chemistry stable, which promotes the health and well-being of your aquatic pets. The keyword for this article is “Acrylic aquarium clean.
“
Use Mineral Reducing Additives as Needed
Maintaining an acrylic aquarium requires proper care and attention to keep it clean and clear. One effective way to ensure optimal water quality is by using mineral reducing additives. These additives help control the buildup of minerals, such as calcium and magnesium, which can lead to unsightly deposits and cloudiness.
By using mineral reducing additives as needed, you can maintain optimal water chemistry and ensure that your fish and other aquatic life remain healthy and thriving. Additionally, regular water changes and filter cleanings are crucial to keeping your acrylic aquarium in pristine condition. By following these maintenance tips, you can enjoy a beautiful and healthy aquatic environment for years to come.
Conclusion
In conclusion, cleaning a cloudy acrylic aquarium can seem like a daunting task, but with a bit of elbow grease and a few clever hacks, you can have a crystal-clear tank in no time. Remember to avoid harsh chemicals and abrasive tools, opt for a natural approach with vinegar and water, and invest in a high-quality aquarium scrubber. And if all else fails, take a page from the ocean’s book and get some friendly aquatic critters to do the cleaning for you! Your fish will thank you, and your guests will be impressed by your sparkling aquatic oasis.
“
FAQs
What causes cloudiness in acrylic aquariums?
Cloudiness in acrylic aquariums can be caused by a number of factors, including overfeeding, the buildup of waste and debris, and an imbalance in the aquarium’s ecosystem.
Can I use soap or cleaning products to clean my acrylic aquarium?
No, you should never use soap or cleaning products on an acrylic aquarium, as they can damage the material and harm your aquatic pets.
What is the best way to clean a cloudy acrylic aquarium?
The best way to clean a cloudy acrylic aquarium is to perform a partial water change, vacuum the gravel and decorations, and scrub the walls with a clean, soft cloth or sponge.
How often should I clean my acrylic aquarium?
You should perform regular maintenance on your acrylic aquarium, including partial water changes and cleaning the gravel and decorations, every two to four weeks.
What can I do to prevent cloudiness in my acrylic aquarium?
To prevent cloudiness in your acrylic aquarium, you should avoid overfeeding your pets, maintain a proper balance of fish and plants, and perform regular water changes and cleanings.
Can I use a commercial aquarium cleaner on my cloudy acrylic aquarium?
It is generally not recommended to use a commercial aquarium cleaner on a cloudy acrylic aquarium, as these products can often contain harsh chemicals that can harm your pets and damage the acrylic material.
How long does it take for a cloudy acrylic aquarium to clear up?
The time it takes for a cloudy acrylic aquarium to clear up can vary depending on the severity of the cloudiness and the steps taken to clean and maintain the aquarium. In some cases, it may take a few days to a week for the cloudiness to dissipate.

