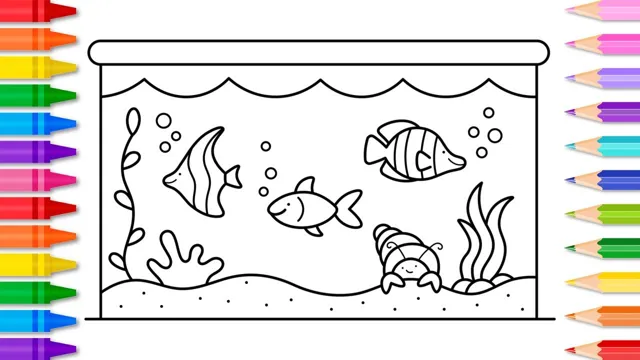
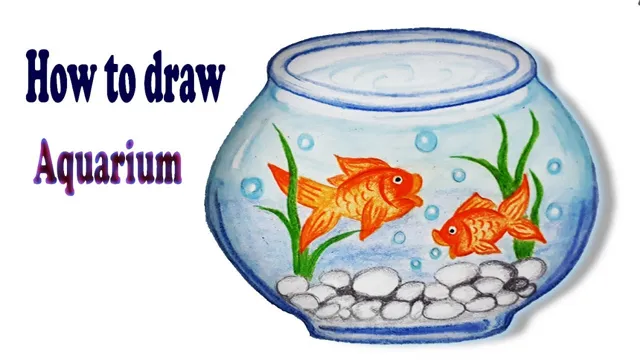
Have you ever wanted to create your own underwater world right at home? Drawing a fish aquarium is a fun and easy way to let your imagination swim wild. It may seem daunting at first, but fear not! With a few simple steps, you can create a beautiful fish aquarium that will make you feel like a true artist. First, start by drawing the outline of your aquarium on the paper.
You can make it as big or small as you like, and you can choose any shape, from a traditional rectangular shape to a more unique design. Then, it’s time to bring your aquarium to life! Start by drawing the gravel on the bottom, then add rocks, plants, and decorations. Now for the real fun – drawing the fish! Start with the biggest fish and work your way down to the smaller ones.
Don’t forget to add details like fins, scales, and eyes. Once you’re happy with your fish, add some bubbles and other details to make your aquarium look more realistic. With these simple steps, you can easily draw a beautiful fish aquarium.
And the best part? You get to create your own fish and design the aquarium exactly as you want it. So, dive in and let your creativity flow!
Materials Needed
If you’re looking to draw a fish aquarium, there are a few materials you’ll need to get started. First and foremost, you’ll need some paper and a set of pencils or colored pencils. You can use any type of paper, but a heavier weight paper works best with colored pencils.
Next, you’ll want to gather some reference material to use as a guide. You can find pictures of fish aquariums in books or online, or you can visit a local aquarium for inspiration. Once you have your materials ready, start sketching out the basic shape of the aquarium and then add in the fish and decorations.
It’s important to take your time and work on each element one at a time, building up the details and textures gradually. With a bit of practice and patience, you can create a beautiful and realistic fish aquarium drawing that will impress your friends and family.
Pencil
When it comes to creating art or simply jotting down notes, a pencil is a reliable and versatile tool to have on hand. To start, you’ll need some high-quality pencils with a variety of lead hardness. I recommend investing in a pack with at least HB, 2B, and 4B lead options.
You’ll also need a sharpener that’s specifically designed for pencils to ensure the lead stays intact and doesn’t break off. If you’re using pencils for art, consider also getting an eraser designed for artists, as it will be much gentler on the paper. Additionally, it’s helpful to have a sketchbook or paper specifically designed for use with pencils, so that the lead doesn’t smudge or bleed too easily.
Don’t forget to keep all of your materials organized and easily accessible, so that you can quickly grab what you need when inspiration strikes. With the right materials on hand, a pencil can unlock a world of creativity.
Marker or Pen
When it comes to writing, the age-old question still lingers: marker or pen? While both have their own advantages and disadvantages, choosing between them comes down to personal preference and the task at hand. Markers are great for writing on surfaces such as whiteboards and blackboards. They usually have a larger tip size, making them more visible from a distance.
They also come in a variety of colors, allowing for more creativity. However, markers tend to dry out faster and can bleed through thinner paper. On the other hand, pens are ideal for writing on regular paper.
They usually have a smaller tip size, allowing for more precise writing. They also tend to last longer and don’t bleed through paper as easily. However, pens can be more difficult to see from a distance and come in a limited range of colors.
Ultimately, the choice between marker or pen depends on the task at hand and personal preference.
Paper
When it comes to creating art or crafting, having the right materials is crucial. For those working with paper, there are a few essential items to keep on hand. Firstly, a good quality cutting tool such as scissors or a craft knife is a must-have.
A cutting mat is also handy to protect surfaces and provide a clean, sharp edge while cutting. Next, adhesive materials such as glue, tape, or double-sided tape are great for holding paper together or adding embellishments. For those who are looking to add color to their paper projects, markers, colored pencils, and watercolors work well to bring designs to life.
Additionally, cardstock or heavier weight paper should be considered for projects that require more durability. All of these materials can be found at local crafting stores or online retailers, making it easy for anyone to get started with their paper-based projects.
Step 1: Drawing the Tank
If you’re wondering how to draw a fish aquarium easy, the first step is to draw the tank itself. Start by drawing a rectangle on your paper to represent the glass walls of the tank. Then, add a curved line at the top to represent the waterline.
Next, draw a small rectangle at the top, which will be the opening for feeding the fish. To create the base of the tank, add another rectangle below the glass walls. And lastly, add some details like a filter, plants, and rocks to make your aquarium look realistic.
Don’t forget to add fish swimming around in the tank once you’ve finished drawing it. With a little bit of practice, you’ll soon be able to draw an aquarium with ease!
Draw a rectangle for the tank.
If you’re looking to draw a tank, the first step is to draw the rectangular shape of the body. You can start by drawing two parallel lines that are about the same length. These will become the top and bottom edges of the tank.
Then, draw two more parallel lines on each side, connecting the top and bottom lines. This will give you the basic outline for the tank’s body. Make sure the lines are straight and evenly spaced to create a rectangular shape. (See Also: How to Lower Saltwater Aquarium Temperature: Tips and Tricks for Keeping Your Fish Cool)
Remember, the tank’s size will depend on the scale you’re drawing it in. With this simple step, you’re well on your way to creating a realistic tank drawing. Get creative with the design, add some details to make it look even more impressive, and have fun with it!
Add a curved line for the top and bottom of the tank.
When drawing a tank, one of the first steps is to add a curved line for the top and bottom of the tank. This is essential to creating a realistic-looking tank that accurately represents its shape. To achieve this, start by sketching a horizontal line for the bottom of the tank.
Then, add two upward sloping lines that meet at a point, forming the front of the tank. From there, draw a curved line that connects the two front corners of the tank, representing the tank’s top. Next, draw another curved line that connects the back corners of the tank, representing the tank’s bottom.
By incorporating these curved lines, you’ll be able to add dimension and character to your tank drawing. Remember to keep practicing and experimenting with different techniques to achieve the desired effect.
Step 2: Adding the Water
Once you’ve got your outline drawn, it’s time to start adding the water to your fish aquarium drawing! This step is relatively simple, but it can also be one of the most satisfying parts of the process. First, start by drawing a wavy line at the bottom of your aquarium to represent the substrate. Then, draw a straight line at the top of your aquarium to represent the water level.
From there, you can start adding in the details of the water, such as bubbles, plants, and rocks. Remember to use the reference image you chose earlier for inspiration. As you’re drawing, think about the movement of the water and how it interacts with the different elements in your aquarium.
Don’t be afraid to play around with different textures and shading techniques to create depth and dimensionality. With a bit of patience and practice, you’ll have a beautiful fish aquarium drawing in no time!
Draw wavy lines to show the water in the tank.
In step 2 of the process to create a tank drawing, we’ll add water to make it more realistic. To do this, we’ll draw wavy lines within the tank to represent the water. You can use curved, fluid lines that mimic the look of actual liquid.
Don’t worry about making them straight or perfectly uniform – water seldom sits still, after all. Instead, aim for a slightly chaotic pattern that mimics the way water looks when it moves. You can also try adding bubbles or waves to give the water added depth and texture.
Overall, this step is all about making your tank drawing look as realistic as possible. By adding water, you’re taking your artwork to the next level and creating an image that truly pops. So go ahead and give it a try – with a little patience and practice, you’ll be able to make your tank look like it’s filled to the brim.
Add bubbles and ripples for a realistic look.
Adding water to a 3D scene is an important aspect to create a realistic look. When doing this, it’s essential to add bubbles and ripples to the water surface. This will give it a more natural appearance and make it seem like it’s in motion.
One way to add bubbles is by using the particle system. You can set the size and density of the bubbles to your preference to ensure they look convincing. You can also add ripples by utilizing the displacement map in your 3D modeling software.
This will create wave-like deformations on the water surface, making it look like it’s moving. It’s important to remember that the size and frequency of the ripples will be dependent on the scale of the water surface. With these techniques, you can easily add water that looks like it’s in motion and livens up your 3D scene.
Step 3: Adding the Fish
Now for the fun part – adding the fish to your drawing! To make the process of creating your fish aquarium easy, start by sketching the shapes of your fish with a pencil. Using different sizes and shapes of fish will create a more dynamic and interesting aquarium. Next, add details such as fins and patterns to your fish.
To give your fish a more three-dimensional look, add shadows and highlights to suggest the way light would fall on them in the water. Don’t forget to add plants and decorations to your aquarium too! You can create all sorts of interesting textures by using different shades of greens and browns for the plants, and rocks and coral can provide a fun contrast to the softer shapes of the fish. With a bit of patience and creativity, you can create a fantastic fish aquarium drawing that will make you feel like you’re under the sea.
So keep experimenting and have fun with your artwork!
Draw the fish using basic shapes like triangles and circles.
When it comes to drawing a fish, it’s important to break it down into basic shapes like triangles and circles. By doing this, the process becomes much less daunting and you’ll end up with a fish that looks recognizable. Start by drawing an oval for the body of the fish and add a triangle for the tail.
Draw two circles for the eyes and add a smaller circle inside each one for the pupils. Use a curved line for the mouth and add some fins using triangular shapes. Keep in mind that you can always adjust the size and shape of the basic shapes to create the look you want.
Don’t worry if it looks a little wonky at first, with a bit of refinement and adding details, you’ll be able to create a fish that looks like it’s swimming right off the page!
Add details like stripes, fins, and eyes.
Now that you have the basic fish shape, it’s time to add some details that will really make it pop! To start with, you can add stripes or spots along the body of your fish. These can be any color you like and can be as thick or thin as you want them to be. Another fun touch is to add some fins, either on the top or bottom of your fish.
These can be simple triangle shapes or more elaborate designs, depending on your preference. Finally, don’t forget the eyes! Adding eyes will bring your fish to life and really make it look like it’s swimming around in the ocean. You can make them large and cartoonish or small and realistic, depending on the overall style of your drawing. (See Also: How to Build an Overflow Box for Aquarium: A Step-by-Step Guide for Beginners)
With these details added, your fish is sure to be a colorful and eye-catching addition to any piece of art!
Step 4: Adding Plants and Decorations
Now that you’ve laid out the basic structure of your aquarium, it’s time to add some life to it! Adding plants and decorations not only makes your tank look more visually appealing but also creates a healthier environment for your fish to live in. When it comes to drawing plants, you can choose from a wide variety of shapes and sizes based on the type of environment you want to create. A popular option is to draw some tall grass or reeds, which will provide your fish with some hiding places and make the tank look more natural.
You can also add in some rocks, caves, or tree branches to give your aquarium some texture and provide your fish with some spots to explore. These can be drawn with some simple lines and shading to create depth. As you draw, remember to keep in mind the placement of your fish and their swimming patterns, so you can create a balanced and functional layout that will serve both the fish and the viewer.
Adding plants and decorations is the next step in creating a beautiful, vibrant aquarium, so let your creativity flow!
Draw plants and decorations using curved lines and basic shapes.
When it comes to adding the finishing touches to your doodle, plants and decorations are the perfect way to bring it to life. By using curved lines and basic shapes, you can draw everything from potted plants to hanging vines with ease. Try drawing simple silhouettes of flowers using basic shapes like circles, ovals and triangles.
For more complex plants, break them down into smaller shapes and add details such as leaves and stems. You can also add decorations to your drawing, such as lanterns, tassels or even a birdhouse. The possibilities are endless, and by incorporating plants and decorations into your doodles, you can create a whimsical and inviting scene that is entirely your own.
So grab your pen and let your imagination run wild!
Add color to the plants and decorations.
Adding plants and decorations to your space can truly elevate the overall ambiance and aesthetic. But don’t just stop there! To make your plants and decor pop, try adding some color into the mix. You can choose vibrant, contrasting hues or stick to a more muted color scheme.
Either way, adding a pop of color can make a big difference in how your space looks and feels. Consider adding a colorful planter or vase, or even painting a piece of furniture or accent wall. This will create visual interest and add personality to your space.
Don’t be afraid to mix and match different colors and patterns – just be sure to keep it cohesive. The addition of color can truly turn your space into a beautiful haven that’s not only visually appealing but also enjoyable to spend time in.
Step 5: Adding Shadows and Highlights
Now that the basic fish aquarium is drawn, it’s time to add some depth by incorporating shadows and highlights. Utilize a light source, such as a lamp or the sun, to determine where the shadows and highlights should be. Shadows should fall on the opposite side of the light source, while highlights should be on the same side where the light hits.
Start by making the shadows darker on the bottom of the tank and lighter towards the top. Conversely, highlights should be lighter on the top and gradually get darker towards the bottom. Blend the colors together to create a seamless transition.
By adding shadows and highlights, the fish aquarium will become more realistic and engaging. And with that step done, your easy-to-draw fish aquarium is complete!
Add shading to show where the light source is coming from.
When it comes to creating realistic artwork, adding shadows and highlights is essential. It is especially important to add shading to indicate the direction of the light source. By doing so, you create a more three-dimensional appearance to your artwork, making it more visually interesting.
To achieve this effect, you need to determine where the light source is coming from in relation to your subject. Then, add shading to the opposite side of the object from where the light source is. This will create a shadow effect, indicating that the object is blocking the light.
On the opposite side of the object, add highlights to show where the light is hitting the object directly. This technique can be applied to any medium, whether it is digital or traditional. By mastering the art of adding shadows and highlights, you can take your artwork to a whole new level of realism and depth.
Add highlights to make the image pop.
When it comes to editing photos, adding shadows and highlights can make a big difference in the overall aesthetic. Shadows create depth and dimension, while highlights provide a pop of brightness and contrast. As a result, your image can look more dynamic and visually appealing.
To add highlights, start by selecting the area you want to highlight with the lasso or brush tool. Then, create a new layer and fill it with white. Change the blending mode to ‘overlay’ or ‘soft light’, and adjust the opacity to your desired level.
For shadows, repeat the same process, but use a dark shade instead of white. By adjusting the opacity, you can control the intensity of the shadow without making it too overpowering. Overall, adding shadows and highlights is a simple yet effective way to enhance your photos and make them stand out from the crowd.
Final Thoughts
In conclusion, learning how to draw fish aquariums can be a fun and fulfilling experience. Start by sketching the fish and the plants that will be in the tank. Then, add details such as rocks, bubbles, and other decorations to bring the drawing to life. (See Also: How to Breed Tilapia in Aquarium Like a Pro: Tips and Techniques)
Don’t forget to add shadows and shading to create depth and dimension. Overall, the key to creating an easy-to-draw fish aquarium is to take your time and pay attention to the details. With practice, you’ll soon be able to create beautiful and realistic fish tanks that will impress your friends and family.
So, grab a pencil, some paper, and let your imagination run wild as you dive into the world of fish aquarium drawing!
Practice is key to becoming a better artist.
As the saying goes, practice makes perfect. This applies to every field, and art is no exception. If you want to become a better artist, you have to put in the time and effort to practice your craft.
Whether it’s painting, drawing, sculpting, or any other form of art, practice is key to improving your skills. You have to be willing to put in the hours and push through the frustration and mistakes. Over time, you will start to see progress and your art will improve.
It’s important to remember that it’s not about perfection, but progress. Don’t be afraid to try new techniques, experiment with different mediums, and learn from your mistakes. By consistently practicing and challenging yourself, you will be able to reach new heights as an artist.
So grab your paintbrush or pencil and start practicing, the results will be worth it!
Experiment with different colors, shapes, and styles.
When it comes to designing, experimenting with different colors, shapes, and styles can help you come up with unique and eye-catching creations. Playing with colors can evoke various emotions or attract certain types of people, while incorporating different shapes can add dimension and depth to your designs. Additionally, experimenting with various styles can help you find your own distinct aesthetic.
It’s important, however, not to go overboard and make your designs too chaotic or busy. Finding a balance between creativity and simplicity can make your creation standout. Remember to use your own personal taste and style as a guide while experimenting, and have fun with the process! By following these tips and regularly experimenting, you will be able to come up with designs that are truly one-of-a-kind and that people will love.
Remember to have fun and be creative!
As we come to the end of this blog post, I want to remind you that creativity and fun go hand in hand. No matter what your creative outlet may be, whether it’s writing, painting, or cooking, remember to enjoy the process and let your imagination run wild. Take risks and experiment with new techniques to push yourself to grow and expand your skills.
Don’t be afraid to make mistakes or try something unconventional. And most importantly, don’t forget to have fun! At the end of the day, creativity is about expressing yourself and bringing joy to both yourself and others. So, let your creativity flow, explore new ideas, and most importantly, enjoy the journey!
Conclusion
In conclusion, drawing a fish aquarium can be easy with the right techniques. Just remember to start with a basic outline of the tank, add some plants and rocks for texture, and then fill it with your favorite fish! And if all else fails, just doodle some squiggly lines and call it modern art. Either way, let your creativity swim free!”
FAQs
What materials do I need for drawing a fish aquarium?
You will need a pencil, paper, eraser, ruler, and colored pencils/paints.
Can I use acrylic paints for coloring the fish aquarium?
Yes, you can use acrylic paints, watercolors, or color pencils to color your fish aquarium.
Is there any specific way to draw a fish aquarium?
You can start by drawing a rectangular or circular shape. Add details like gravel, plants, rocks, and a background.
What is the best way to draw fish in the aquarium?
First, draw the outline of the fish. Then, add fins, scales, and color. You can also add multiple fish and arrange them in a way that looks realistic.
How can I make my fish aquarium stand out?
Experiment with different colors and shapes of fish. Add unique plant arrangements, rocks, and backgrounds to make it look more interesting.
Can I draw a fish aquarium without any reference?
It’s always better to have a reference image, but you can draw from imagination too. Just make sure to research the specific type of fish you want to draw for their exact features.
Is it difficult to draw a fish aquarium?
It can be challenging, but with practice and patience, you can master it. Start by drawing simple aquariums and fish, then progress to more complex ones.

