Drilling a hole in an acrylic aquarium can seem daunting, but with the right tools and techniques, it can be done easily and without causing damage to the tank. It may seem counterintuitive to drill a hole in a tank filled with water, but it’s a necessary step for adding a filter, a protein skimmer, or enabling water changes without siphoning. This step-by-step guide will help you drill a hole in your acrylic aquarium safely and successfully! Picture this: you’ve just purchased a brand new acrylic aquarium and you are excited to set it up and add your fishy friends.
However, you quickly realize that there’s no way to conveniently add a filter. You could use a hang-on-back filter, but we all know that can be an eyesore. So, what do you do? You drill a hole! But before you jump in with a power drill, it’s essential to know the proper way to do it.
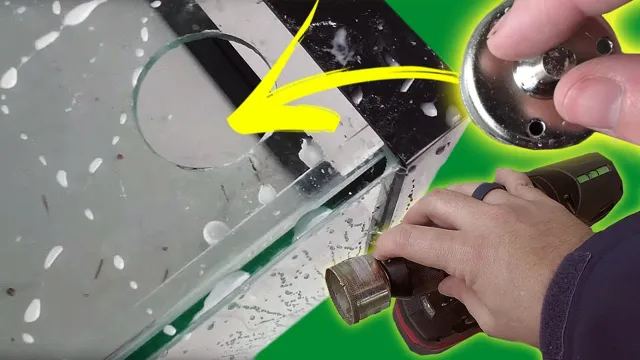
First, you’ll need the right tools. You’ll require a drill specific for acrylic, a diamond-coated hole saw with the size you want, and a drill press. You’ll also want a water-soluble lubricant, a level, and masking tape.
It’s essential to know that these tools are not interchangeable with those used for glass aquariums. Acrylic is softer, so using the wrong drill bit could cause damage to the tank. Next, using the masking tape and level, mark where you want the hole to be drilled on the outside of the tank.
Double-check to ensure it’s level. Once you’ve determined where to drill, measure the thickness of the tank where the hole will be drilled. This is important because the diamond bit should only protrude approximately one-third of the thickness of the tank.
Now it’s time to drill the hole! Lubricate the bit with water-soluble lubricant and start drilling at low speed, increasing as necessary. Do not force the drill bit, let it do the work. Once you’ve made it through the first layer of the tank, back the bit out and spray some water on the hole.
Materials Needed
If you’re looking to add an accessory to your acrylic aquarium, learning how to drill a hole is a necessary skill. But before you get started, you’ll need a few materials. Firstly, you’ll need a drill with a drill bit that’s specifically made for drilling acrylic.
You can find these bits at most hardware stores or online. Next, you’ll need a drill bit guide, which will help prevent the drill from sliding around and damaging your aquarium. You can also use masking tape to create a guide if you don’t have a specific tool.
Additionally, you may want to have a spray bottle with water and a microfiber cloth to keep the acrylic cool during the drilling process. Remember to take your time and work carefully to avoid any mishaps, but with the right tools, you’ll be able to add a new accessory to your aquarium in no time!
Examples of drilling bits and drilling templates
When it comes to drilling bits and templates, there are several materials that you will need. First and foremost, you will need a high-quality drill bit that is suitable for your drilling project. The materials used to make drilling bits can vary, and some common options include high-speed steel, cobalt steel, and carbide.
You will also need a drilling template to ensure that your holes are drilled in the correct location and at the right angle. This can be a physical template that you place over the surface you are drilling or a digital template that you can download and print. Additionally, you may need auxiliary materials such as lubricants or coolants to help keep your drill bit cool and extend its lifespan.
By using the right materials for your drilling project, you can achieve accurate, efficient, and high-quality results.
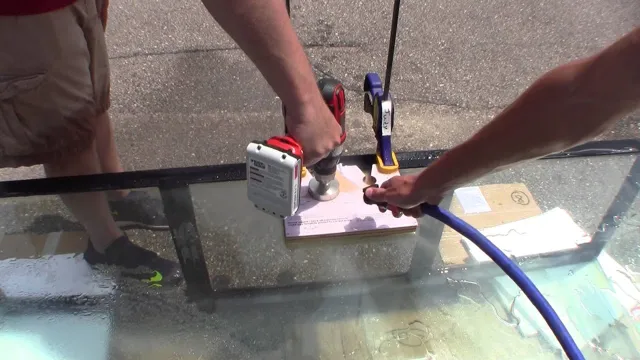
Preparation
Drilling a hole in an acrylic aquarium can seem like a daunting task, but with the right preparation, it can be done easily and safely. The first step is to obtain the right equipment, including a drill bit designed for use on acrylic. Once you have the proper tools, it’s important to choose the right location for your hole.
This should be an area that won’t interfere with the function of your aquarium and that won’t cause stress to the material. To ensure that you don’t crack the acrylic, start by marking the spot with a permanent marker, and then use a small, slow drill bit to create a pilot hole. After you have a pilot hole, you can switch to a larger bit to create the final hole. (See Also: How to Get Clear Water in Aquarium: Tips and Tricks for Crystal Clear Water)
Be sure to maintain a steady, even pressure as you drill, and keep the drill bit cool and lubricated with water. With these simple steps, you can successfully drill a hole in your acrylic aquarium and customize it to suit your needs.
Selecting the appropriate location and size of the hole
When it comes to selecting the appropriate location and size of a hole, preparation is key to achieving a successful outcome. Before starting, it’s important to have a clear understanding of what the hole will be used for and the type of material being worked on. This will help determine the ideal location and size of the hole.
For instance, if the hole is in a load-bearing area, it’s crucial to ensure adequate support and reinforcement before drilling. Additionally, the size of the hole should be just big enough to accommodate the intended use, without weakening the surrounding material or compromising its structural integrity. By taking the time to properly prepare before drilling, you can avoid costly mistakes and ensure that the hole is suitable for its intended purpose.
Cleaning and drying the area around the hole
Before starting the actual process of repairing a hole in the wall, you need to prepare the area around the hole. This involves cleaning and drying the area to ensure that the repair is done on a clean surface. The first step is to remove any loose debris or dust from the hole and the surrounding area.
You can use a brush or a vacuum cleaner to do this. Next, use a damp cloth or sponge to clean the area thoroughly. This will remove any dirt, grime, or grease that may have accumulated on the wall.
Once you have cleaned the area, let it dry completely before proceeding with the repair. This is important because any moisture or dampness can affect the adhesion of the patching material and compromise the strength of the repair. So, take your time and let the area dry naturally or use a fan or a hairdryer to speed up the drying process.
By preparing the area properly, you will ensure that your repair is neat, strong, and long-lasting.
Drilling the Hole
If you’re wondering how to drill a hole in an acrylic aquarium, you’ve come to the right place. Drilling a hole in acrylic is a bit different than drilling in glass because acrylic is softer and can crack easier. You’ll need some specialized equipment, like a diamond-tipped drill bit and protective gear, to ensure you don’t damage your aquarium or harm yourself.
Before drilling, decide on the location and size of your hole and mark it with a permanent marker. Then, use slow and steady pressure to begin drilling the hole at a 45-degree angle and gradually increase the pressure and angle until you’ve reached the desired depth. Remember to keep a constant stream of water over the area as you drill to prevent the acrylic from melting or cracking.
With some patience and precision, you’ll successfully drill a hole in your acrylic aquarium in no time.
Applying masking tape to prevent cracking
When it comes to drilling holes, especially in brittle materials like tile or ceramics, it’s important to take precautions to prevent cracks and chips. One helpful hack is to apply masking tape over the area where you plan to drill. The tape helps to absorb the pressure and vibration from the drill, reducing the likelihood of impact damage.
To do this, simply place a piece of masking tape over the spot where you want to drill, and use a pen or marker to mark the center of your hole. Then, use your drill bit to make the hole, applying firm pressure but taking care not to press too hard. Once you’ve completed your drilling, carefully remove the tape to reveal a neat and tidy hole. (See Also: How to Control Population of Live Bearers in Aquarium: Tips and Tricks)
With this simple trick, you can avoid damaging your tiles or other delicate materials, and achieve a professional-looking result every time.
Using the drill at a slow speed and applying firm, even pressure
When it comes to drilling a hole, many people tend to rush the process and end up with a messy result. However, drilling a hole is a straightforward process that requires a slow speed and even pressure to achieve the desired outcome. To get started, select the right drill bit size and attach it to your drill.
Next, secure the material you want to drill through and start the drill at a slow speed. Using too much pressure or letting the drill bit run too fast can cause the bit to slip, creating an uneven hole or damaging the material. Instead, apply firm, even pressure, and allow the drill bit to do the work.
Once you’ve drilled through the material, remember to turn off the drill and carefully remove the bit. By following these simple steps, you can achieve a precise and clean hole every time. So, next time you’re drilling a hole, take it slow, apply even pressure, and enjoy a perfect result.
Finishing Up
So, you’ve successfully drilled a hole in your acrylic aquarium! Now what? The last step is to sand the edges of the hole to create a smooth and polished finish. This can be done using sandpaper or a sanding bit on a rotary tool. Start with a coarse grit (around 120-180) and slowly work your way up to a finer grit (around 400-600).
Take your time and be gentle to avoid cracking or damaging the acrylic. Once the edges are smooth and free of rough spots, clean up any dust or debris with a damp cloth and enjoy your newly modified aquarium. It’s important to note that proper research and precautions should be taken before attempting to drill a hole in any aquarium, and always double check the safety of any modifications before introducing marine life.
With a little patience and care, drilling a hole in an acrylic aquarium can be a successful and rewarding DIY project.
Removing masking tape and debris from the hole
After successfully drilling a hole, you are left with a piece of masking tape and debris covering the opening. The next step is to remove these materials to ensure that the hole is clean and ready for use. Carefully peel off the masking tape and discard it properly.
Use a vacuum cleaner or a brush to remove any debris that may have accumulated at the bottom of the hole. You can also blow air into the hole using a compressor to ensure that it is completely clean. This step may seem trivial, but it is crucial to the final outcome of your project.
Leaving debris in the hole can affect the strength and stability of whatever material you plan to insert into the hole. Once you have removed all the debris, the hole is ready for use. Now you can proceed with the next step in your project, confident in the knowledge that you have taken all the necessary precautions for a successful outcome.
Filling the aquarium with water and checking for leaks
As you carefully fill up your aquarium with water, it’s important to stay vigilant for any potential leaks. Once the tank is filled, take a close look at its edges, seams, and corners to check for any signs of water seeping through. Don’t be discouraged if you spot some leaks, as this is a common occurrence.
Instead, simply drain the water back out and make the necessary adjustments and fixes before starting the process over again. It’s always better to take the time to address any leaks early on, rather than risking damage to your tank and its inhabitants in the long run. Once you’re confident that your tank is holding water securely, you can begin adding the final touches, such as gravel, plants, and decor, to create a beautiful aquatic environment for your fish to thrive in.
With some patience and diligence, you’ll soon have a stunning aquarium that brings joy and tranquility to your home. (See Also: How to Keep Marine Aquarium Sand Clean: A Step-by-Step Guide)
Conclusion
In conclusion, drilling a hole in an acrylic aquarium requires a delicate touch and a steady hand. It’s important to take your time and follow the proper steps to avoid cracking or damaging the material. Just remember, when it comes to drilling acrylic, slow and steady wins the race.
So go ahead, give it a try and soon you’ll be enjoying the benefits of a perfectly placed hole in your aquarium. Happy drilling, folks!”
FAQs
What type of drill bit should I use for drilling a hole in acrylic aquarium?
Use a drill bit specifically designed for acrylic or plastics.
How do I prevent the acrylic from cracking while drilling?
Use a steady, moderate pressure and drill at a slow speed. Lubrication with water can also help.
Do I need to remove the fish from the aquarium before drilling a hole?
It is recommended to remove the fish to prevent any stress or harm.
What size hole should I drill for a typical aquarium accessory?
The size of the hole depends on the size of the accessory and its fitting specifications. Refer to the instructions or consult with the manufacturer.
Can I drill multiple holes in the same location in the acrylic aquarium?
It is not recommended to drill multiple holes in the same location as it can weaken the acrylic and cause cracking or splitting.
How do I clean the acrylic after drilling a hole?
Use a soft, non-abrasive cloth with a mild cleaner specifically designed for acrylic. Rinse thoroughly with water and dry with a soft cloth.
How deep should I drill in the acrylic?
Drill only as deep as necessary to accommodate the accessory or fitting. Avoid drilling too deep to prevent weakening or cracking the acrylic.

