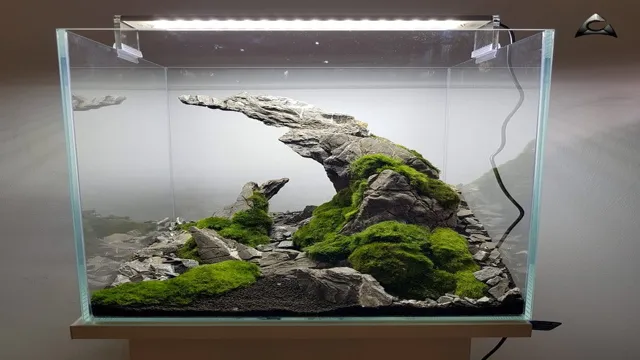
Looking for a way to make your aquarium more interesting to look at? Adding some rocks is a great way to accomplish that. But what if you want to take it to the next level and create more complex designs with your rocks? That’s where gluing rocks together comes in! By using aquarium-safe silicone glue, you can create structures like caves and archways that will make your aquarium more visually appealing and provide hiding spots for your fish. But before you dive into gluing rocks together, there are a few important things you need to know.
Keep reading to learn more about this fun and creative aquarium project!
Materials Needed
If you’re looking to create a stunning aquarium filled with rocks, you may be wondering how to glue them together so they don’t end up falling over or apart. Luckily, the process is fairly simple and only requires a few materials. First, you’ll need to purchase aquarium-safe silicone adhesive.
This is crucial because any other type of glue can be toxic to fish and other aquatic life. Additionally, you’ll need a clean work surface, clean rocks, and gloves to protect your hands. Once you have all your materials, start by cleaning and drying each rock thoroughly.
Then, apply a small amount of silicone adhesive to one rock and press it against another, holding them together for a few seconds. Repeat this process until all your rocks are attached securely. Be sure to let the adhesive dry completely before placing your rocks in the aquarium.
With a little patience and care, your new rock formation will add a beautiful touch to your fish tank.
Aquarium-safe silicone glue
When it comes to aquarium construction, it’s essential to choose the right materials to ensure your aquatic life is safe and healthy. One crucial component for constructing an aquarium setup is silicone glue. However, not all silicone glue is safe for aquariums.
It’s critical to select a formula that is specifically designed for aquarium use to avoid any harmful chemicals or toxins leaching into your tank water. In addition, make sure the silicone is 100% silicone without any additives or fungicides that could harm your fish or other aquatic life. By choosing an aquarium-safe silicone glue, you can construct your aquarium with confidence and peace of mind, knowing that you’re providing a safe and healthy environment for your aquatic pets to thrive.
Aquarium-safe epoxy
When it comes to keeping aquatic pets, creating the perfect aquarium environment is crucial. And for that, you need to use materials that are safe for your pets. If you’re planning on using epoxy in your aquarium, you need to make sure it’s aquarium-safe epoxy.
This type of epoxy doesn’t contain any harmful components that can put your aquatic pets at risk. To get started, you’ll need a few materials. Firstly, you’ll need to find an aquarium-safe epoxy that specifically indicates it’s safe for marine life.
Secondly, you’ll need a measuring syringe, a mixing cup, a stirring stick, and a disposable brush to apply the epoxy. With these materials, you can easily and safely build structures and create a beautiful aquatic environment for your pets. Always keep an eye on your aquarium’s pH, temperature, and cleanliness to ensure the best living conditions for your fish and marine life.
Clean, dry rocks
When it comes to creating a beautiful rock garden, one of the key ingredients is clean, dry rocks. These rocks can be found at your local garden center or purchased online, but it’s important to make sure they’re completely dry before using them in your garden. Wet or damp rocks can cause mold and mildew to grow, which can be harmful to your plants.
To avoid this, lay your rocks out in the sun for several days to allow them to fully dry out. Once they’re dry, use a soft-bristled brush to remove any dirt or debris from the surface of the rocks. This will not only make them look better but also help avoid the growth of unwanted weeds in your garden.
So, whether you’re creating an entire rock garden or just adding a few accent pieces, don’t forget the importance of clean, dry rocks for a successful project.
Clean towel or cloth
When it comes to personal hygiene, having a clean towel or cloth is essential. Whether you are drying yourself off after a shower or washing your face before bed, using a fresh towel or cloth can make a big difference in how clean and refreshed you feel. To ensure that your towel or cloth is as clean as possible, there are a few materials that you will need.
First, you will need a washing machine and detergent. Make sure to use a mild detergent that is suitable for the type of fabric your towel or cloth is made of. You will also need a dryer or a clothesline to dry your towel or cloth after washing it.
However, if you want to avoid using a dryer, you can hang your towel or cloth in a sunny spot to dry naturally. Finally, make sure to have several towels or cloths on hand, so you always have a clean one when you need it. By taking these simple steps, you can keep your towels and cloths clean and fresh, ensuring optimal hygiene and comfort. (See Also: How to Clean Your Aquarium Decorations: Tips and Tricks for a Sparkling Tank)
So, why not make using a clean towel or cloth a daily habit for a healthier and more refreshing you?
Steps for Gluing Rocks Together
If you’re looking to create a beautiful aquarium filled with natural rock formations, you may be wondering how to glue rocks together. Luckily, the process isn’t too complicated, but it does require some careful attention and a steady hand. First, make sure your rocks are clean and dry.
Next, choose a high-quality aquarium safe glue that won’t harm your fish or plants. Apply a small amount of glue to one of the rocks and gently press it against the other, holding them in place for several minutes until the glue sets. Repeat this process with each rock until your design is complete.
Keep in mind that it’s best to work in small sections, allowing each section to dry completely before moving on to the next. By taking your time and following these steps, you can create a stunning aquarium that’s both beautiful and safe for your aquatic pets.
Step 1: Clean the Rocks
Are you ready to bring your rock garden to the next level by gluing some of the rocks together? While it may seem like a daunting task, it’s actually quite simple with the right steps. The first step is to make sure the rocks are clean and free of any debris. This will ensure a strong bond between the rocks.
Use a stiff brush and water to scrub away any dirt or grime. Let them dry completely before moving on to the next step. Once your rocks are clean and dry, you’re ready to move on to the next step in gluing them together.
By following these steps, your rock garden will be sure to impress all who see it.
Step 2: Apply the Glue
Gluing rocks together can be a fun and enjoyable activity, but it’s important to do it right to ensure that they stay together for the long haul. The second step in this process is applying the glue. When selecting a glue, it’s important to choose one that is strong enough to hold the size and weight of the rocks you are using.
You also want to consider the color of the glue, as some can dry clear while others may have a noticeable color. Before applying the glue, clean both rocks to remove any dirt or debris that may be present. Apply a small amount of glue to one of the rocks and then press the second rock onto it.
Hold the rocks together for a few minutes to allow the glue to set properly. You can also add additional glue around the edges of the rocks to reinforce the bond. Just be sure not to use too much glue, as this can cause it to seep out around the edges and ruin the appearance of the final product.
With a little patience and attention to detail, you can create beautiful and long-lasting rock formations that will add a unique touch to any space.
Step 3: Press and Hold
Now that you have placed your rocks in the desired position, it’s time to apply glue. Make sure you use a good quality adhesive that will bond the rocks efficiently. Apply the glue to both the surfaces that need to be joined.
Then, press and hold the rocks together for at least a minute. This will help to make a strong bond between the rocks. As you hold the rocks together, take care not to move them as this can cause the glue to shift, and the rocks may not stick together correctly.
Also, ensure that there is no excess glue that may ooze out from between the rocks. If there is, carefully wipe it off with a damp cloth. Once the glue has completely dried, your beautiful rock structure is ready to display! Remember, the key to successful rock gluing is patience and attention to detail.
Step 4: Let it Dry
Once you’ve glued your rocks together, be sure to let them dry thoroughly. This step is crucial in ensuring that your newly formed structure stays intact and sturdy. Depending on the type of glue you used and the size of your project, drying time can vary from a few hours to a full day or more. (See Also: How to Make a 55 Gallon Aquarium Stand in 7 Easy Steps: DIY Guide)
It’s best to leave it undisturbed during this time, so it can set and harden properly. It’s also a good idea to keep checking on it periodically to make sure it’s drying evenly and nothing is shifting or coming loose. Once your rocks have completely dried, you can start to admire your handiwork and enjoy your newly created piece.
Remember to always take safety precautions when handling glue and rocks, and happy crafting!
Tips and Precautions
If you’re looking to glue rocks together for an aquarium, it’s important to take some precautions to ensure that your fish and plants remain safe. First and foremost, it’s important to use a non-toxic glue specifically designed for aquarium use. This will prevent any harmful chemicals from leaching into the water and harming your aquatic environment.
Before gluing rocks together, make sure to thoroughly clean them to remove any debris or dirt. Once you’re ready to glue, apply a small amount of glue to one surface and hold the rocks firmly together for a few minutes to allow the glue to bond. It’s important to not use too much glue, as this can create air pockets and weaken the bond.
To prevent any accidents, it’s also important to wear gloves and eye protection when working with glue. By following these tips and precautions, you can glue rocks together safely and securely to create a beautiful aquarium environment for your fish and plants.
Avoid toxic glue types
When it comes to adhesive products, it’s crucial to avoid toxic glue types. Not only can they be harmful to your health, but they can also be damaging to the environment. One way to ensure that you’re using safe and eco-friendly adhesives is to read the labels carefully and research the ingredients.
Look for products that are water-based, as opposed to those that use harsh chemicals like solvents or formaldehyde. Additionally, always use adhesives in a well-ventilated area and wear protective gear such as gloves, goggles, and a mask if necessary. By taking these precautions, you can enjoy the benefits of adhesives without putting yourself or the environment at risk.
Remember, safety should always come first!
Allow enough time to dry
When it comes to painting, one of the most important things to keep in mind is to allow enough time for your paint to dry. Rushing the process can lead to a variety of issues, such as streaks, smudges, or even ruined surfaces. To avoid this, make sure you’re using the right type of paint for the surface you’re painting, and pay attention to the manufacturer’s instructions regarding drying times.
Additionally, try to avoid painting in humid or damp conditions, which can delay the drying process. Finally, if you’re working on a large project, it’s a good idea to break it up into smaller sections, allowing each section to dry thoroughly before moving on to the next. By following these tips and taking the necessary precautions, you can ensure that your painting project turns out beautifully and lasts for years to come.
Apply enough glue for a secure bond
When it comes to woodworking projects, using the right amount of glue is essential for ensuring a secure bond. Apply too little, and your project may fall apart over time. Apply too much, and you may find yourself dealing with a sticky mess.
So, how do you know how much glue to use? As a general rule, aim for a thin, even layer that covers the entire surface area. If you’re not sure if you’ve applied enough, try holding the pieces together for a few seconds before letting go. If they stay in place without sliding or shifting, you’re good to go.
When applying glue, it’s important to take precautions to avoid making a mess. Lay down a drop cloth or newspaper to catch any drips or spills, and use a small brush or toothpick to apply the glue to hard-to-reach areas. With these tips in mind, you can confidently tackle your next woodworking project and create a strong, lasting bond.
Smooth out uneven surfaces before gluing
When it comes to gluing surfaces together, it’s crucial to ensure a strong bond for lasting durability. One way to achieve this is by smoothing out any uneven surfaces before applying the adhesive. This can be achieved by using sandpaper or a file to remove any bumps or rough spots.
By doing so, you create a better surface area for the glue to adhere to, reducing the risk of air pockets or weak spots. It’s important to note that you should exercise caution when sanding or filing, especially on delicate surfaces or materials that can crack or break easily. If you’re unsure, test a small area first before proceeding.
Remember, a little extra effort in preparing your surfaces can make all the difference in achieving a successful bond that stands the test of time. So take the time to smooth out those surfaces before gluing, and you’ll be rewarded with a strong and lasting bond. (See Also: How to Clean and Sanitize Aquarium Rocks: A Step-by-Step Guide for a Healthy Fish Habitat)
Avoid using too much glue and hiding the natural appearance of rocks
When it comes to using rocks in your DIY projects, it’s important to avoid using too much glue. While it may seem like a good idea to add extra adhesive to secure the rocks in place, it can actually detract from their natural appearance. Instead, use just enough glue to hold the rocks in place, allowing the natural shape and texture to shine through.
Additionally, be careful not to cover up too much of the rock’s surface with other materials. The beauty of using rocks in your projects lies in their unique and natural appearance, so be sure to let that shine through. By following these simple tips and precautions, you can create beautiful and natural-looking projects that showcase the beauty of rocks in all their glory.
So next time you’re incorporating rocks into your DIY projects, remember to use just enough glue and let their natural appearance take center stage.
Conclusion
In conclusion, gluing rocks together in an aquarium can be a tricky task, but with the right adhesive and a bit of creativity, it can be a surreal and stunning addition to your underwater landscape. Remember to take your time, experiment with different shapes and combinations, and most importantly, don’t forget to have fun. Just like in life, sometimes all it takes is a little bit of glue to keep things together and create something beautiful.
“
FAQs
What type of glue is safe for aquariums?
For gluing rocks together in an aquarium, it is recommended to use aquarium-safe silicon adhesive or epoxy glue.
How long does it take for the glue to dry?
Depending on the type of glue used, it can take anywhere from 24-72 hours for the glue to fully cure and dry.
Can glue harm fish or other aquatic creatures?
If the glue is not aquarium-safe, it can release harmful chemicals into the water that can harm fish and other aquatic creatures. That’s why it’s important to use an aquarium-safe glue.
Is it necessary to clean the rocks before gluing them together?
Yes, it is important to clean the rocks thoroughly before applying the glue. This will remove any dirt, debris, or contaminants that may have accumulated on them. A clean surface will help the glue adhere better.
Can glued rocks withstand the pressure of water in an aquarium?
Yes, if the rocks are glued together properly and with an aquarium-safe adhesive, they can withstand the pressure of water in an aquarium.
Can I remove the rocks once they are glued together?
Yes, it is possible to remove the rocks if needed, but the process can be difficult and may damage the rocks or the aquarium during removal.
What are some tips for gluing rocks together in an aquarium?
Some tips include ensuring the rocks are dry and clean before gluing, applying the glue in a well-ventilated area, and avoiding disturbing the rocks for at least 24 hours after gluing to ensure the glue has fully cured.

