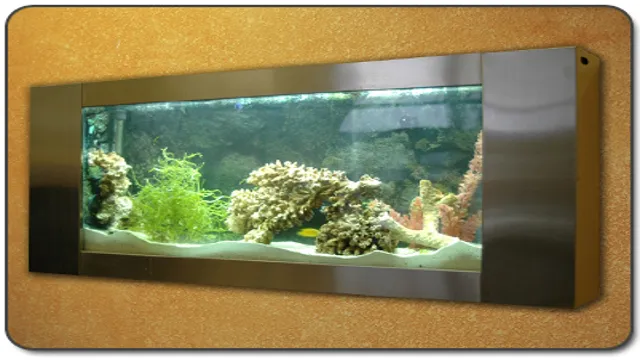
Have you ever considered adding a wall-mounted aquarium to your living space? Bringing a piece of the aquatic world into your home can be a unique way to add life and vibrancy to any room. Not only do wall-mounted aquariums serve as a stunning conversation piece, but they also provide therapeutic benefits, such as reducing stress levels and lowering blood pressure. However, the thought of mounting an aquarium to your wall may seem daunting, especially for those unfamiliar with the process.
Don’t fret, though, because with the right tools and guidance, installing a wall-mounted aquarium can be a breeze. In this article, we’ll guide you through the steps of how to install a wall-mounted aquarium and bring a little bit of shimmering, underwater life into your home.
Determine the Location
When it comes to installing a wall mounted aquarium, the first thing you need to do is determine the perfect spot for it. You’ll need to find an area that’s away from direct sunlight and other heat sources, such as vents or radiators. This will help maintain a consistent water temperature for your fish and prevent any potential damage to your aquarium.
It’s also important to ensure the location you choose can support the weight of the aquarium, including water, fish, and any decorative items you plan on adding. To determine this, you’ll need to use a stud finder to locate the studs in the wall and decide if they can support your aquarium. Another important factor to consider is accessibility.
You’ll want to choose a location that’s easily accessible so you can clean the aquarium and add or remove items with ease. By carefully considering these factors, you’ll be well on your way to finding the perfect spot for your wall mounted aquarium.
Measure and Mark the Wall
When it comes to hanging wall decor, the first step is to determine the location where you want to place it. You can use a pencil to mark the spot, but before doing so, it’s important to consider a few things. First, you’ll want to make sure that the location is at the right height for the piece.
Whether it’s a painting or a mirror, you’ll want it to be at eye level, which is usually around 57-60 inches from the ground. Additionally, you’ll want to consider the surrounding decor. Is there enough space for the piece to stand out, or will it be too cluttered? Once you have the perfect spot in mind, use a tape measure to determine the exact height and width of the piece.
Then, use a pencil to mark the wall where the top and sides of the piece will be located. This will help ensure that the piece is centered and level when it’s hung. By taking the time to measure and mark the wall, you’ll have a much easier time hanging your wall decor and ensuring that it looks just right.
Check for Studs and Electrical Connections
When it comes to mounting something on a wall, the first step is to determine the location. But before you start drilling, make sure to check for studs and electrical connections. Finding a stud to anchor your screws into is important for security and stability.
Using a stud finder can save you time and effort, as it quickly detects the presence of wooden studs behind drywall. Electrical connections are also important to avoid damaging wiring or causing a fire hazard. Make sure to turn off the power at the breaker box and use a non-contact voltage detector to ensure that there are no live wires in the area where you plan to drill.
Additionally, it is important to not drill too deep as to not accidentally penetrate any wiring. Taking the time to check for studs and electrical connections will ensure that your wall mount is safely and securely installed.
Prepare the Tank
When it comes to installing a wall-mounted aquarium, proper preparation of the tank is crucial. You should begin by thoroughly cleaning the tank with warm water and a gentle soap, making sure to rinse it completely to remove any residue. Then, take the time to measure and level the bracket that you will use to secure the tank to the wall.
It’s important to ensure that the bracket is securely anchored to the wall, so use appropriate tools and hardware to complete the task. Once the bracket is in place, carefully lift the tank onto the bracket and secure it using bolts or screws. Be sure to double-check that the tank is level and securely attached to the wall before adding any water or fish to your new aquarium.
By taking the time to properly prepare your tank and secure it to the wall, you can enjoy a beautiful and safe wall-mounted aquarium for years to come.
Attach the Brackets to the Tank
To begin attaching the brackets to the tank, the first step is to prepare the tank itself. This involves ensuring that the surface is clean and free of any dirt or debris, as well as determining the appropriate placement for the brackets. The brackets should be situated in a location that will provide adequate support for the weight of the tank, as well as maintain a stable and secure position. (See Also: How to Lower the pH of Aquarium Water: 5 Effective Tips for Maintaining Optimal Water Chemistry)
Once the ideal location is determined, mark the placement of the brackets on the tank using a pencil or marker. Before attaching the brackets, it’s important to double-check the placement to avoid any errors that could compromise the stability of the tank. By taking the time to properly prepare the tank and accurately mark the bracket placement, you can ensure a successful installation that will provide long-lasting support and security for your tank.
Keep in mind that safety is always the top priority, so take extra care during the installation process to avoid any accidents or mishaps.
Attach the Tank to the Wall Mount
To attach your tank to the wall mount, you’ll need to ensure that the tank itself is properly prepared. Begin by installing the mounting bracket onto the back of the tank with the accompanying screws, taking care to align it carefully. Once the bracket is securely in place, it’s time to attach the wall mount.
Make sure that the location you’re attaching it to is sturdy and can support the weight of the tank, and use a measuring tape to ensure that it’s level and centered. Line up the holes on the wall mount with the screws on the mounting bracket, and use more screws to secure the tank to the wall. With your tank successfully attached to the wall mount, you’re another step closer to having a fully functioning setup.
In order to make sure that your tank stays firmly in place, it’s important to choose the right mounting hardware for your specific tank and wall surface. You’ll also want to double-check that the tank is level both vertically and horizontally, so that it doesn’t tilt or shift over time. Don’t be afraid to ask for help from a friend or family member if you’re having trouble holding the tank in place while you attach it to the wall.
With these simple steps, you’ll have your tank securely mounted on the wall and ready for use in no time.
Install the Filter and Lights
Installing a wall-mounted aquarium requires some time and effort, but the end result will be worth it. Once the tank is installed on the wall, the next step is to add the filter and lights. First, attach the filter to the back of the tank according to the instructions provided.
Make sure it’s secured tightly and that the hoses are correctly connected. The filter is crucial to keep the water clean and healthy for the fish. Secondly, attach the lights to the top of the tank.
Make sure they are securely attached and that the wiring is all connected properly. The lights will provide both a natural source of light for the fish and will enhance the visual appeal of the aquarium. Once the filter and lights are installed, it’s time to add water and the necessary elements to make it a suitable environment for the fish.
Remember to follow the instructions carefully and take your time during the installation process.
Attach the Filter to the Tank
To complete the installation of your fish tank, the next step is to attach the filter to the tank. This is an integral part of keeping your fish and aquatic plants healthy and happy. First, make sure that you have the right size and type of filter for your tank.
Next, position the filter in the back corner of your tank, close to where the water is being pumped out. Attach the filter to the tank using its suction cups or installation kit, making sure it is securely in place. Once the filter is attached, you can move on to installing the lights.
Proper lighting is essential for the growth of your aquatic plants and helps create a healthy environment for your fish. Attach the light fixture above the tank, usually using brackets that come with the fixture. Remember to choose the right type and intensity of light for your plants and fish.
By following these installation steps, you can ensure a happy and healthy home for your aquatic pets. (See Also: How to Make a Holder for Live Aquarium Plants: Easy DIY Tips and Tricks)
Attach the Lights to the Tank
Once you have positioned your aquarium and leveled it, the next step is to install the filter and attach the lights to the tank. First, let’s tackle the filter. Depending on the type of filter you have, instructions may vary.
However, most filters will require you to attach the intake and output tubes to the filter, as well as the power cord. Once you have done this, you can then secure the filter to the back of the tank with the provided suction cups. When it comes to attaching the lights, it’s important to make sure they are the appropriate size for your tank.
You’ll also want to ensure they are secured properly to prevent any accidents. Many lights come with clips or brackets that attach to the rim of the tank. Simply attach the clips or brackets, position the lights over the tank, and plug them into an outlet.
With your filter and lights properly installed, your aquarium is now starting to take shape!
Add Water and Fish
So, you’ve decided to add some aquatic life to your home by installing a wall mounted aquarium. Congratulations! It’s a great way to bring some calming energy into your space, while also providing a fun hobby and unique conversation piece. But, how do you actually install the aquarium? The first step is to gather all of the necessary tools and supplies, including the aquarium itself, mounting hardware, a level, a measuring tape, and a drill.
Then, find the perfect spot on your wall, taking into consideration factors such as natural light and distance from electrical outlets. Once you’ve marked the spot and double checked that it’s level, it’s time to start drilling and mounting the hardware. Finally, add water and fish to the aquarium, being careful to acclimate your new aquatic friends slowly to their new environment.
Overall, installing a wall mounted aquarium can be a bit time consuming, but with careful planning and execution, it can be a beautiful and rewarding addition to any home.
Fill the Tank with Water
When setting up a new fish tank, it’s important to fill the tank with water before adding any fish. But you might be wondering, how much water do you need and where should you get it from? Firstly, you want to make sure that you have the correct amount of water for your tank size. Generally, you should aim for at least one gallon of water for every inch of fish that you plan to keep.
Secondly, it’s best to use dechlorinated tap water or aquarium water that you’ve already conditioned. Chlorine and other chemicals found in tap water can be harmful to fish, so it’s important to treat it properly before adding it to the tank. Once you have the appropriate amount of water, it’s time to carefully add your fish.
But before that, you should also add bacteria to the tank to help with the initial nitrate process. With patience and care, your new fish tank will be a happy and healthy home for your fish.
Add Fish and Decorations
Now that you’ve prepared your fish tank and filled it up with water, it’s time to add some life to it! First, you’ll want to choose the fish species that will thrive in your tank based on its size and water conditions. It’s always a good idea to consult with a local fish store or do some research online to ensure you choose the right fish for your tank. Once you’ve chosen your fish, make sure to acclimate them to their new environment by slowly adding some of the tank water to their bag or container and letting it sit for about 20 minutes before gently releasing them into the tank.
But your tank doesn’t have to just be a home for fish – you can also add decorations to make it a beautiful piece of decor in your home. There are a lot of options for decorations, including live or fake plants, rocks, and ornaments. Live plants can help keep the water clean and oxygenated, while fake plants and ornaments add color and character to the tank.
Just be sure to choose decorations that are safe for your fish and won’t harm them. Overall, adding fish and decorations to your tank is a fun and exciting step in setting up your aquarium. With the right species and decorations, you’ll have a beautiful and thriving ecosystem in no time!
Maintenance Tips
If you’re thinking about installing a wall-mounted aquarium in your home, there are a few things to keep in mind to ensure that your fish thrive and your tank stays in good condition. Firstly, it’s essential to choose the right location for your tank – avoid direct sunlight or areas with temperature fluctuations. Once you’ve found the right spot, you can start the installation process. (See Also: How to Get to the Aquarium by Train: A Complete Guide for Hassle-Free Travel)
First, attach the aquarium bracket to the wall, and then hang the tank onto the bracket. Next, add the substrate, decorations, and water to the aquarium. Make sure you’ve allowed the water to sit for at least 24 hours before adding any fish.
It’s also important to regularly clean your aquarium to maintain optimal water quality, such as replacing a third of the water every week. Remember to use proper fish food and monitor the water conditions regularly, which can help you avoid any problems that might arise. By following these tips and guidelines, your wall-mounted aquarium will provide a beautiful and serene addition to your home.
Conclusion
Congratulations! You have successfully mastered the art of installing a wall mounted aquarium! Not only will it bring a new level of beauty and tranquility to your space, but it’s also a great conversation starter for guests. Just remember to always keep an eye on your aquatic friends, and never forget to feed them (or suffer the consequences). With this aquarium, you’ve officially become a master of both interior design and marine biology.
So sit back, relax, and let the calming waves of your wall mounted aquarium wash over you.”
FAQs
What is a wall mounted aquarium?
A wall mounted aquarium is a type of fish tank that is designed to be mounted on a wall instead of standing on a surface.
What are the benefits of a wall mounted aquarium?
Wall mounted aquariums are great space savers, serve as a decorative element in a room, and can be a great conversation starter.
What types of fish can be kept in a wall mounted aquarium?
A wall mounted aquarium is suitable for keeping small fish, such as tetras, guppies, and other small freshwater fish. It is not recommended for larger fish or saltwater fish.
What equipment is needed to install a wall mounted aquarium?
To install a wall mounted aquarium, you will need the aquarium, mounting hardware, drill, screws, anchors, level, and plumbing equipment if necessary.
How do you prepare the wall for a wall mounted aquarium installation?
Before you start mounting the aquarium, you should clear the area of any debris and clean the wall to ensure it is free of dust and grease. You should also locate the studs in the wall and mark the spots where the screws will be installed.
How do you mount a wall mounted aquarium?
First, attach the mounting hardware to the back of the aquarium. Then, drill holes in the wall, insert the anchors, and attach the mounting hardware to the wall using screws. Finally, hang the aquarium on the mounting hardware and level it.
Can you easily remove a wall mounted aquarium?
Yes, you can remove a wall mounted aquarium by unscrewing the mounting hardware from the wall and carefully removing the aquarium. However, keep in mind that removing the aquarium may cause damage to the wall.

