Do you have an aquarium at home but constantly worry about the temperature fluctuations? Do you want to create a conducive environment for your aquatic pets without breaking the bank? In that case, creating an aquarium chiller might be the solution you’ve been looking for. Aquarium chillers help maintain the water temperature at an optimal level, which is essential for the health and well-being of your aquatic creatures. They work by cooling the water inside the aquarium using a refrigeration process.
By lowering the water temperature, the chiller ensures that your fish and other aquatic animals remain comfortable and stress-free. Building an aquarium chiller might seem like a daunting task, but it’s relatively easy and straightforward. With the right tools, equipment, and a little bit of DIY spirit, you can create a chiller that meets your specific needs and fits your budget.
Plus, constructing your chiller allows you to customize it to your liking and make any necessary adjustments as needed. So why spend a fortune on a store-bought aquarium chiller when you can create one yourself? With this guide, we’ll walk you through everything you need to know about creating an aquarium chiller, including how it works, the necessary components and tools, and step-by-step instructions to build one yourself. Get ready to dive in and create the perfect environment for your aquatic pets!
Introduction
Are you looking to create your own chiller for your aquarium? Well, you’re in luck because it’s actually quite simple! First, you’ll need to gather some materials such as copper tubing, a water pump, and a small fan. Next, wrap the copper tubing around the fan and secure it in place. Attach the water pump to the tubing and submerge it in a container of cold water such as a bucket or ice chest.
Turn on the pump and fan, and voila! You’ve just created your very own chiller. The copper tubing will act as a heat exchanger, transferring heat from the aquarium water to the cold water in the container. This will help to keep your aquarium water at a consistent temperature, which is vital for the health of your fish and other aquatic animals.
So now that you know how to make a chiller for your aquarium, why not give it a try? Your aquatic pets will thank you!
What is an aquarium chiller?
Aquarium chiller Have you ever wondered how aquariums maintain a constant temperature? One solution is by using an aquarium chiller. An aquarium chiller is a piece of equipment that helps regulate the temperature of the water in your aquarium by cooling it down. These are particularly useful in aquariums that house fish or other aquatic animals that are sensitive to temperature changes.
The chiller works by extracting heat from the water using a refrigerant gas, which is then released into the air, leading to a drop in temperature. Aquarium chillers are typically designed to be compact and easy to install, making them a convenient addition to any tank. If you’re struggling to keep the temperature of your aquarium consistent, investing in an aquarium chiller might be just what you need to provide the optimal conditions for your aquatic pets.
Why is it important to have one?
An important aspect of creating an online presence is having a blog section on your website. Not only does it serve as an excellent way to communicate with your audience, but it is also a fantastic tool for boosting your online visibility and establishing yourself as an authority in your industry. Having a blog section on your website means that you are consistently producing fresh and engaging content for your audience, which can be a significant factor in attracting and retaining potential customers.
Additionally, creating content that is SEO-friendly and optimized for search engines can help improve your website’s search engine rankings, making it more visible to potential customers. In short, having a blog section on your website is important because it helps you connect with your audience, establish your authority, and improve your website’s visibility and traction in search engine results.
Materials
Are you struggling with keeping your aquarium cool during the warmer months? Making a chiller for your aquarium can be a cost-effective solution to this problem. To make a chiller for your aquarium, you will need some basic materials such as a small pump, a length of PVC tubing, a refrigerator or a freezer, and a temperature controller. Cut the PVC tubing to the appropriate length and connect it to the water pump.
Place the pump into the aquarium and run the tubing through the refrigerator or freezer. Use the temperature controller to regulate the temperature of the water. By doing this, you can reduce the temperature of the water in your aquarium and ensure the health and wellbeing of your aquatic pets.
Keep in mind that this is just a basic guide on how to make a chiller for your aquarium, and you can modify it to fit your specific needs. So, go ahead and take the first step towards creating your own homemade chiller for your aquarium today and enjoy a healthy and happy aquatic environment! (See Also: How to Make Things Float in Aquarium: Tips and Tricks for a Perfect Display)
What you will need to build a chiller
When it comes to building a chiller, there are a few materials that you’ll need to make sure you have on hand. First and foremost, you’ll need a container to hold the chilled liquid. This could be anything from a bucket to a large tank, depending on the size of the chiller you are building.
Additionally, you’ll need a compressor, which will provide the pressure required to move the liquid through the chiller and into your system. Another important component is the evaporator, which is responsible for absorbing heat from the liquid and releasing it into the environment. You’ll also need tubing to connect everything together, as well as various fittings and valves to regulate the flow of liquid and gases.
Finally, you’ll need a refrigerant, which is the substance that actually cools the liquid as it passes through the chiller. Whether you’re building a simple DIY chiller or a more complex commercial system, having the right materials is key to success.
Where to find them
When it comes to finding materials for your DIY projects, the options can seem overwhelming. But fear not, with a little research and creativity, you can locate exactly what you need. Your local hardware or craft store is a great place to start.
They will likely have a variety of materials to choose from, including wood, paint, fabric, and tools. You can also check out online retailers, such as Amazon or Etsy, for unique materials that may not be available locally. Another option is to repurpose materials.
For example, an old dresser can be transformed into a stylish bookshelf with a little elbow grease and some paint. Don’t forget your own home! Look around for items you no longer need, such as old t-shirts or cans, that can be given new life in your DIY projects. By being resourceful, you can find a wide range of materials to bring your creative visions to life.
Building the Chiller
If you’re looking for a way to keep your aquarium cool and comfortable for your aquatic pets, building a chiller is a great DIY project. To make a chiller for an aquarium, you will need a few tools and materials such as a refrigeration unit, insulated tubing, and a heat exchanger. First, you’ll need to connect the tubing to the inlet and outlet points of the refrigeration unit.
Then, you’ll need to connect the heat exchanger to the tubing and place it in the aquarium water. As the water flows through the heat exchanger, it will be cooled by the refrigeration unit. With a little bit of tinkering and some patience, you can create a chiller that is perfect for your aquarium.
It’s a cost-effective way to keep your pets happy and healthy during the hot summer months.
Step-by-step instructions
If you’re looking to build your own chiller, it’s important to know the steps involved to make sure you get it right. First off, you’ll need to gather all the necessary materials, including a foam cooler, aquarium pump, PVC pipe, and some copper tubing. Once you have everything you need, the next step is to drill holes in the cooler and attach the PVC pipe and copper tubing.
Then, you’ll need to fill the cooler with water and add ice to get it to the desired temperature. Finally, turn on the aquarium pump and watch as the water circulates, cooling in the process. It may take some trial and error to get it just right, but with a little patience and persistence, you’ll have your very own chiller in no time.
Remember, safety is key when working with electrical equipment and power tools, so be sure to take all necessary precautions and follow any directions or guidelines carefully. (See Also: How to Make Moss Balls for Aquarium: A Step-by-Step Guide for Beginners)
Tips and tricks for success
If you’re looking to build a chiller, there are a few things you need to keep in mind to ensure success. First and foremost, it’s important to choose the right components. Your chiller will rely on a compressor, condenser, evaporator, and expansion valve, so be sure to source high-quality options that suit your needs.
Additionally, you’ll want to ensure you have proper insulation and refrigerant control to optimize the efficiency of your chiller. When it comes to assembly, pay close attention to the details to avoid leaks or malfunctions. Consider using pipe dope or thread tape to seal connections and be sure to properly evacuate the system before charging with refrigerant.
With these tips in mind, you’ll be well on your way to building a reliable and efficient chiller for your needs.
Using the Chiller
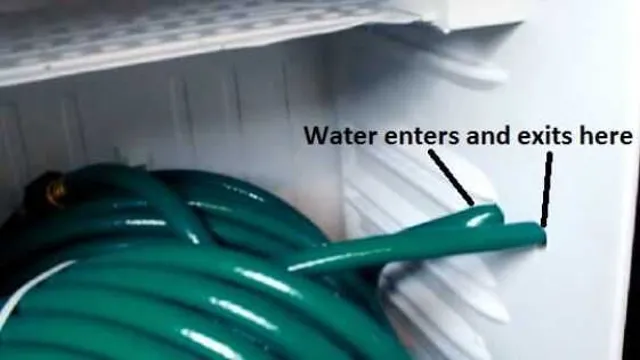
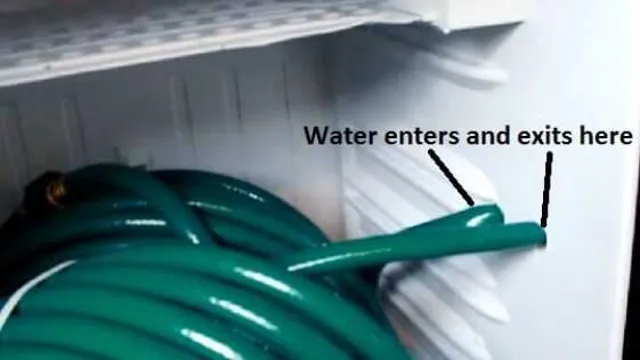
If you’re looking for a way to keep your aquarium water cool during the hot summer months, a chiller may be just what you need. Making a chiller for your aquarium isn’t as difficult as it may seem, and it can save you money in the long run compared to purchasing one. To start, you’ll need a mini fridge or chest freezer that can fit inside or next to your aquarium stand.
Next, you’ll need to remove the shelves or drawers and drill holes in the back for the tubing. Attach the tubing to the fridge or freezer and to a submersible pump, which will circulate the water from the aquarium through the chiller. Once everything is hooked up, turn on the fridge or freezer and adjust the temperature to your desired level.
Voila! You now have a functioning chiller for your aquarium. Remember to check on it periodically to ensure it’s working properly and adjust the temperature as needed. With a little bit of DIY know-how, you can keep your aquatic pets cool and comfortable all year round.
How to set it up
Setting up and using a chiller may seem like a daunting task, but with the right approach, it can be a breeze. First, make sure to select a chiller that fits your specific needs and the size of your system. Then, find a suitable location to install the unit, considering factors such as accessibility for maintenance and noise reduction.
Once installed, it’s essential to properly maintain the unit, including regularly cleaning filters and condenser coils and replacing any worn-out parts. Remember to also keep track of the unit’s performance to detect and address any issues early on. With these steps in mind, you can use your chiller with confidence, knowing it’s set up correctly and functioning optimally.
Whether it’s for industrial processes, air conditioning, or other applications, the right chiller can make a significant difference, keeping things running smoothly and efficiently.
Maintenance and cleaning
When it comes to using your chiller, it’s essential to perform regular maintenance and cleaning to ensure that it runs at peak performance. One crucial task is to regularly clean the condenser coils to prevent them from collecting dirt, dust, and debris that can obstruct airflow and decrease efficiency. You can do this by gently brushing the coils with a soft brush or using compressed air to blow away any loose particles.
Another important step is to change the chiller’s filters regularly to prevent them from getting clogged and decreasing airflow. Additionally, it’s crucial to ensure that your chiller’s coolant levels are adequate and to monitor the pressure gauges regularly. By performing proper maintenance and cleaning, you can prolong your chiller’s lifespan and avoid costly repairs down the line. (See Also: How to Clean Aquarium with White Vinegar: A Step-by-Step Guide for Sparkling Water)
Don’t forget to schedule a professional inspection at least once a year to make sure your chiller is running efficiently.
Conclusion
In conclusion, creating a chiller for your aquarium may seem like a daunting task, but with a little bit of DIY ingenuity, it can be a fun and rewarding project. Whether you opt for a simple ice-filled DIY cooler or a more complex refrigeration system, a chiller is necessary for maintaining a cool and comfortable home for your fishy friends. So get creative, gather your materials, and dive into the world of DIY aquarium chillers – your fish will thank you!
FAQs
What materials do I need to make a chiller for my aquarium?
To make a chiller for your aquarium, you will need a small refrigeration unit, copper tubing, a water pump, and a heat exchanger.
How does a chiller cool an aquarium?
A chiller works by pumping water through copper tubing in a heat exchanger, which cools the water before returning it to the aquarium.
What size chiller do I need for my aquarium?
The size of the chiller you need will depend on the size of your aquarium and the temperature requirements of the fish and other aquatic life you keep. A general rule of thumb is to have a chiller that can handle 2-3 times the volume of your aquarium.
Can I use a regular air conditioner as a chiller for my aquarium?
While it is possible to use a standard air conditioner to cool an aquarium, it is not recommended. Air conditioners are not designed for the specific needs of an aquarium, and can cause issues with water temperature regulation and humidity.
How often do I need to clean my aquarium chiller?
It is important to regularly maintain and clean your aquarium chiller to ensure it is functioning properly. This should be done every 3-6 months, depending on usage.
Can I adjust the temperature on my aquarium chiller?
Yes, most aquarium chillers have adjustable temperature settings that can be programmed to maintain a specific temperature range for your aquarium.
How much electricity does an aquarium chiller use?
The amount of electricity used by an aquarium chiller will vary depending on the size of the unit and how often it runs. It is important to choose a chiller with an energy-efficient design to minimize energy costs.

