Creating your own double wooden aquarium stand can be a fulfilling and rewarding experience for any DIY enthusiast. Not only will it be a great addition to any room in your home, but it also provides a secure and stylish display for your precious fish tanks. But where do you start and how do you make it? In this blog post, we will guide you through the step-by-step process of creating your own double wooden aquarium stand.
From selecting the materials to assembling your masterpiece, we’ve got you covered. Get ready to dive into the world of woodworking and aquariums!
Gathering Materials
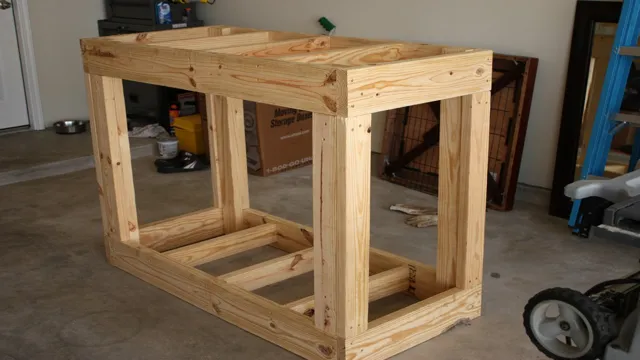
To make a double wooden aquarium stand, you’ll need to gather the right materials first. To start, get two sheets of plywood that are the same dimension as the aquariums you plan on using. You’ll also need four wooden posts, which will be used as the stand’s legs.
These posts should be long enough to support the plywood and the weight of the aquariums. You’ll also need screws, wood glue, sandpaper, and a saw. Once you have all the materials you need, it’s time to get started on building the frame.
Cut the plywood to the size you need for the top and bottom of the stand, then cut the wooden posts to the desired height. Sand down the edges of the wood to ensure a smooth finish and then use wood glue to attach the top and bottom pieces to the posts. Finish off by using screws to secure everything in place.
With the right preparation and materials, making a double wooden aquarium stand is a fun and rewarding DIY project.
Wood
When it comes to woodworking, choosing the right type of wood is crucial. Whether you’re building a table, a chair, or any other type of furniture, selecting the right wood is essential for achieving the best results. But, where do you start? Before you head to your local lumberyard, it’s important to have an idea of what you’re looking for.
Consider the type of project you’re working on, your budget, and the durability you need. You also want to look at the grain, color, and texture of the wood. Some popular types of wood include oak, cherry, maple, and mahogany, each with its unique characteristics and uses.
Oak is a sturdy and durable wood that’s perfect for furniture pieces that withstand wear and tear, while cherry wood has a beautiful grain pattern that’s ideal for accents or inlays. So, take your time and consider all the factors before making your final decision. With the right wood, you’re one step closer to creating a beautiful and functional piece of furniture.

Screws and Bolts
Gathering materials for a construction project can seem overwhelming, especially when it comes to selecting screws and bolts. These small but essential components play a critical role in ensuring the durability and stability of a structure. But with so many types and sizes available, it can be challenging to know where to start.
When gathering materials for a construction project, be sure to consider the specific application and load requirements. For example, if you’re working with wood, you’ll want to choose wood screws with sharp points and deep threads. On the other hand, if you’re dealing with metal components, you’ll need bolts with washers and nuts to keep them in place.
Whatever your project requires, take the time to carefully select the appropriate screws and bolts to ensure a safe and sturdy result.
Drill and Bits
When it comes to tackling a DIY project that involves drilling, it’s important to have the right drill and bits. But with so many options out there, it can be overwhelming to decide which ones to choose. The first step in gathering materials is to determine the size and type of hole you need to drill.
This will help you select the appropriate drill bit size and design. If you’re not sure what size bit to use, start with a smaller size and work your way up. It’s also important to consider the material you’ll be drilling into as different bits are designed for different materials.
For example, masonry bits are great for drilling into brick or concrete, while wood bits are better suited for drilling into softwood. Lastly, make sure to invest in a high-quality drill and bits as they will ensure accurate and efficient drilling. By taking the time to gather the right materials, you’ll be one step closer to DIY success.
Measuring and Cutting the Wood
If you’re looking to make a double wooden aquarium stand, then one of the first things you’ll need to do is measure and cut the wood. This step is crucial since it will determine the overall strength and stability of your stand. You’ll want to make precise measurements and use a saw with a fine blade to avoid splintering or damaging the wood. (See Also: How to Aquarium Fish Breeding: A Comprehensive Guide for Beginners)
One useful tip is to mark your measurements with a pencil before cutting to ensure accuracy. Additionally, be sure to wear gloves and safety goggles to protect yourself from harm. With careful attention to detail, you’ll be able to create a strong and sturdy aquarium stand that will house your fish tank for years to come.
Cutting the Legs
Measuring and cutting the wood for your project is a crucial step in successfully building furniture that will last for years to come. You want to ensure that you have the right measurements before you make the first cut, so take your time and measure twice! Once you have your measurements, use a saw to make your cuts. Depending on the project, you may need to use a miter saw, table saw, or circular saw.
It’s important to choose the right saw for the job and practice proper safety precautions. Once your pieces are cut, it’s time to consider how to join them together. You may use pocket screws, dowels, or other methods, but make sure to follow the instructions carefully to ensure a strong joint.
Don’t rush this step, as it can greatly affect the strength and durability of your piece. Remember, the quality of your woodworking project starts with precise measurements and carefully planned cuts.
Cutting the Side Rails
When it comes to building a bed frame, cutting the side rails is a crucial step. First, measure the length of the side rails and mark the wood accordingly with a pencil. It’s important to measure twice and cut once to ensure accuracy and avoid wasting materials.
Once the wood is marked, use a saw to carefully cut along the lines. Make sure to keep a steady hand to ensure a clean cut. Sand any rough edges to avoid splinters and create a smooth surface.
Remember, the side rails need to be strong enough to support the weight of the mattress and any additional weight on top, so choosing the right type of wood is important. Pine and oak are popular choices for bed frames due to their durability and sturdiness. Taking care when cutting the side rails will ensure a strong and stable bed frame that will last for years to come.
Cutting the Front and Back Rails
When building a fence, cutting the front and back rails is an important step to ensure proper installation. Before cutting the wood, it’s crucial to measure the length of the rails. The length should match the distance between the posts, allowing for a snug fit.
It’s essential to choose high-quality, sturdy wood for the rails. Once you have the measurements, mark them on the wood, and use a saw to cut the rails to length. It’s important to make sure the cuts are straight and precise to ensure a straight fence.
Always remember to measure twice to avoid any errors. A good tool to use is a speed square, which can help you make accurate cuts. Once you’ve cut the front and back rails, you can move on to cutting the pickets.
With proper measurements and care, you’ll have a beautifully crafted fence that will last for years to come.
Assembling the Stand
If you’re looking to build a double wooden aquarium stand, there are several steps you’ll need to follow to ensure your stand is secure and stable. First, gather all necessary materials, including wood, screws, and a saw. Next, measure and cut the wooden pieces according to your desired dimensions, making sure to sand down any rough edges.
Then, begin assembling the stand by connecting the legs and base with screws, ensuring everything is level and secure. Finally, add the top shelf, making sure it fits snugly and is evenly supported by the legs and base. Remember, when building a stand for your aquarium, safety is key.
Make sure to double-check all measurements and connections to ensure your stand can support the weight of your tank. With some careful planning and attention to detail, you can build a beautiful and sturdy double wooden aquarium stand for your home.
Creating the Frame
Creating the Frame To assemble the stand, you first need to create the frame. This involves connecting the poles or pieces that will support the rest of the stand. Begin by laying out all of the frame components and identifying which pieces correspond to each other. (See Also: How to Best Maintain a Plant Aquarium: Expert Tips and Tricks)
Then, start by connecting the base pieces and work your way up. You may need to use screws or other fasteners to securely attach the pieces together, depending on the design of your stand. Take your time to make sure each connection is tight and secure, as a wobbly stand could potentially damage whatever you are displaying on it.
Once you have connected all of the frame pieces, you are ready to move on to constructing the rest of the stand.
Attaching the Bottom Shelf
Attaching the bottom shelf is an essential step in assembling the stand for your bookshelf. Once you have the legs and the top shelf secured, it’s time to attach the bottom shelf, which serves as the foundation of your bookshelf. To do this, attach the support brackets to the legs and then slide the bottom shelf into place.
Ensure that the shelf sits levelly and then secure it with screws. This shelf will add stability to your bookshelf and provide a platform for additional storage. One metaphor to think about is that the bottom shelf is like the roots of a tree; just as the roots provide strength and stability to the trunk, the bottom shelf serves as the foundation for the entire bookshelf.
By attaching the bottom shelf, you are laying the groundwork for a sturdy and reliable piece of furniture that will hold your precious books for years to come.
Adding the Top Shelf
Now that we have assembled the base of the stand, it’s time to add the top shelf. You may have already noticed that your stand looks great, but it’s not very useful without a top shelf. The top shelf not only adds an extra storage space but also provides an elegant look to the stand.
You’ll need to gather the top shelf and the accompanying screws to attach it to the stand. Carefully align the holes of the top shelf with those of the stand and secure them with screws. The key here is to ensure that the top shelf sits on the stand securely and doesn’t wobble.
Once you have finished, you can step back and admire your handiwork. Congratulations, you have created a beautiful stand that is both functional and organized.
Finishing Touches
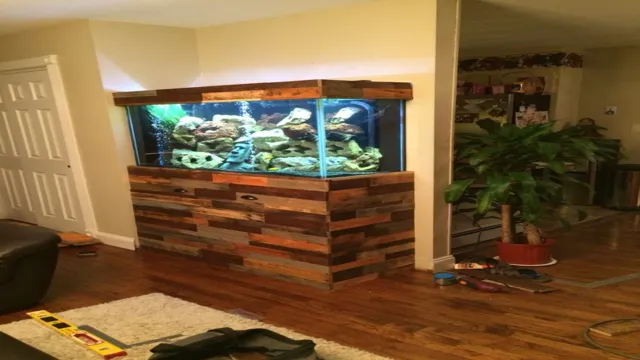
After constructing the frame of the double wooden aquarium stand, it’s time for the finishing touches. First, sand down any rough edges or surfaces to ensure a smooth finish. Next, apply a coat of primer to seal the wood and prepare it for painting.
Once the primer has dried, apply a coat of paint in a color that complements the surroundings or the aquarium itself. For added protection and a shiny finish, add a layer of polyurethane or a similar lacquer. Don’t forget to add small touches like decorative molding or handles to complete the look.
With a little bit of effort and attention to detail, your double wooden aquarium stand will become a beautiful addition to your home decor while providing the perfect display for your aquatic pets.
Sanding the Stand
After constructing the stand for your latest DIY project, you’ll want to ensure that it looks polished. This means sanding down the stand to ensure that it’s smooth and free of any splinters or rough surfaces. Sanding is an essential step in the finishing process as it helps to create a perfect surface for painting or staining.
Before beginning, you’ll want to choose the right sandpaper for your project. Coarse sandpaper will remove more material and is perfect for removing rough spots, while fine sandpaper is better suited for creating a smooth finish. Make sure to sand in the direction of the wood grain to avoid any damage.
Once you’ve finished sanding, wipe down the stand to remove any residual dust and debris and then apply the paint or stain of your choice. Your DIY project will look professional and clean with these finishing touches.
Applying Stain or Paint
When it comes to completing your woodworking or DIY project, the finishing touches are crucial, and applying paint or stain is one of the most important steps. Both options have their pros and cons, and the choice depends on personal preference, the type of wood, and the desired outcome. Applying stain enhances the wood’s natural grain, giving it character and depth, while paint can add color and protect the wood from damage. (See Also: How to Introduce Driftwood into an Aquarium: A Step-by-Step Guide)
It’s important to choose high-quality products and follow the manufacturer’s instructions to get the best results. Applying paint or stain requires patience, attention to detail, and a steady hand, as uneven applications can ruin the final look. Don’t forget to take the time to prepare the wood surface beforehand by sanding and cleaning it thoroughly.
By applying these finishing touches with care and precision, you can create a piece of furniture or decoration that you can be proud of for years to come.
Adding Hardware for Doors if Needed
When it comes to finishing touches for your door installation, sometimes adding hardware is necessary to ensure proper functionality. This can include items such as handles, locks, hinges, and even weatherstripping to prevent drafts and heat loss. Choosing the right hardware is important for both the aesthetic appeal and security of your door, so it’s important to consider the material, finish, and level of durability needed for your particular space.
Different types of doors may require different hardware, such as sliding or pocket doors that need flush pulls or bi-fold doors that require specialized hinges. By taking the time to carefully select and install the right hardware, you can ensure that your door is not only functional but also looks great and provides added security.
Conclusion
In conclusion, making a double wooden aquarium stand is more than just a craft project, it’s a labor of love that requires attention to detail and a keen eye for design. With the right tools, materials, and a touch of creativity, you can create a masterpiece that not only serves as a functional piece of furniture but also adds charm and character to your aquatic sanctuary. So, grab your saws, sandpaper, and paintbrushes, and embark on this DIY adventure that’s sure to impress both your fish and your guests alike!”
FAQs
What are the materials needed to make a double wooden aquarium stand?
The materials needed for a double wooden aquarium stand include wood boards, screws, wood glue, and a measuring tape.
How much weight can a double wooden aquarium stand hold?
The weight a double wood aquarium stand can hold depends on the type of wood used and the quality of the construction. It’s important to ensure that the stand is able to support the weight of the aquarium plus the weight of the water and any other aquarium equipment.
What are the benefits of making a double wooden aquarium stand?
Making a double wooden aquarium stand can be a cost-effective and customizable solution for holding your aquariums. It can be tailored to fit the specific size and weight requirements of your aquarium, and it can also provide extra storage space for aquarium equipment and supplies.
How do I measure the dimensions for my double wooden aquarium stand?
Using a measuring tape, measure the length, width, and height of your aquarium to determine the appropriate dimensions for your wooden aquarium stand. It’s also important to factor in any extra height needed for the aquarium equipment such as filters or heaters.
Can I paint or stain my double wooden aquarium stand?
Yes, you can paint or stain your wooden aquarium stand to match your home decor or personal preference. Just be sure to use a non-toxic paint or stain that is safe for aquarium use.
How long does it take to build a double wooden aquarium stand?
The time it takes to build a double wooden aquarium stand depends on your level of experience with woodworking and the complexity of the design. It can take anywhere from a few hours to a few days to complete the project.
Are there any safety precautions I should take when building a double wooden aquarium stand?
Yes, when building a double wooden aquarium stand it’s important to wear appropriate protective gear such as gloves, safety glasses, and ear protection. It’s also important to use caution when handling power tools and to follow all safety instructions.


