Are you interested in setting up a saltwater aquarium at home? If so, one of the most crucial components you’ll need is a sump. A sump is an extra tank that connects to your main aquarium and helps maintain a stable and healthy environment for your fish and other marine life. While it may seem intimidating to create your sump, it’s actually quite simple with the right guidance.
In this blog post, we’ll walk you through how to make a saltwater aquarium sump step-by-step, so you can enjoy a thriving aquatic ecosystem in the comfort of your own home. So, let’s dive in and explore the world of sump building!
Overview of a Sump
If you’re looking to set up a saltwater aquarium, you may hear the term “sump” thrown around quite a bit. But what exactly is a sump, and why would you need one? Essentially, a sump is an additional tank or reservoir that sits beneath your main aquarium, connected by pipes. It provides a place for excess water to flow, as well as a spot for your equipment, such as filters and heaters, to be housed.
A sump can also increase the total water volume of your system, which can help keep your water parameters more stable. To make a sump for your saltwater aquarium, you’ll need to select a tank that fits your needs, add a baffle system to help control water flow, and plumb it to connect to your main tank. While it may sound complicated, with some research and planning, even a beginner can successfully set up and utilize a sump in their aquarium system.
What is a Sump?
A sump is a catch basin that’s commonly used in plumbing systems to collect any accumulated fluids. It’s typically placed in the lowest part of the system and is responsible for removing water and ensuring proper drainage. Sumps are useful in preventing water damage in basements, as well as preventing flooding during heavy rainfall.
They work by collecting excess water and diverting it away from the home’s foundation, which can help to prevent soil erosion and structural damage. Additionally, sumps can be used to collect and process wastewater from various sources, like washing machines or dishwashers. By providing a convenient place to capture water, a sump can help to keep your plumbing system working smoothly and efficiently, preventing damage and prolonging the lifespan of your pipes.
So, if you’re looking for a way to protect your home from water damage or simply want to improve the overall functionality of your plumbing system, consider adding a sump to your home’s infrastructure.
Why You Need a Sump?
If you’re a homeowner, you may have heard about the importance of having a sump pump installed in your basement. But what exactly is a sump and why do you need one? A sump is essentially a pit that is dug in your basement floor and houses a pump that is designed to remove any excess water that may collect in your basement. This can happen due to heavy rainfall, melting snow, or even a burst pipe.
Without a sump, this excess water can cause all sorts of damage to your foundation, walls, and personal belongings. A sump pump ensures that any accumulated water is promptly removed before it can cause harm. The best part? With a sump pump installed, you can have peace of mind knowing that your home is protected from water damage, even during the wettest conditions.
So if you haven’t already, consider installing a sump in your home to protect your investment and keep your family safe.
Essential Parts of a Sump
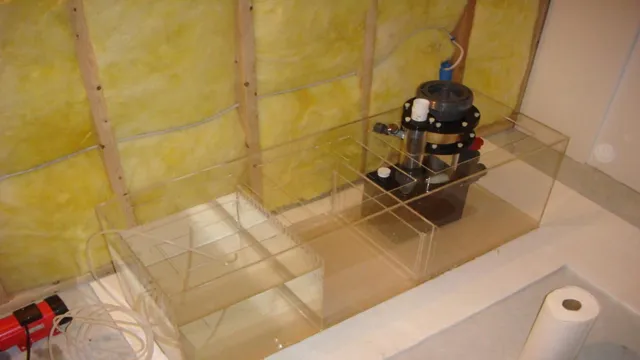
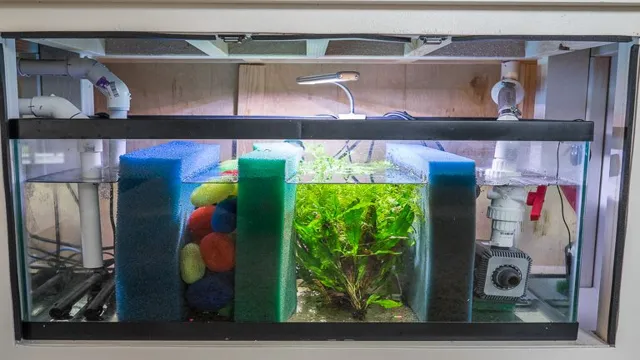
If you’re considering setting up a saltwater aquarium, you might be wondering how to make a sump that works effectively. In essence, a sump is a container that sits beneath the main display tank and holds various components like a protein skimmer, mechanical and biological filtration media, and a return pump. An essential part of a sump is a baffle, which separates the sections and controls the flow of water.
It’s usually made of acrylic and creates a quiet and efficient space for the equipment to function. Another critical component to consider is the return pump, which sends the water back to the display tank. It needs to be appropriately sized and powerful enough to handle the amount of water it’ll pump.
Additionally, the protein skimmer works to remove organic waste and ensures that the water is clear and healthy for the fish. A good quality skimmer will ensure that the water parameters remain stable. These are just a few of the crucial elements that make up a functional sump, and it’s essential to follow expert guidelines that can help you create a perfect sump for your saltwater aquarium.
Overflow Box
An overflow box is one of the essential parts of a sump system. It works by allowing water to flow through a small opening, which then creates a siphon effect that pulls water from the tank into the sump. This is important because it helps keep the water level in the tank stable and prevents overflow.
Overflow boxes come in different sizes and designs, and choosing the right one depends on the size and type of your tank. Some overflow boxes come with built-in strainers to filter out debris before water flows into the sump. If you’re setting up a sump system, be sure to invest in a quality overflow box to ensure proper water flow and prevent any potential disasters. (See Also: How to do Large Water Change in Large Aquariums: The Ultimate Guide for Beginners)
Skimmer
One vital part of a sump system is a skimmer. Essentially, a skimmer is designed to remove organic waste, such as fish excrement and uneaten food, from the water in your tank before it has a chance to break down and cause ammonia spikes. Skimmers work by creating a column of tiny bubbles that attract waste to the surface, where it is then removed through a collection cup or similar mechanism.
While some aquarium hobbyists may opt to skip the skimmer altogether, it is considered an essential component of most sump systems, as it can significantly improve water quality and reduce the need for frequent water changes. Investing in a high-quality skimmer is well-worth the expense, as it can help maintain a healthy and thriving aquatic environment for your fish and other aquatic inhabitants.
Refugium
Refugium Essential Parts of a Sump When it comes to creating a healthy and thriving aquatic environment, a sump is an essential piece of equipment to consider. A sump is a type of filter that connects to the aquarium and helps to maintain water quality by removing waste and impurities. One important component of a sump is a refugium.
A refugium is a small section of the sump that serves as a safe haven for small organisms to thrive and grow. It can include live rock, plants, and sand to provide an environment with beneficial bacteria, algae, and invertebrates. The refugium can help to control nutrients in the water, which can prevent algae blooms and promote healthy fish and coral growth.
It also offers a place for organisms to reproduce and grow, which can contribute to a thriving and diverse ecosystem in the aquarium. Overall, a refugium is an essential part of a sump for maintaining a healthy and balanced aquatic environment.
Steps to Building Your Own Sump
Building your own sump for your saltwater aquarium can be a challenging but rewarding project. The first step is to gather all the necessary equipment, including a tank for your sump, a pump, and plumbing materials. You’ll want to design your sump based on the size of your aquarium and the specific needs of your fish and coral.
Measure and cut holes in your sump for the pump and plumbing, making sure they are level and secure. Once you have everything in place, you can start configuring your filtration system. You may want to include mechanical, chemical, and biological filtration methods to ensure a clean and healthy environment for your aquatic friends.
Don’t forget to test and adjust your water parameters regularly to maintain optimal conditions. With a little patience and TLC, your homemade sump can be a great addition to your saltwater setup.
Selecting the Right Tank for Your Sump
When it comes to building your own sump, it’s essential to choose the right tank size. First, consider the space you have available, as well as the amount of water you plan to filter. A good rule of thumb is to have a sump that can hold at least 10% of your total aquarium volume.
So, for a 100-gallon tank, a sump of at least 10 gallons would be suitable. However, you should also take into account the size of your equipment, such as your protein skimmer and return pump. Make sure to select a tank that will provide enough space for all of your gear to fit comfortably.
Additionally, consider the shape of the tank. A rectangular tank is typically the most practical for a sump, as it allows for more efficient use of space and better water flow. With these factors in mind, you can select the right tank for your sump and ensure that it functions effectively as part of your aquarium system.
Creating the Baffle System
If you’re looking to build your own sump, one crucial component to consider is the baffle system. The baffle system is responsible for regulating the water flow inside your sump and preventing any unwanted debris or bubbles from entering your main display tank. To create a baffle system, you’ll need to purchase glass baffles of the appropriate size and shape.
First, measure the length and width of your sump’s divided sections to determine the dimensions of your baffles. Next, carefully place the baffles in the sump and seal the edges with aquarium silicone to prevent any water from seeping through. Once your baffles are securely in place, it’s time to install your sump’s other components including the return pump, protein skimmer, and heater. (See Also: How to Breed Discus Fish in Aquarium: Expert Tips and Techniques)
With a properly installed baffle system, your sump will efficiently filter out unwanted debris and help keep your aquarium environment clean and healthy.
Installing the Parts in the Sump
When installing the parts in the sump, it’s essential to follow the right steps to get the desired result. Firstly, install the baffles as they are the backbone of the sump, preventing water from flowing freely. Make sure to secure them tightly and in the right position.
Secondly, add any filters or media reactors according to your needs. Filter socks or foam blocks can be utilized for removing debris and particulate matter. Lastly, install the return pump by placing it in an appropriate position in the sump.
Ensure that it is placed horizontally and can maintain prime at all times. Once all parts have been installed, check for any leaks and adjust components as necessary. With these steps, your sump will be ready to take on the essential task of filtering your aquarium water, keeping your fish and other aquatic life healthy.
Connecting the Sump to Your Saltwater Aquarium
Building your own sump for your saltwater aquarium can be a rewarding and cost-effective project. It’s essential to connect the sump properly to ensure the water flow is stable and efficient. First, you need to determine the size and shape of the sump that best fits your requirements.
Next, create a diagram to map out the layout of the sump and its components, including the protein skimmer, return pump, and heaters. Before connecting the sump, make sure your aquarium is level and stable, and consider using PVC pipes to make the plumbing connections. When connecting the sump to the aquarium, ensure the return pump is positioned slightly above the waterline to prevent siphoning and use a check valve if needed.
Remember to test the system for leaks and make adjustments as necessary. By following these steps, you can successfully build and connect a sump to your saltwater aquarium, providing a high-quality filtration system for your aquatic pets.
Maintenance of Your Sump
If you’re setting up a saltwater aquarium, one important element to consider is a sump. This is essentially an overflow tank that works to filter the water in your aquarium. While a sump can be beneficial for keeping your tank clean and healthy, it’s important to maintain it properly.
Regular cleaning is crucial to prevent buildup of debris and grime inside the sump, which can lead to clogs and ultimately harm your system. Make sure to clean the sump regularly with proper brushes and antimicrobial solutions to ensure a healthy environment for your saltwater species. With proper care, your sump can help keep your aquarium thriving for years to come.
Cleaning the Sump
Maintaining your sump is crucial to ensure its longevity and efficiency in keeping your aquarium clean and healthy. Regular cleaning of the sump is an essential aspect of its maintenance, and one of the most important steps is to clean the debris from the sump regularly. Debris from the aquarium can accumulate in the sump over time, making it harder for the sump to function correctly.
To clean the sump, take out any rocks or other décor placed in it, and use a siphon to remove any debris. Make sure to scrub the walls and the bottom of the sump with a cleaning brush to remove any stubborn waste. Also, make it a habit to clean the sump at least once a month and have a backup sump if your primary one needs repair.
By regularly cleaning your sump, you can ensure it runs well, extends its lifespan, and maintains a healthy aquarium.
Replacing or Upgrading Parts
When it comes to maintaining your sump, replacing or upgrading parts can be a necessary task. There are a few things to consider when deciding if it’s time to replace a part or upgrade to something newer and better. Firstly, you should inspect your sump regularly and look for signs of wear and tear.
If you notice any cracks, leaks, or corrosion on any components, it’s time for a replacement. Additionally, if your sump pump is not pumping water out as efficiently as it used to, it might be time to upgrade to a newer and more efficient model. Another thing to keep in mind is the age of your sump. (See Also: How to Add a Decoration to an Existing Aquarium: Tips and Techniques for Enhancing Your Underwater World)
As with all appliances, parts can wear out over time, and if your sump is an older model, it might be a good idea to upgrade to something more modern. Taking care of your sump by replacing or upgrading parts as needed will help ensure it keeps functioning smoothly for years to come.
Conclusion
In conclusion, creating a sump for your saltwater aquarium is like building a secret underground lair for your aquatic friends. It takes some planning, creativity, and a bit of elbow grease, but the payoff is worth it. Your marine life will have more space and a carefully controlled environment to thrive in, while you enjoy a cleaner, clearer display tank.
So grab your tools and start digging (or at least measuring), because a sump is the ultimate upgrade for any serious saltwater hobbyist!”
FAQs
What materials do I need to make a sump for a saltwater aquarium?
You will need a tank or container for the sump, plumbing pipes and fittings for water flow, and a return pump to send water back to the aquarium.
Where should I place the sump in relation to my saltwater aquarium?
The sump can be placed below, next to, or behind the aquarium. Just make sure to take into consideration the distance between the sump and the aquarium for plumbing and flow purposes.
How much water should I aim to have in my sump?
It’s recommended to aim for at least 10% of the total water volume of your aquarium, but having a larger sump can provide more biological filtration capacity.
Can I use a regular container or tank as a sump for my saltwater aquarium?
Yes, as long as it can hold water and has the necessary plumbing fittings for water flow.
How often should I clean my sump?
It’s recommended to clean the sump every 3-6 months, depending on the bio-load and maintenance schedule of your aquarium.
Do I need any special skills or knowledge to set up a sump for my saltwater aquarium?
Basic plumbing skills and knowledge of aquarium water flow dynamics are helpful, but there are many resources and guides available online to guide you through the process.
What are the benefits of using a sump for my saltwater aquarium?
A sump can provide additional biological filtration, house equipment such as protein skimmers and heaters, and help increase overall water volume for more stability in the aquarium.

