Are you searching for a budget-friendly way to showcase your beautiful aquatic pets without breaking the bank? Look no further than creating your own aquarium stand! Not only is it a cost-effective solution, but it can also be customized to fit your specific needs and preferences. With a little bit of patience and creativity, you can construct a sturdy and attractive stand that will provide a safe and comfortable home for your fish. In this blog post, we will walk you through the process of making a cheap aquarium stand to help elevate your underwater oasis.
Get ready to dive into the world of DIY aquarium furniture!
Materials Needed
Making a cheap aquarium stand doesn’t have to be a daunting task. With a little bit of creativity and some inexpensive materials, you can easily create a sturdy and reliable stand to support your aquarium. To get started, you will need some 2×4 boards, plywood, screws, and wood glue.
You can find these materials at your local home improvement store for a relatively low cost. Additionally, you will need a saw, drill, and measuring tape to cut and assemble the pieces. While it may seem like a lot of work, building your own aquarium stand can save you a significant amount of money and give you a sense of satisfaction knowing that you created it yourself.
With just a little bit of time and effort, you can have a functional and affordable stand that will support your aquarium for years to come.
Choice of Wood
When it comes to the choice of wood for your woodworking project, there are several options available to choose from. Each type of wood has unique characteristics that can impact the appearance and durability of your finished product. Some of the most commonly used woods in woodworking include oak, pine, maple, mahogany, and cherry.
Oak is a popular option for furniture as it is sturdy and durable, while maple is known for its light color and grain patterns. Pine is a softer wood that may dent easily but can add a warm and rustic feel to your project. Mahogany and cherry woods are both darker in color and can give a rich and luxurious touch to your project.
Ultimately, the choice of wood will depend on your specific project needs, style preferences, and budget. With the right choice of wood, you can create a stunning and unique masterpiece that will last for years to come.
Screws and Nails
When it comes to building or repairing anything, having the right materials is essential. For fastening wood together, the two most common options are screws and nails. Screws are versatile and can be used in a variety of situations, while nails are best for applications where sheer strength is needed.
To decide which to use, consider the task at hand and the materials being worked with. For example, if the wood is prone to splitting, screws are a better choice. Meanwhile, if a project requires joining two pieces of wood, nails might be a better option due to their shear strength.
It’s important to choose the correct size and type of fastener for the job to ensure a secure and long-lasting result. When shopping for screws and nails, look for ones that are made of high-quality materials to ensure reliability. With the right materials and some careful consideration, your project will turn out great!
Measuring Tape
If you’re planning on measuring something, the first tool you reach for is likely going to be a measuring tape. While measuring tapes are relatively simple tools, there are a few things you need to keep in mind before using one. First off, you’ll obviously need a measuring tape – make sure it’s a good quality one that’s easy to read and has precise markings.
Additionally, you may want to have a pencil and notepad on hand to record measurements as you go. Finally, if you’re measuring something particularly large or heavy, you may want to recruit a second person to help you out. By ensuring you have the right tools on hand, you’ll be able to get accurate measurements every time.
Mitre Saw
If you’re looking to use a mitre saw for your next woodworking project, it’s important to know the materials you’ll need to get started. Of course, you’ll need the mitre saw itself, but you’ll also need a few other essentials. Firstly, you’ll need a workbench or table to set up your saw and work on your project. (See Also: How to Make a Plastic Aquarium Hood: A Step-by-Step Guide for Fishkeepers)
You’ll also need saw blades to attach to your mitre saw – make sure you choose the right blade for the material you’re working with. A power source is also essential, so make sure you have access to an outlet or extension cord to power your saw. Additionally, safety equipment should not be overlooked – goggles, ear plugs, and a dust mask are all crucial for keeping yourself safe while operating a mitre saw.
By having these materials on hand, you’ll be ready to start your mitre saw project with confidence.
Drill
When it comes to using a drill, there are a few essential materials that you need to have on hand to ensure success. First and foremost, you’ll need the drill itself. There are many different types of drills available, each with its own unique features and capabilities.
It’s important to choose the right drill for the job at hand, so make sure you do your research before making a purchase. Next, you’ll need a set of drill bits. These come in a variety of sizes and can be made from different materials based on the type of surface you’ll be drilling into.
Finally, you’ll need some sort of lubricant or coolant to keep the temperature down and prevent overheating. This is especially important when drilling through tough materials like metal or concrete. By having these materials on hand and using them properly, you can ensure that your drilling project will be a success.
Steps to Make the Aquarium Stand
If you’re looking for a budget-friendly way to create an aquarium stand, here are some steps to help you make one. Firstly, gather the materials needed for the project, such as plywood, 2x4s, screws, and an electric saw. Measure and cut the plywood for the base and top of the stand, and attach the 2x4s for support of the aquarium.
Next, cut and attach the legs to the base of the stand. Sand down any rough edges and paint or seal the stand to protect it from moisture. Finally, securely place the aquarium on the stand and fill it with water.
Remember, safety is crucial when working with electric saws and heavy materials, so make sure to follow all safety guidelines. Creating a cheap aquarium stand takes some effort and patience, but the result can be both functional and decorative for your aquatic pets.
Cutting the Wood Pieces
Cutting the wood pieces is an essential step when making an aquarium stand. You will need to ensure that the pieces are cut precisely to the right size and shape to fit together perfectly. To start, gather all the necessary tools: a measuring tape, a saw, and a straight edge.
Then, take your measurements and mark the wood pieces using a pencil or marker. Make sure to double-check your measurements before making any cuts to avoid costly mistakes. Once you are confident in your measurements, use the saw to cut the wood pieces to the correct size and shape.
Always take your time with this step to ensure that your cuts are straight and accurate. Remember to wear protective gear such as gloves and eye protection when working with saws. With your wood pieces cut to perfection, it’s time to move on to the next step in building your aquarium stand.
Assembling the Frame
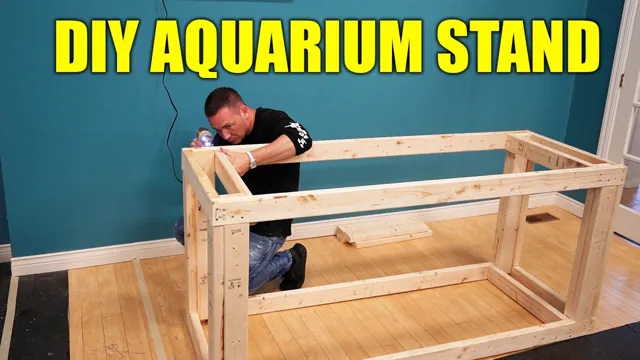
Assembling the frame is an essential part of making a sturdy and reliable aquarium stand. The first step is to measure and cut all the wooden pieces needed for the frame. It is crucial to ensure that the measurements are precise as any slight errors may cause the stand to wobble or collapse under the weight of the aquarium.
Once all the wood pieces are cut, they can be assembled using screws and wood glue. The frame should be square and level, which can be achieved by using a carpenter’s square and a level. It is recommended to let the wood glue dry overnight before proceeding to the next step.
Assembling the frame may seem like a simple task, but it is crucial to take the time and effort to do it correctly to avoid any safety issues down the line. By following these steps, you will have a sturdy and reliable frame for your aquarium stand that can hold the weight of your aquarium without any trouble. (See Also: How to Protect Aquarium Light from Water Damage: Tips and Tricks)
Attaching the Legs
When it comes to making your own aquarium stand, attaching the legs is an essential step. First, you will want to measure and cut your legs to the desired height of your stand. Then, using screws or bolts, attach the legs to the base of the stand.
It is important to make sure the legs are securely fastened to prevent any wobbling or instability. Additionally, using a level during the attachment process can help ensure that the stand is even and stable. Once the legs are attached, the stand is starting to take shape and can be further customized to fit your aquarium’s specific needs.
By taking care during the leg attachment process, you can create a strong and stable stand that will securely hold your aquarium for years to come.
Support Braces
Support Braces Aquarium stands are essential to secure your fish tanks from falling over, and with the help of support braces, you can make an even more sturdy platform. Firstly, you will need to thoroughly clean your workspace and gather all the required tools and materials like wood, clamps, screws, and saw. Once you have the necessary items, you can start measuring the stand’s size and cut the wood into manageable shapes.
It’s crucial to cut the pieces on a flat surface and checkout for any protrusions or errors. After cutting, smooth out the edges with sandpaper and use clamps to hold the braces in place. Secure the braces by screwing them into the bottom section of the stand with modern support screws to keep it from destroying the wood.
Finally, inspect the smoothness of the braces, and if you’re satisfied, you can add varnish or paint to make it look more elegant. With proper care and maintenance, your aquarium stand will endure for years to come.
Optional Additions
Are you looking to add some additional features to your DIY aquarium stand? There are plenty of optional additions that can make your stand even more functional and visually appealing. For instance, you can install LED lighting under the stand to illuminate your tank from below, giving it a sleek and modern look. Adding a storage cabinet or shelves can also be a great way to maximize space and keep all of your aquarium-related items organized.
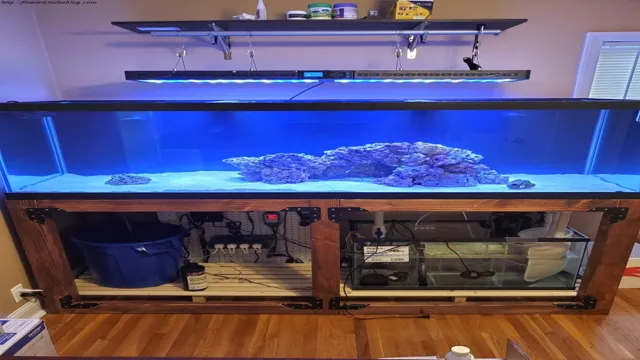
Another optional addition can be a cutout in the stand for easy access to a sump or filtration system. These simple yet effective upgrades can take your cheap aquarium stand to the next level, making it both practical and visually appealing. With a little creativity and some basic tools, you can customize your stand to fit your needs and budget while still achieving a professional look.
Painting and Finishing
When it comes to painting and finishing a project, there are various optional additions that can enhance its overall appearance and durability. One such addition is the use of a sealant, which can protect the surface from moisture, UV rays, and other environmental factors. A sealant can be applied after the paint has dried and cured, and it can provide an extra layer of protection against wear and tear.
Another optional addition is the use of metallic or glitter additives, which can create a unique and eye-catching finish. These additives can be mixed into the paint or applied on top of it, and they can add dimension and sparkle to the surface. However, it’s important to note that these additives may also affect the drying time and consistency of the paint, so it’s best to follow the manufacturer’s instructions carefully.
Other optional additions may include using a primer to ensure better adhesion, adding in texture with a specialty tool or brush, or using a glaze to give the surface an aged or antique look. Ultimately, the choice of optional additions will depend on the desired outcome and the specific project at hand.
Adding Storage Shelves
If you’re looking to add some extra storage space to your home or office, consider installing some shelves. Shelves are a great way to maximize vertical space and keep things organized. There are a variety of different types of shelves available, from simple floating shelves to more elaborate built-in units.
Whatever your needs and budget, there is certainly a shelf solution that will work for you. Keep in mind that shelves can also be a great way to add some style and personality to a space. Try experimenting with different shapes, colors, and materials to find a shelf that fits with the overall aesthetic of your room. (See Also: How to Make Aquarium Bonsai Tree: A Step-by-Step Guide for Beginners)
Whether you’re looking to store books, display decorative items, or just keep things tidy, shelves are a versatile option that are sure to meet your needs.
Conclusion
In conclusion, making a cheap aquarium stand is not rocket science, but it does require a bit of creativity and basic DIY skills. With a little bit of patience and some elbow grease, you can create a functional and stylish stand that will not only hold your aquarium, but also impress your friends and family. So don’t be afraid to get your hands dirty and try out this fun and practical project.
Who knows, you might even discover a new hobby or passion along the way!”
FAQs
What materials do I need to make a cheap aquarium stand?
You can make a cheap aquarium stand with plywood, 2x4s, screws, and wood glue.
Can I make a cheap aquarium stand without any power tools?
Yes, you can make a cheap aquarium stand using hand tools like a saw, drill, and screwdriver.
How much weight can a cheap DIY aquarium stand hold?
A cheap DIY aquarium stand can hold up to 500 pounds depending on the design and materials used.
Where can I find plans to make a cheap aquarium stand?
You can find plans to make a cheap aquarium stand online or in aquarium hobbyist forums.
Do I need to seal or finish my cheap DIY aquarium stand?
Yes, you need to seal or finish your cheap DIY aquarium stand to protect it from moisture damage.
Can I customize the design of my cheap DIY aquarium stand?
Yes, you can customize the design of your cheap DIY aquarium stand to fit the size and shape of your aquarium.
How long does it take to make a cheap DIY aquarium stand?
It can take anywhere from a few hours to a few days to make a cheap DIY aquarium stand depending on the complexity of the design and the tools and materials available.

