Have you been thinking of adding some personality to your aquarium? Look no further than a DIY aquarium background! Not only will it enhance the aesthetic appeal of your fish tank, but it can also provide a naturalistic environment for your fish. Plus, it’s a fun and creative project to tackle on your own. In this step-by-step guide, we’ll walk you through everything you need to know to create a stunning aquarium background that you’ll be proud to show off.
So, roll up your sleeves and let’s get started!
Materials Needed
If you’re looking to add a unique touch to your aquarium, one way to do that is by creating a DIY aquarium background. To get started, you’ll need a few materials. First, you’ll need the main material for the background, which can be anything from Styrofoam or plastic to plywood or cork.
Next, you’ll need a good quality silicone adhesive to attach the background to the aquarium walls. You’ll also need a sharp knife or saw to shape the background to fit your tank and a ruler or measuring tape to ensure accuracy. For decoration, you can use aquarium-safe paints, rocks, sand, plants, or any other creative ideas you have in mind.
Remember to research the safety of all materials before introducing them to the aquarium environment. With the right materials and a bit of creativity, you can create a beautiful and unique aquarium background that your fish will love.
List of Required Items for the Project
If you’re planning a project, it’s crucial to have a list of all the necessary materials and items to ensure its success. Whether it’s a home renovation, DIY craft project, or a simple repair job, having the right tools and supplies on hand can save you both time and money. The list of required items for a project will depend on its nature and scope.
For example, if you’re remodeling your kitchen, you’ll need items like paint, brushes, rollers, sandpaper, wood filler, tiles, and fixtures. In contrast, a sewing project may require fabric, needles, thread, and scissors. It’s essential to research what tools and materials you need before you begin the project, including checking to make sure you have the right safety gear.
Overall, creating a detailed list of all the required items will make sure you’re adequately prepared and ensure your project goes smoothly.
Preparation
If you’re looking to add some personality to your aquarium, creating a DIY aquarium background can be a fun and rewarding project. Before you get started, make sure you have all the necessary materials on hand. This will typically include foam sheets, silicone sealant, and aquarium-safe paint.
You should also have a clear plan in mind for the design and layout of your background. Consider the size and shape of your aquarium, as well as any rocks, plants, or other decorations you may want to incorporate. Take your time during the preparation stage to ensure you have everything you need and a clear vision for your DIY aquarium background, as this will make the project run much more smoothly and ensure a successful outcome.
Choosing the Right Type of Background
When it comes to choosing the right type of background, preparation is key. Before selecting a backdrop for your photo or video shoot, it’s important to consider the purpose of the content and the desired mood or tone. Are you aiming for a professional look or a more casual vibe? Will the background complement or distract from the subject of the shot? These are important questions to answer before making a decision.
It’s also important to consider the lighting conditions of the location where you’ll be shooting. Will the background be properly lit, or will it be too bright or too dark? Taking these factors into account can help you choose the perfect background for your content. By doing your homework beforehand, you can ensure that your final product is visually pleasing and effective in conveying your message.
Cleaning and Preparing the Aquarium For Installation
When preparing your aquarium for installation, it’s important to start with a clean slate. This means emptying out any old water and removing any decorations or plants that may be inside. Once the tank is emptied, use an aquarium-safe cleaner to scrub down the walls and floor of the tank to remove any algae or debris.
Rinse the tank thoroughly with clean water and allow it to air dry before moving on to the next step. It’s also important to make sure your equipment, such as filters and heaters, are cleaned and in good working order before reinstalling them in the tank. Taking the time to properly prepare your aquarium will not only ensure a healthy environment for your fish, but also help to prevent any potential issues in the future.
Remember, a little extra effort now can save you time and money down the road. (See Also: How to Acidify Aquarium Water: Tips and Techniques for Optimal pH Levels)
Construction
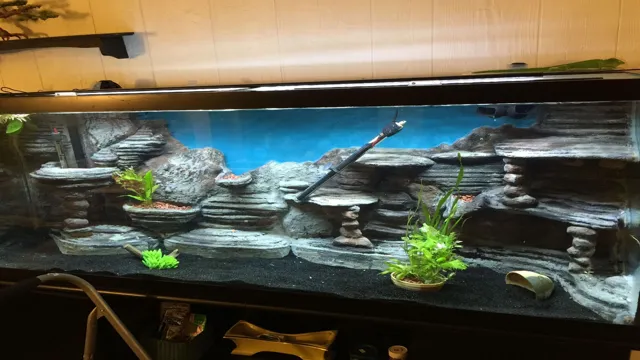
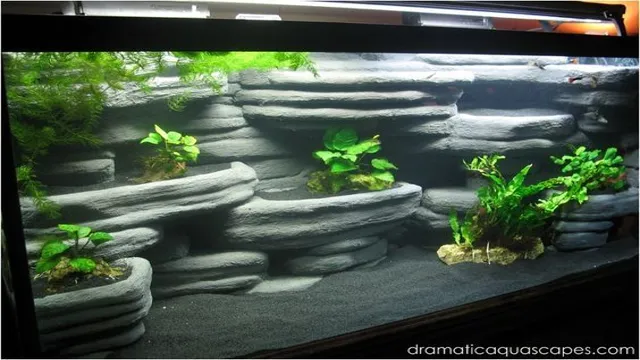
If you’re looking for a fun DIY project to enhance your aquarium, building your own background can be a great option! To get started, you’ll need a foam board, a utility knife, and aquarium-safe silicone sealant. Begin by sketching out your design on the foam board and carving it out with the utility knife. Be sure to leave plenty of grooves and texture for fish to swim through and for plants to attach to.
Once you’re satisfied with your design, seal the foam board with a layer of silicone sealant. You can then add additional layers of texture and color using aquarium-safe paint, sand, or gravel. Once everything is dry and cured, simply set your new background into your aquarium and enjoy the beauty it brings to your aquatic world.
With just a little time and effort, you can create a unique and personalized background that will provide both visual interest and functional benefits for your fish. So why not give it a try and see what kind of creative designs you can come up with?
Design Planning & Sketching
When it comes to construction projects, design planning and sketching are essential parts of the process. Before any work can begin, careful consideration must be given to the layout, materials, and aesthetics of the build. This is where design planning and sketching come in.
These steps help create a tangible vision of the end result and allow for adjustments to be made before construction begins. Sketching also helps to identify any potential challenges or limitations in the building process and allows for problem-solving solutions early on. As construction projects are inherently complex, design planning and sketching provide a roadmap for the process and ensure that all parties involved are on the same page.
Overall, taking the time to plan and sketch before construction begins is crucial for a successful and efficient build.
Making the Base for the Background
When constructing the base for the background of your project, there are a few things to keep in mind. Firstly, you’ll need to choose the right materials for the job. Depending on the size and scale of your project, you may want to consider using wood or metal framework to provide strength and stability.
Once you’ve decided on your materials, you can begin measuring and cutting them to size. It’s important to be precise with your measurements to ensure a sturdy and stable base. Once your framework is in place, you can attach your chosen background material, whether it’s plywood, fabric, or something else entirely.
By taking the time to construct a solid base for your background, you’ll be setting yourself up for success in the rest of your project. So take your time and be sure to get it right!
Creating the Texture & Features
Construction is a crucial stage in creating the texture and features of any project. It involves the actual building process using materials such as wood, concrete, steel, or masonry, among others. During construction, it is necessary to ensure that the design plan is being followed, and the right materials are used.
This phase requires a team of skilled workers, including architects, engineers, contractors, and builders, who work together to ensure that the project is completed on time and within the budget. One important aspect of construction is safety, and every effort must be made to ensure that all workers and visitors are safe throughout the process. The use of personal protective equipment, proper training, and strict adherence to safety protocols are all crucial to this end.
Overall, construction is the backbone of any project, and it is essential to have a well-planned and executed construction phase to ensure a successful outcome.
Finishing Touches
Now that you have successfully made your DIY aquarium background, it’s time for some finishing touches! First, make sure to rinse the background thoroughly with water before adding it to your aquarium. This will remove any excess debris or dust that may have accumulated during the crafting process. Next, carefully place the background into your tank and secure it in place with aquarium-safe silicone sealant. (See Also: How to Clean Aquarium Glass Stains: Quick & Easy Tips for Crystal Clear Glass)
Once it has dried, you can add some plants or decorations to the background to give your aquarium some additional flair. Don’t forget to regularly clean your aquarium and the background to prevent any algae or bacteria buildup. With these simple steps, your DIY aquarium background will look amazing and add a unique touch to your aquatic ecosystem.
Painting and Priming
Painting and priming are crucial steps in achieving a smooth, flawless finish on any surface. These finishing touches ensure that both the color and texture of the paint adhere properly to the surface. One can’t have a perfectly finished surface without properly priming it first.
Primer acts as a base coating that fills in tiny gaps and cracks in the surface, ensuring that the paint will adhere properly and last longer. To achieve the best results, one should choose a high-quality paint and primer combo, as they are specifically designed to work together to create superior coverage and durability. It’s also important to make sure the surface is clean and dry before painting or priming, as any dirt or residue will prevent proper adhesion.
By paying attention to these crucial details, one can achieve a beautiful, long-lasting finish that will make any surface look brand new.
Installing the Background into Your Aquarium
When it comes to adding the final touches to your aquarium, installing the background is an important step. It not only enhances the overall aesthetics of the tank, but also provides a sense of security to your fish by blocking out external stimuli. Installing the background is a simple process.
First, make sure your aquarium is clean and dry. Then, place the background against the back of the tank and mark off any excess material with a pair of scissors. Apply a thin layer of adhesive to the back of the background, making sure to spread it evenly across the surface.
Once the adhesive is applied, line up the background with the back of the tank and press it firmly against the glass. Smooth out any air bubbles with a squeegee or credit card. Finally, allow the adhesive to dry completely before refilling the tank with water.
With these easy steps, you’ll have a stunning aquarium that your fish will love to call home.
Maintenance and Care
If you’re looking to liven up your aquarium, a DIY aquarium background might just do the trick. Firstly, you’ll want to plan out the design and materials you’ll need – such as foam board, glue, and sandpaper. You can carve out different features like caves, ledges, and tunnels.
Once your foam board is carved and glued together, it’s time to mix up some cement in a wheelbarrow or bucket. Use safety gloves and a face mask for this step. With a trowel, spread the cement mixture onto the foam board, being careful to fill in any holes or gaps.
After that, let the cement dry and then give it a good sanding so it’s smooth and ready for painting. You can get creative with paint colors and textures to make your background look like real rocks or coral reefs. Once you’re satisfied with the look, let the paint dry and then place the background into your aquarium.
Voila – a personalized aquarium background that will add a unique touch to your aquatic habitat!
Cleaning and Maintaining Your Aquarium Background
Maintaining your aquarium background is crucial to the health and happiness of your fish. The first step in cleaning your background is to remove any visible debris, such as uneaten food or dead plants. You can use a gravel vacuum or a net to easily remove the debris.
Next, it’s important to do a partial water change. This will help remove any excess nutrients and maintain the water quality. Depending on the size of your aquarium and the number of fish you have, a weekly 10-20% water change is typically recommended. (See Also: How to Grow Moss in Your Aquarium: Tips and Tricks for a Lush Aquatic Garden)
Another important aspect of maintaining your aquarium background is to check your filter regularly. Make sure it’s functioning properly and replace any filter media as needed. In addition, it’s important to periodically clean the interior surface of your aquarium glass.
This can be done with a gentle aquarium-safe glass cleaner and a soft cloth. By regularly maintaining and cleaning your aquarium background, you will provide a healthy and enjoyable environment for your fish to thrive in. Don’t forget to enjoy the beautiful view of your aquatic world!
Conclusion
In conclusion, crafting your own aquarium background is a wonderfully rewarding experience that not only adds personality and creativity to your aquatic habitat, but also saves you money and is environmentally friendly. Whether you choose to use foam, rocks, plants, or a combination of all three, the possibilities are endless when it comes to designing a unique and aesthetically pleasing aquarium environment. So dive into the world of DIY aquarium backgrounds and let your imagination swim free!”
FAQs
What materials will I need to make a DIY aquarium background?
You will need foam board, silicone sealant, acrylic paint, and various decorations.
How do I measure and cut the foam board for my aquarium background?
Use a measuring tape and ruler to mark where you need to cut the foam board, and then use a sharp utility knife to make the cuts.
How do I attach decorations to my aquarium background?
Use silicone sealant to glue the decorations onto the foam board and allow it to dry completely.
Can I use any type of acrylic paint for my DIY aquarium background?
No, make sure to use non-toxic, waterproof acrylic paint that is safe for aquarium use.
Should I let my DIY aquarium background dry before adding it to my aquarium?
Yes, make sure the background is completely dry and any sealant has cured before placing it in your aquarium.
Will the silicone sealant I use harm my aquarium fish?
No, as long as you use a non-toxic, aquarium-safe silicone sealant that has cured properly.
How long does it take to make a DIY aquarium background?
It can take anywhere from a few hours to a few days, depending on how complex you want your design to be.

