Ever thought about having your own aquarium but don’t want to spend a fortune on a fancy pump? Making your own DIY aquarium pump can not only save you money but also provide a fun DIY project. Instead of purchasing an expensive pump, learn how to make your own and customize it to fit your specific aquarium needs. Not only can this be a fun project, but it can also be a great way to learn about aquariums and their inner workings.
In this blog, we’ll go over everything you need to know about creating a DIY aquarium pump, from the necessary materials to the step-by-step process. So, grab your tools and let’s get started on creating your very own aquarium pump!
Introduction
If you’re looking for a simple and affordable way to create a DIY aquarium pump, you’ve come to the right place. With a few components, you can construct your very own pump that will efficiently circulate water in your aquarium. One of the most important components is a small-sized submersible motor that should be easy to find in a hardware store.
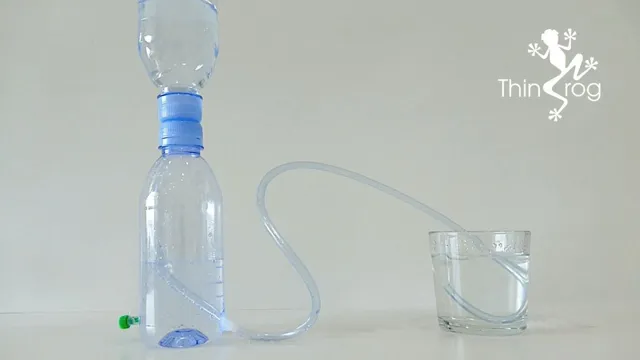
Additionally, you’ll need a PVC pipe, plastic bottle, and some tubing to connect everything together. Start by cutting the PVC pipe into a size that fits the bottle cap. Next, drill a hole in the bottle cap and insert the PVC pipe.
Attach the motor to the pipe using wire and hot glue. Finally, use the tubing to connect the motor to the bottle and your DIY aquarium pump is complete! Test it in your tank to ensure it’s working well before you integrate it into your aquarium. With a bit of effort, you can save money and create something custom that will work perfectly for your needs.
Explanation of Aquarium Pumps
Aquarium pumps play a crucial role in maintaining a healthy aquarium ecosystem. These devices are designed to circulate and oxygenate the water in your aquarium while preventing stagnation. There are various types of aquarium pumps available in the market, each with its specific features and functions.
For instance, submersible pumps are placed inside the aquarium and are commonly used for smaller aquariums, while external pumps are installed outside the aquarium and are ideal for larger setups. These pumps use impellers and other components to draw in water, push it through various filtration systems, and release it back into the aquarium. This continuous water circulation not only improves water quality but also maintains a consistent temperature and prevents the growth of harmful bacteria.
Overall, aquarium pumps are essential for any serious aquarist as they help ensure healthy and thriving aquatic life.
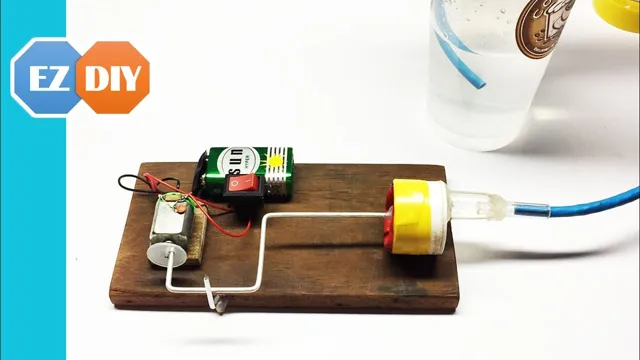
Benefits of Making a DIY Aquarium Pump
Making a DIY aquarium pump can be a fun and rewarding project for any aquarium enthusiast. Not only can it save you money compared to buying a pre-made pump, but it also allows for customization and personalization of your aquarium setup. With a DIY pump, you can easily adjust the flow rate and water pressure to fit the specific needs of your aquarium inhabitants.
Additionally, you have control over the materials used in the construction of the pump, allowing for the use of eco-friendly and sustainable options. Overall, making your own aquarium pump can enhance the functionality and aesthetics of your aquarium while providing a satisfying DIY experience. So why not give it a try and see the benefits for yourself?
Materials Needed
If you’re interested in making a DIY aquarium pump, you’ll need a few materials to get started. First, you’ll need a submersible water pump that can handle the size of your aquarium. You’ll also need tubing that fits securely onto the pump and into the aquarium.
A handful of suction cups can be utilized to help secure the tubing to the side of the aquarium. Depending on the design of your pump, you may also require connectors to join the tubing together or control the flow of water. Some optional items that may come in handy include a drill, scissors, a bubble stone, and an air valve.
With these materials on hand, you’re well on your way to producing a reliable and cost-effective aquarium pump that suits your personal needs.
List of Materials
If you’re planning to do a DIY project, the first thing you need to consider is the list of materials that you’ll need. Before starting any project, it’s essential to ensure that you have everything that’s on your list to avoid interruptions or delays. Depending on the nature of the project, the materials required might vary, but there are some common items that are necessary to have on hand. (See Also: How to Build an Aquarium Stand for 30 Gallon Tank – Step-by-Step Guide)
Some of the most commonly used materials include measuring tapes, power tools, hand tools, screws, nails, adhesive, sandpaper, paintbrushes, and paint. Additionally, you might need specific materials such as wood, metal, plastic, or fabric, depending on the project. It’s crucial to have a comprehensive list of all the materials you’ll require to avoid last-minute runs to the store.
Remember, having all the necessary items on hand will save you time and stress and ensure the success of your DIY project.
Safety Precautions
When working with tools and machinery, safety should always be the top priority. In order to protect yourself and those around you, it’s important to have the right materials on hand. Some essential items include safety glasses or goggles to protect your eyes from debris and sawdust, earplugs or earmuffs to prevent hearing damage from loud machinery, and a dust mask to avoid breathing in harmful particles.
Additionally, it’s important to have a first aid kit with basic medical supplies in case of an emergency. Remember, even with the proper materials, accidents can happen. Always follow manufacturer instructions and take breaks if you feel fatigued or unfocused.
With these precautions in place, you can work safely and with peace of mind.
Steps to Make a DIY Aquarium Pump
Do you want to save some money and make your own DIY aquarium pump? It’s easier than you might think! First, gather the necessary supplies, including a DC motor, a PVC pipe, a drill, and some tubing. Next, drill a hole in the PVC pipe and attach the motor using screws or glue. Then, attach the tubing to the pipe and motor, making sure to seal any gaps with silicone adhesive.
Finally, connect the pump to an electrical source and test it out in a container of water. With some patience and effort, you can create a functioning aquarium pump at a fraction of the cost of a store-bought one. Give it a try and enjoy the satisfaction of a job well done!
Step 1 – Preparing the Motor
Making a DIY aquarium pump may seem like a daunting task, but with a little patience and effort, it’s absolutely doable. The first step is to prepare the motor, which will power the pump. You can use a small DC motor, commonly found in toys, which can be purchased online or at a hobby store.
Next, you’ll need to connect a propeller or impeller to the motor shaft, which will create the necessary suction and movement of water. You can use a plastic propeller or create your own impeller with a 3D printer. Before installing the motor, it’s important to waterproof it using a special epoxy or silicone sealant.
Once the motor is sealed and has dried, you can attach it to a base or stand using screws or clips. With the motor ready, you can move on to the next step in creating your DIY aquarium pump. By following these steps and taking your time to ensure each component is securely in place, you’ll have a functioning aquarium pump in no time.
Step 2 – attaching the Impeller
If you’ve reached this step, congratulations! You’re well on your way to creating your own aquarium pump. Attaching the impeller is a crucial step in building your DIY aquarium pump. The impeller is the component that pushes water through the system, so it needs to be securely fastened.
Start by placing the impeller inside the pump housing. Then, attach the impeller cover, making sure that it fits snugly over the impeller. Use a screwdriver to tighten the screws that hold the cover in place.
Be careful not to overtighten, as this can damage the impeller or strip the screws. Once you’re confident that the impeller is securely attached, you can move on to the next step. Don’t rush through this step, as it’s important to ensure that the impeller is properly installed for the pump to work effectively.
Keep in mind that this can take some trial and error, so be patient and take your time. (See Also: How to Make Fertilizer for Aquarium Plants: An Easy Step-by-Step Guide)
Step 3 – attaching the Outflow Pipe
The third step in making your own aquarium pump is to attach the outflow pipe. This step involves connecting the pipe to the pump outlet and securing it in place using the appropriate fittings. It is essential to ensure that the outflow pipe is angled correctly in order to direct the water flow in the desired direction.
Additionally, it is important to consider the size of the outflow pipe in relation to the size of the aquarium to ensure the pump is providing adequate circulation. Proper water circulation is essential to maintaining a healthy aquatic environment for your fish and other aquatic inhabitants. By following these steps, you can create your own efficient and functional aquarium pump that will provide clean and healthy water for your underwater pets.
With a little bit of time and effort, you can enjoy the benefits of a custom-made aquarium pump that fits your unique needs and preferences.
Step 4 – Testing the Pump
Now that the DIY aquarium pump has been assembled, it’s time to test if it’s working properly. Connect the pump to a power source and submerge the hose into a bucket of water. Turn on the power source and observe if the water is being sucked into the pump and then getting ejected through the outlet.
Listen for any odd sounds coming from the pump, which may indicate that some parts are malfunctioning or may need some fine-tuning. Note if the water flow is too weak or too strong, and adjust the speed of the motor or the size of the impeller accordingly. Once satisfied, remove the pump from the water and dry it off properly.
Testing the pump is an important step in ensuring that it will function as intended in the aquarium setup. By following these simple steps, you can build your own DIY aquarium pump that is tailored to your specific needs while also saving some money.
Maintenance and Troubleshooting
Are you tired of spending money on expensive aquarium pumps? Why not make your own DIY aquarium pump instead? Making a DIY aquarium pump is not only cost-effective, but it can also be a fun and rewarding project. To make a DIY aquarium pump, you will need a few basic materials such as a plastic bottle, a small motor, tubing, and a power source. Simply attach the motor to the plastic bottle and attach the tubing to the motor to create a suction and discharge line.
Connect the pump to a power source and your DIY aquarium pump is ready to go! Keep in mind that maintenance and troubleshooting will be important to ensure the longevity and efficiency of the pump. Check for any clogs in the tubing and clean the motor periodically. With a little bit of effort and creativity, you can have a functional and inexpensive aquarium pump for your aquatic pets that you made yourself.
So, why not give it a try?
How to Maintain Your DIY Aquarium Pump
Maintaining your DIY aquarium pump is essential for ensuring your aquatic creatures are living in a healthy environment. Regular maintenance will prevent clogs and other issues that could lead to harm to your fish. One crucial aspect of maintaining your aquarium pump is ensuring it remains clean.
When cleaning the pump, it’s essential to turn it off, remove the impeller, and clean it with a soft brush. If you notice any cracks or damages to the impeller, it’s time for a replacement. Another issue you may face is leaks.
If you notice leaks, check the seals and o-rings for damage or wear. Replacing damaged seals and O-rings prevent water from leaking and damaging your electrical components. With thorough maintenance of your DIY aquarium pump, you’ll avoid costly repairs, and your fish will thrive in a healthy environment.
Common Pump Issues and Solutions
Regular maintenance and troubleshooting are essential in avoiding common issues with pumps. One of the most common problems is a clogged pump, which can be caused by debris or sediment buildup. This can lead to decreased flow and efficiency of the pump, ultimately causing it to fail. (See Also: How to Keep Water Crystal Clear in Aquarium: Tips and Tricks for A Clean and Healthy Habitat)
To avoid this issue, it is recommended to clean out the pump regularly and use a strainer or filter to prevent debris from entering the pump. Another common issue is mechanical failure of the pump, which can be caused by worn or damaged parts. In this case, it may be necessary to replace or repair the affected components.
Poor suction or priming can also cause issues, such as air leaks or cavitation. Checking for leaks and ensuring proper priming can help avoid these problems. By regularly inspecting and maintaining your pump, you can prevent these common issues and keep your system running smoothly.
Conclusion
In conclusion, making your own aquarium pump may seem like a daunting task, but with the right tools and a bit of determination, it’s a DIY project that’s both practical and rewarding. And let’s be honest, what’s more satisfying than sitting back and watching your beloved fish swim happily in the cavities you created for them? So, roll up your sleeves and get ready to dive in, because with a little creativity and handy work, you’ll be pleasantly surprised at what you can accomplish on your own.”
FAQs
What materials do I need to make a DIY aquarium pump at home?
To make a DIY aquarium pump, you will need an air pump, air tubing, an air stone, and a container to hold water.
Can I use a regular air pump for my DIY aquarium pump?
Yes, you can use a regular air pump to make a DIY aquarium pump.
How do I set up my DIY aquarium pump?
Connect the air tubing from the air pump to the air stone, and place the air stone in the container of water. Plug in the air pump and you’re ready to go.
Is a DIY aquarium pump as effective as a store-bought pump?
A DIY aquarium pump can be just as effective as a store-bought pump, depending on the size of your aquarium and the power of the air pump you use.
How often should I clean my DIY aquarium pump?
It is recommended to clean your DIY aquarium pump once a month to prevent any buildup of algae or other debris.
Can I use a DIY aquarium pump for saltwater aquariums?
Yes, you can use a DIY aquarium pump for saltwater aquariums, but be sure to use equipment that is specifically designed for saltwater use.
How can I make my DIY aquarium pump quieter?
You can make your DIY aquarium pump quieter by placing it on a piece of foam or rubber to absorb the vibrations, and by placing it in a location where it won’t be disturbed by other noises.

