Are you a beginner in the world of aquariums and searching for an effective way to filter your tank’s water? Look no further! A DIY canister aquarium filter might just be the perfect solution for you. Don’t let the idea of building your own filter intimidate you, it’s actually quite simple and can save you money compared to store-bought options. In this beginner’s guide, we’ll walk you through the steps of creating your very own canister aquarium filter, discussing the necessary materials and equipment along the way.
Think of it as building your own unique system that suits your specific aquarium needs! With a bit of patience and the willingness to learn, you’ll be well on your way to having a clean and healthy aquatic environment for your fish to thrive in. So, grab your tools and let’s get started on this exciting new project!
Introduction
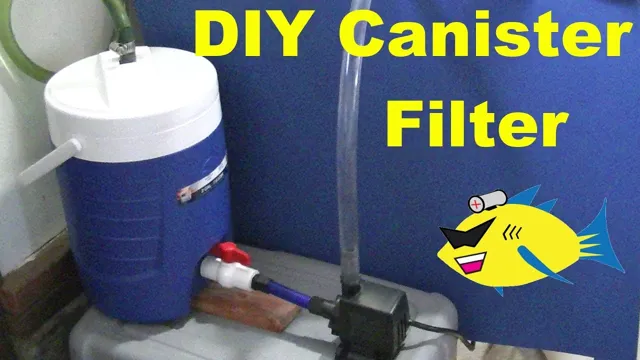
If you’re interested in creating your own canister aquarium filter, you’re in the right place! Making your own canister filter can be a great way to save money and customize your filtration system to your aquarium’s specific needs. To start, you’ll need a few supplies, including a canister, filter media, tubing, a pump, and some basic tools. Once you have everything you need, it’s just a matter of assembling the filter and setting it up in your aquarium.
While it may take a bit of time and effort to create your own canister filter, it can be a fun and rewarding experience that will ultimately benefit your aquarium’s health and longevity. So, let’s dive in and explore how to make your own canister aquarium filter!
What is a Canister Aquarium Filter?
A canister aquarium filter is a type of filtration system that is used in aquariums to help keep the water clean and clear. This type of filter is commonly used in larger aquariums and is known for its superior performance and durability. Canister filters are designed to hold a large amount of filter media, which allows them to filter out more debris and waste than other types of filters.
Additionally, they are easy to install and maintain, which makes them a popular choice among aquarium owners. So, if you’re in search of a reliable and high-performing filtration system for your aquarium, a canister filter might just be the ideal choice for you.
Why You Should Make Your Own Canister Aquarium Filter
If you’re considering setting up an aquarium, the type of filter you install is a crucial factor that determines the water’s cleanliness. While there are a variety of commercially available filters, there’s a better alternative: making your own. When you make a DIY canister aquarium filter, you can customize its functionality, ensuring it meets your precise requirements.
Other advantages of building your own aquarium filter include the ability to use high-quality materials, which increases its durability and lifespan. Additionally, a homemade filter can save you a lot of money in the long run because you can reuse and repurpose already available materials. By making your own canister aquarium filter, you get a high-quality, personalized, and eco-friendly filter that enhances the aesthetic appeal of your aquarium while providing your fish with a healthy environment.
Things to Consider Before Making Your Own Canister Aquarium Filter
Canister aquarium filter If you are an aquarium enthusiast, you will know how important it is to keep the water in your fish tank clean and clear. One of the most essential tools for achieving this is a canister aquarium filter. These filters come in a variety of shapes and sizes, but what if you wanted to make your own? Before diving headfirst into this project, there are a few things you need to consider.
First and foremost, you need to have a clear understanding of how a canister filter works and what each component does. Additionally, you need to research different types of filter media and substrates to ensure you are using the right materials for your individual tank’s needs. It is also important to consider the cost and time investment involved in making your own filter versus purchasing one pre-made.
By taking these factors into account, you can decide if making your own canister aquarium filter is worth it for you and your aquatic pets.
Materials and Tools
If you’re looking for an affordable way to filter your aquarium, making your own canister filter could be a perfect solution. The materials and tools you’ll need include a cylinder container (like a PVC pipe or coffee can), filter media (such as sponge or ceramic rings), activated carbon, a pump, tubing, and a few other supplies like silicone or zip ties. The first step is to drill holes in your cylinder container, ensuring they’re big enough to pass water through but small enough to hold the filter media in place.
Next, layer your filter media inside the container and add a layer of activated carbon. Attach the tubing to your pump and place it inside the container. Finally, add a lid, seal it with silicone, and start filtering! Creating a canister filter allows you to customize your filter media and saves money in the long run.
Give it a try and see the difference it makes in your aquarium’s water quality. (See Also: How to Make Simple Aquarium Filter at Home – DIY Tutorial)
What You’ll Need
If you’re getting ready to tackle a DIY project, it’s important to have all the necessary materials and tools on hand before you begin. Depending on the project, the list of things you’ll need can vary. However, there are a few basic items that are typically required.
Basic hand tools such as screwdrivers, hammers, and pliers are essential. If you’re working with wood, you’ll need a saw, sandpaper, and a measuring tape. For painting or staining, you’ll need brushes, rollers, and drop cloths.
In addition to these basic items, you’ll also want to make sure you have safety gear, such as gloves and goggles, on hand to protect yourself as you work. By gathering all the necessary materials and tools before you start, you’ll save yourself time and frustration in the long run.
Tools You’ll Need
When it comes to starting a DIY project, having the right materials and tools is crucial. Depending on the nature of the project, you may need a variety of tools, such as a saw, hammer, screwdriver, drill, level, measuring tape, and pliers. It’s important to invest in high-quality tools, as they can last longer and save you money in the long run.
Additionally, having a well-stocked toolbox with various screws, nails, bolts, and other fasteners can make the project run more smoothly. Along with the physical tools, it’s also important to have safety gear, such as gloves, safety glasses, and a dust mask, to protect yourself from potential hazards. Before starting any DIY project, take the time to make a list of the necessary materials and tools to ensure you have everything you need to complete the job successfully.
Building Your Canister Aquarium Filter
Canister aquarium filters are a great addition to any aquarium setup as they provide superior filtration and water clarity. While you can always purchase a pre-made filter, building your own canister aquarium filter is a fun DIY project that also saves you money. To make your own canister aquarium filter, you will need a water-tight container, a pump, filter media, and tubing.
First, drill holes in the container for the tubing and pump. Next, insert the tubing and pump, and fill the container with your preferred filter media. Finally, connect the tubing to your aquarium and turn on the pump.
Voila! You now have a custom-made canister aquarium filter that will keep your tank clean and healthy for your fish. By making your own filter, you can also customize the size and types of media used depending on your specific needs. So, get creative and build your own canister aquarium filter today!
Step 1: Drill Holes in the Container
To begin building your canister aquarium filter, the first step is to drill holes in the container. This will allow water to flow in and out of the filter. Make sure to use a drill bit appropriate for the size of the holes you will be drilling.
Consider the location of the holes to ensure that they will not interfere with any internal components of the filter, such as the media basket or intake tube. It’s important to work carefully and accurately to avoid damaging the container or creating uneven holes that could affect the filter’s performance. By taking your time with this first step, you’ll set a solid foundation for the rest of the build and ensure a smoothly functioning filter for your aquarium in the long term.
Step 2: Cut and Add Sponge Filter
Now that you’ve gathered all the necessary materials, it’s time to move on to step two of building your canister aquarium filter. The next step involves cutting and adding a sponge filter to your setup. The sponge filter will help trap debris and keep your water clear and clean.
Begin by cutting the sponge filter to the size of your filter media tray. Make sure it fits snugly and doesn’t leave any gaps in the tray. Next, add the sponge to the tray and top it off with some filter floss.
This will help catch any fine particles that may have slipped through the sponge. Once you’ve completed this step, it’s time to move on to step three and add your chosen filter media to the tray. With this addition, your canister filter will be well on its way to providing your aquarium with clean and healthy water.
Step 3: Add Pump and Tubing
Now that the media trays are in place, it’s time to add the pump and tubing to your canister aquarium filter. The pump is responsible for pulling water from the tank into the filter where it can be cleaned, then returning it back to the tank. The tubing connects the pump to the filter and to the outlet where the clean water will be returned to the aquarium. (See Also: How to Clean Aquarium Pipes: Best Techniques and Tips for Sparkling Clear Water)
The size of the pump and tubing needed will depend on the size of the tank and the flow rate required. It’s important to choose the right size and ensure a secure fit with the filter and outlet. When installing the tubing, make sure to avoid kinks or bends that could restrict water flow or cause leaks.
Once everything is properly connected, you can turn on the pump and start enjoying the benefits of a clean and healthy aquarium. Don’t forget to regularly maintain and replace the filter media to keep your canister aquarium filter functioning at its best.
How to Maintain Your Canister Filter Aquarium
Are you tired of constantly buying new canister filters for your aquarium? Why not save some money and create your own canister filter! First, gather all the necessary materials such as a plastic container with a tight-fitting lid, a powerhead, tubing, filter media, and a hose clamp. Then, drill holes in the container and place the powerhead and tubing inside, securing them with a hose clamp. Fill the container with filter media like filter floss, sponge, and ceramic rings.
Finally, attach the tubing to the container and your aquarium. Remember to clean and replace the filter media regularly to maintain a healthy environment for your aquatic pets. With this DIY canister filter, you’ll have a cost-effective and efficient way to keep your aquarium clean.
Step 1: Clean the Filter Regularly
If you want your aquarium to thrive, you need to maintain your canister filter regularly. The first step is to clean the filter on a consistent basis. Over time, debris and waste can accumulate in the filter, causing it to become clogged and ineffective.
When this happens, your aquarium water can become murky and filled with harmful bacteria, posing a threat to your fish and other aquatic life. To clean the filter, you first need to turn off the filtration system and unplug it from the electrical source. Then, remove the canister from the aquarium and take out the filter media.
Rinse the media with aquarium water or dechlorinated water until it’s free of debris. While you’re doing this, clean the canister with a brush or sponge, being careful not to damage any of the internal parts. Once all the parts are clean, reassemble the filter and replace it in the aquarium.
By cleaning the filter regularly, you’ll be able to keep your aquarium water clean and clear for your fish and other aquatic inhabitants to thrive.
Step 2: Replace the Filter Media
Maintaining your canister filter aquarium is crucial to keeping your fish healthy and happy. One important step in this process is regularly replacing the filter media. The filter media is responsible for removing debris and waste from the aquarium water, so if it becomes clogged or worn out, it can no longer do its job effectively.
To replace the media, start by turning off the filter and unplugging it from the electrical source. Open the canister and remove the old media, being careful not to disturb the beneficial bacteria that may have formed on it. Replace the old media with new, clean media, making sure to install it according to the manufacturer’s instructions.
Once everything is in place, turn the filter back on and let it run for a while to make sure that it is working correctly. By following these simple steps, you can ensure that your canister filter is functioning at its best and your fish are living in a healthy and clean environment.
Step 3: Check Pump and Tubing Connections
Maintaining your canister filter aquarium is important to keep your water quality at its best, and one important step in keeping your filter running smoothly is to check pump and tubing connections. This step may seem obvious, but it can easily be overlooked. Loose or damaged connections can lead to leaks, loss of suction, and even pump failure.
To check the connections, first, turn off your filter and unplug it from the electrical outlet. Remove the pump cover, and check the impeller for any debris or damage. Then, inspect the tubing for any cracks or kinks that may be blocking the water flow. (See Also: How to Lower Phosphate Levels in Reef Aquarium: A Comprehensive Guide)
Tighten any loose connections, and if you find any damaged parts, replace them promptly. It’s also important to clean the tubing regularly to prevent any blockage or buildup that can cause pump problems. Use a soft brush to gently scrub the inside walls and rinse thoroughly.
You can also add a filter cleaning solution into a bucket of water and let the tubing soak for a few hours before rinsing. In summary, regularly checking pump and tubing connections, along with keeping the tubing clean, can help ensure your canister filter aquarium runs smoothly and maintains optimal water quality. Don’t overlook this important step to keep your aquarium healthy and clean.
Conclusion
In conclusion, creating your own canister aquarium filter is not only affordable, but also allows for customization and personalization to fit your specific tank needs. With the right materials and a little ingenuity, you can easily construct a filtration system that not only keeps your fish happy and healthy, but adds an extra touch of DIY flair to your aquatic paradise. So skip the pre-made filters and dive into the world of DIY aquarium filtration – you’ll be hooked in no time!”
FAQs
What are the benefits of using a canister aquarium filter?
Canister aquarium filters are highly effective at removing debris, increasing oxygen levels, and creating a healthy environment for your fish. They offer greater filtration capacity than other types of filters and require less frequent maintenance.
How do I choose the right size canister aquarium filter for my tank?
The size of your canister filter should be based on the size of your aquarium. As a general rule, the filter should be able to process the volume of your tank at least four times per hour. For example, a 50-gallon tank would require a canister filter rated for 200 gallons per hour.
Do I need any special tools or equipment to install a canister aquarium filter?
Most canister filters come with all the necessary components and instructions for installation. However, you may need a few additional tools such as pliers or a screwdriver for assembly.
How often do I need to clean my canister aquarium filter?
This can vary depending on the size of your tank, the number of fish you have, and the type of filter media you are using. A general rule of thumb is to clean or replace filter media every 4-6 weeks, and the entire filter system every 3-6 months.
Can I use a canister aquarium filter with saltwater tanks?
Absolutely! Canister filters are effective in both freshwater and saltwater environments. However, it is important to choose a filter rated for your tank size and the specific needs of your marine animals.
How do I troubleshoot common problems with my canister aquarium filter?
Common issues with canister filters include leaks, clogs, and noisy operation. If you experience any of these problems, try checking the filter gaskets, cleaning the media, and adjusting the flow rate. If the problem persists, consult your manufacturer’s manual or seek assistance from a professional.
Can I customize my canister aquarium filter with different media options?
Yes! Canister filters offer a wide range of filter media options for customization, including mechanical, biological, and chemical filtration. Be sure to choose the right media for your specific needs and tank setup.

