Have you ever wanted to create a stunning dual overflow aquarium but didn’t know where to start? Plumbing a dual overflow aquarium can seem overwhelming, but with the right guidance, it can be a straightforward process. Dual overflow systems are popular because they provide an efficient way to circulate water through filtration systems, ensuring a healthy environment for your aquatic friends. Plus, they can create a visually appealing structure in your home or office.
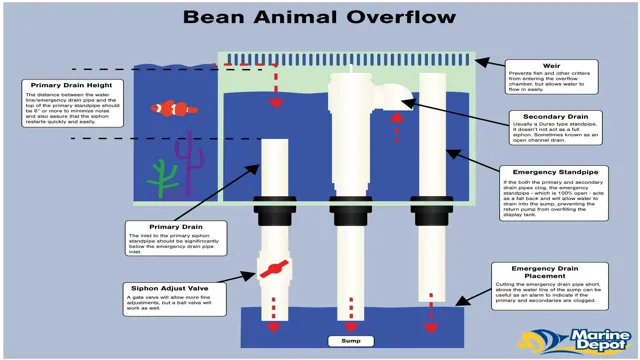
But how do you plumb a dual overflow aquarium exactly? It involves using a series of pipes, check valves, and bulkheads to create a looped flow of water. It’s essential to get it right, or it could lead to leaks, flooding, and other issues. In this blog, we’ll break down the steps involved in plumbing a dual overflow aquarium, so you can enjoy your aquatic wonderland without any worries.
We’ll cover the tools you’ll need, the importance of planning, and the steps to take before assembling the system. So, let’s dive in and learn how to plumb a dual overflow aquarium!
Introduction
Plumbing a dual overflow aquarium might seem daunting to some, but it is actually a straightforward process. First, you’ll need to choose the appropriate size of PVC pipes that match your aquarium’s overflow. Then, you’ll need to attach bulkheads onto the overflow boxes and connect them to the PVC pipes.
Make sure that the bulkheads are tightened securely to avoid leaks. Next, connect the PVC pipes to a sump using a PVC elbow. It’s vital to ensure that the sump and the aquarium are level to prevent backflow.
Lastly, attach a return pump to the sump and connect a return line back to the aquarium. By following these easy steps, you’ll have successfully plumbed your dual overflow aquarium. Don’t forget to test the water flow to verify that everything is working correctly before introducing fish into your aquarium.
Explanation of Dual Overflow Aquariums
Dual overflow aquariums are a fascinating addition to any home or office. They offer a unique way to showcase aquatic life, with their striking double-waterfall system and impressive water flow. These specialized aquariums operate using two overflow chambers that work together to ensure a constant water flow, which is crucial for maintaining a healthy aquatic environment.
With low levels of water disturbance, these tanks create a calm, natural environment that is ideal for both fish and plants. Dual overflow aquariums are designed to handle a larger volume of water than traditional aquariums, with many models boasting capacity of over 100 gallons. Overall, these aquariums are a great investment for those who are looking to create an attractive, low-maintenance aquatic paradise in their living space.
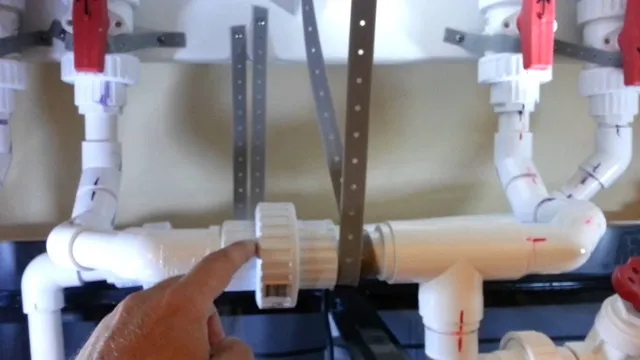
Benefits of a Dual Overflow Aquarium
When it comes to aquariums, having a dual overflow system can offer numerous benefits. A dual overflow aquarium is a tank that has two overflow boxes that work simultaneously to keep the water levels stable. This means that the risk of overflowing, which can cause damage to your furniture and flooring, is significantly reduced.
Another advantage of a dual overflow system is that it improves water circulation and filtration. By having two overflows, more water is drained out at a faster rate, ensuring that debris and waste don’t accumulate in one area. The result is cleaner water and a healthier environment for your aquatic pets.
So, if you’re looking for an efficient and practical way to maintain the health and beauty of your aquarium, a dual overflow system is definitely worth considering.
Gathering Materials
When it comes to plumbing a dual overflow aquarium, you need to gather the right materials to ensure a successful installation. Firstly, you need to select quality PVC pipes, valves, and adapters that correspond with the plumbing dimensions of your aquarium. It’s important to choose pipes that are strong and durable because they will withstand high water pressure and provide a safe environment for your aquatic pets.
You will also need to purchase silicone sealant to ensure a water-tight seal when connecting pipes together. Don’t forget to buy plumbing tape to wrap around the threads of the fittings as this will enhance the seal. It’s always a good idea to have a bucket or two handy as well as a sump where disconnected water will flow.
By carefully selecting the right materials for your plumbing project, you are setting yourself up for success and making your dual overflow aquarium installation a breeze.
Required Materials List
When it comes to crafting, gathering materials is a crucial step in the process. Every project requires different materials, so it’s essential to start by making a list of what you’ll need. This list should include everything from the obvious components like paper, paint, and glue to the less obvious items like brushes, miniatures, or embellishments.
It’s also important to consider the quality of the materials you’re purchasing. For example, using high-quality paper or a sturdy canvas can make a significant difference in the final outcome of your project. And while it may be tempting to skimp on costs, purchasing cheaper materials can result in a less polished final product. (See Also: How to Find Suppliers for a Fish Aquarium Store: Top Tips and Tricks)
So, take the time to research and gather the necessary materials to ensure your crafting experience goes smoothly and produces a high-quality outcome.
Choosing the Right Plumbing
When it comes to choosing the right plumbing materials, it’s important to gather all the necessary supplies before starting the project. This includes pipes, fittings, valves, and any required tools. It’s always a good idea to invest in high-quality materials to ensure that the plumbing system functions properly and lasts for a long time.
Don’t be tempted to skimp on materials, as cutting corners can lead to costly repairs or replacements down the road. Consider the specific needs of the project, such as the type of piping needed for hot or cold water, as well as any environmental factors that could affect the plumbing system. By carefully selecting the right materials, you can ensure a successful plumbing project that will provide reliable performance when you need it most.
Installation Process
Plumbing a dual overflow aquarium can seem complicated, but with the right tools and steps, you can do it yourself. Firstly, you need to gather all the necessary materials such as a PVC pipe, sump, drill bits, and bulkheads. The next step is to drill holes into your aquarium for the overflow pipes and bulkheads; this can be done using a diamond hole saw.
Once the holes are in place, you can attach the bulkheads using silicone seals and Teflon tape. Then, connect the PVC pipe, which will run from the tank’s overflow to the sump. Finally, make sure to test the overflow system to check for any leaks or malfunctions.
Remember, patience and attention to detail are key for a successful installation. By following these steps, you will be able to effectively plumb a dual overflow aquarium and create a healthy environment for your aquatic pets.
Setting up the Overflow Box
Setting up the overflow box can seem like a daunting task, but with the right instructions, it’s actually quite simple. The installation process involves positioning the box in the desired location, selecting an appropriate drain size, and securing the box in place using provided screws and brackets. It’s important to ensure that the overflow box is level to prevent any leaks or damage to the aquarium.
Additionally, it’s recommended to attach a flexible hose to the box to make maintenance and cleaning easier. By following these steps, you’ll have a fully functional overflow system in no time, providing essential surface skimming and proper water circulation for your aquarium. Make sure to double-check all connections and perform regular maintenance to keep the overflow box functioning at its best.
Plumbing the Overflow Box to the Sump
Plumbing an overflow box to a sump is an essential part of a successful aquarium installation. The process of installation is relatively straightforward and can be done by anyone with basic plumbing skills. To do this, you will first need to locate the overflow box in your aquarium and ensure that it is properly installed and functioning correctly.
Next, you will need to connect the overflow box to the sump via a PVC pipe, which should be cut to the correct length. You will also need to attach a bulkhead fitting to the bottom of the overflow box to secure the pipe. Once the pipe is securely attached, you can then attach another bulkhead fitting to the sump and connect the pipe to it.
This will allow any overflow water to be redirected to the sump, where it can be filtered, oxygenated, and pumped back into the main tank. With this process done, you can now enjoy a healthy and thriving aquarium.
Plumbing the Return Pump to the Display Tank
When it comes to setting up a return pump for your display tank, there are a few important steps to follow. First, make sure you have all the necessary equipment, including the pump itself, plumbing pipes, and fittings. Once you have everything ready to go, start by determining the best location for the pump within your sump or filtration system.
This will typically involve finding a spot where the pump can effectively circulate water throughout the tank without causing too much turbulence or disturbance. Once you have decided on the pump’s location, it’s time to start attaching the plumbing pipes and fittings. This is where the keyword “plumbing” comes into play, as you’ll need to carefully measure and cut the pipes to ensure a snug, leak-free fit.
Additionally, it’s a good idea to use a sturdy adhesive or sealant to secure the connections and prevent any leaks from occurring over time. While the process can be a bit complex at first, with patience and attention to detail, you can have your return pump up and running in no time, giving your aquarium the flow and filtration it needs to thrive.
Testing the System
If you’re wondering how to plumb a dual overflow aquarium, testing the system is a crucial step. Once you’ve installed and connected all the necessary components, it’s time to ensure everything is working as it should. Begin by filling the tank with water, making sure the water level is high enough to activate the overflow. (See Also: How to Make a Saltwater Aquarium at Home – Tips and Tricks for Beginners)
Observe the flow of water and check for any leaks or clogs in the plumbing. You can do this by using a bucket to measure the amount of water coming out of each outlet, or alternatively, by using a flow meter. It’s important to test both overflows simultaneously to ensure they are balanced.
If one side is draining more water than the other, it may indicate an issue with the plumbing. Once you’re satisfied that everything is working correctly, it’s time to add in your marine life and enjoy your new aquarium!
Fill the Tank with Water
One of the most important steps in setting up a new aquarium system is filling the tank with water. But this isn’t just a matter of turning on the tap and letting it run. You need to make sure the water is clean and free from impurities that could harm your fish.
To begin, use a dechlorinator to remove any chlorine or other chemicals from the water. This will make it safe for your fish to swim in and breathe. Once the dechlorinator has done its job, you can start filling the tank with water.
Do this slowly to avoid disturbing any gravel or decorations in the tank. A helpful tip is to fill the tank with a large bucket. This reduces the risk of accidentally disturbing the aquascape.
Keep an eye on the water level, and once it reaches the desired height, turn off the tap and let it settle for a few hours. After this, you can add the filtration system and heater. By taking this careful approach, your aquarium will be off to a healthy start, giving your fish the best possible living environment.
Check for Leaks
When it comes to testing your plumbing system, it’s important to check for leaks. Leaks can be small and difficult to detect, causing water damage over time and wasting water. One way to check for leaks is by turning off all faucets and water appliances in your home, then noting the reading on your water meter.
Wait a few hours without using any water, then check the meter again. If the reading has changed, it could indicate that there is a leak somewhere in your system. Another way to check for leaks is by adding a few drops of food coloring to the toilet tank and waiting to see if the water in the bowl changes color.
If it does, there may be a leak in the toilet’s flapper or another component. Regularly checking for leaks can save you money on your water bill and prevent costly water damage in your home. So take the time to test your plumbing system and ensure that everything is running smoothly.
Maintenance Tips
If you’re planning to set up a dual overflow aquarium, plumbing it correctly is vital to avoid leaks and ensure proper water circulation. First, you’ll need a clear plan that outlines where you want your overflows to be positioned and the equipment you’ll need. Then, you’ll need to drill holes and install bulkheads on your tank.
Depending on the tank’s size and the amount of water you want to circulate, you can choose the appropriate plumbing materials such as PVC pipes, flexible hosing, and valves. The key to successful plumbing is getting the right size of pipes to handle the water flow and installing them securely to avoid leaks. Regular maintenance is also crucial in keeping your plumbing system running smoothly.
Ensure that you clean and replace tubing and valves periodically; this will help prevent clogs and ensure effective filtration. By following these tips, you’ll have a dual overflow aquarium that is efficient, durable, and a delight to look at.
Keeping the Plumbing Clean
Keeping your plumbing clean is essential to maintain a healthy home. Simple maintenance tips can help you save money and avoid untimely plumbing disasters. Firstly, always be mindful of what you put down the drain.
Only dispose of waste that can be handled by your plumbing system to avoid clogs and backups. Secondly, regularly clean your drains using natural solutions like baking soda and vinegar. These remedies can help break down and eliminate any buildup or residue in your pipes. (See Also: How to Make a Fish Aquarium Table: Step-by-Step Guide for a Stunning Home Decor!)
Thirdly, schedule regular plumbing inspections with a licensed professional to detect any underlying issues before they become major problems. By following these tips, you can maintain your plumbing and extend its lifespan, saving you money and allowing you to enjoy seamless plumbing performance.
Regular Maintenance Checks
Regular maintenance checks are crucial to ensuring the longevity and optimal performance of any vehicle, whether it be your daily driver or a prized possession. Some simple maintenance tips to keep in mind include regularly checking your car’s oil and fluid levels, inspecting your tires for wear and tear, and making sure your brakes are functioning properly. It’s also important to keep an eye on your car’s battery and electrical systems, as well as the air filters and engine belts.
By staying on top of regular maintenance checks, you can catch minor issues before they become major problems, saving you time and money in the long run. Remember, a well-maintained car not only runs better, but is also safer for you and your passengers. So, make sure to schedule those regular check-ups with a trusted mechanic and give your car the TLC it deserves.
Conclusion
Plumbing a dual overflow aquarium is like performing a delicate dance underwater. You need precision, patience, and a good sense of humor in case things go awry. But fear not, fellow fish lovers, with the right tools and a bit of know-how, you’ll have those overflows running smoothly in no time.
Just remember to measure twice, cut once, and always keep an eye out for those sneaky snails trying to steal your spotlight.”
FAQs
What is a dual overflow aquarium?
A dual overflow aquarium is a type of aquarium that has two overflow pipes, allowing for better water circulation and filtration.
Why is proper plumbing important for a dual overflow aquarium?
Proper plumbing is important for a dual overflow aquarium to prevent leaks, maintain water flow, and ensure adequate filtration.
What materials are needed to plumb a dual overflow aquarium?
Materials needed include PVC piping, elbows, tees, valves, aquarium silicone, plumbing tape, and a bulkhead fitting.
How do you install a bulkhead fitting in a dual overflow aquarium?
To install a bulkhead fitting, mark the location on the aquarium where the hole will be drilled, drill the hole, insert the bulkhead fitting, and secure it with silicone and plumbing tape.
How do you assemble the PVC piping for a dual overflow aquarium?
Assemble the PVC piping by dry fitting the pieces first, then gluing them together with PVC glue. Be sure to measure twice and cut once.
How do you test for leaks in a dual overflow aquarium plumbing system?
Test for leaks by running water through the plumbing system with all valves and drains closed. Check all joints, connections, and bulkhead fittings for leaks.
What is the proper water flow rate for a dual overflow aquarium?
The proper water flow rate is approximately 5-10 times the volume of the aquarium per hour, depending on the type and number of fish and other aquatic organisms in the aquarium.

