Are you looking to set up a saltwater aquarium in your home or office but not sure where to begin with the plumbing? Look no further because we’ve got you covered with this comprehensive step-by-step guide. First and foremost, it’s important to understand that plumbing a saltwater aquarium is crucial for its health and longevity. Without proper plumbing, waste and debris can accumulate in the tank leading to poor water quality, which can have detrimental effects on the fish and corals.
So, where do you begin? The first step is to determine the appropriate location for your aquarium and ensure that the plumbing is easily accessible. You’ll then need to gather the necessary materials such as PVC pipes, fittings, valves, and a return pump. It’s important to invest in high-quality materials to ensure a leak-free system.
Next, you’ll need to plan the layout of your plumbing system. This will involve determining the optimal location for your sump tank, return pump, and other equipment. It’s crucial to consider the flow rate of water and the size of your tank to determine the appropriate pipe diameter and valve size.
Once you’ve planned the layout, it’s time to start assembling the plumbing system. This may involve cutting and fitting pipes, installing valves and fittings, and connecting the return pump. It’s essential to ensure that all connections are tight and leak-free before filling the tank with saltwater.
Finally, it’s time to test the plumbing system and ensure that it’s functioning correctly. It’s recommended to fill the tank with freshwater first to check for leaks before adding saltwater. Once you’re satisfied that the plumbing system is working as intended, you can add your saltwater and begin the process of cycling your tank.
In conclusion, plumbing a saltwater aquarium may seem overwhelming at first, but with careful planning and attention to detail, it can be a straightforward and rewarding process. By following the steps outlined in this guide, you can ensure that your aquarium has a healthy environment for your fish and corals to thrive.
Basic Equipment Needed
Plumbing a saltwater aquarium may seem like a daunting task for beginners, but with the right equipment and a bit of knowledge, it can be easy and satisfying. To start, you’ll need a good quality aquarium pump for circulating the water, which is crucial for keeping the water clean and healthy for your marine life. You’ll also need plumbing pipes and connectors, which allow the aquarium to drain and fill with water efficiently.
A sump or filter system can also be beneficial for removing any unwanted waste from the tank. It’s important to invest in high-quality equipment to ensure the longevity and stability of your aquarium. By having the proper equipment, you can easily plumb your saltwater aquarium and create a beautiful underwater world for your aquatic creatures to thrive in.
1. Tank
If you’re thinking of getting into the wonderful world of fishkeeping, one of the first things you’ll need is a tank. Tanks come in many shapes, sizes, and materials. The most popular tank materials are glass and acrylic.
Glass is heavy and more fragile than acrylic but has a clear view, while acrylic is lightweight and sturdy but can scratch easily. When choosing a tank, it’s important to consider the space you have available and the size of the fish you want to keep. Some common tank sizes include 10-gallon, 20-gallon, and 50-gallon tanks.
Don’t forget to also think about the accessories you’ll need for your tank like a filter, heater, substrate, and decorations. These items will help create a healthy and comfortable environment for your fish. With the right tank and accessories, you’ll be ready to start your fishkeeping journey in no time!
2. Sump
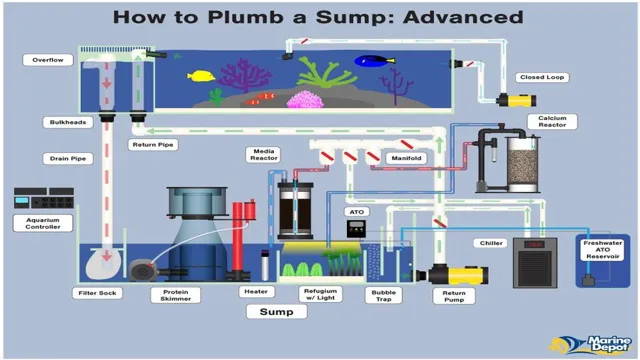
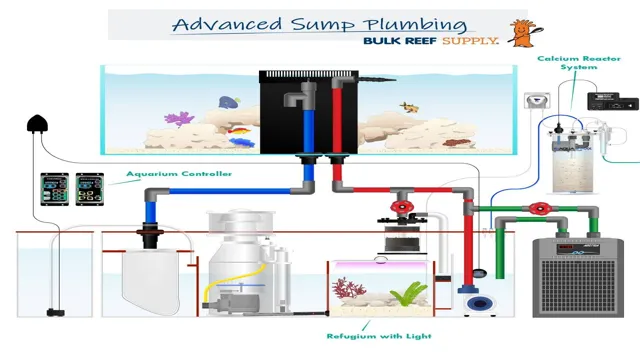
When setting up a saltwater aquarium, a sump is an essential piece of equipment that can help keep the system clean and maintain water quality over time. Sumps are typically installed underneath the main tank and act as a filtration chamber where water can be collected and processed before being returned to the main tank. To set up a basic sump system, you will need a few key pieces of equipment, including an overflow box, return pump, protein skimmer, and a filter media basket.
The overflow box is used to transfer water from the main tank to the sump, while the return pump pushes clean water back into the main tank. With the addition of a protein skimmer, organic waste and debris can be removed from the water, and filter media can be used to further purify the water. All of these components work together to maintain a healthy and thriving saltwater aquarium, ensuring your fish and coral thrive in a clean and well-maintained environment.
3. Pipes and Fittings
Pipes and fittings are an essential part of any plumbing system. To ensure that your plumbing works efficiently, you need some basic equipment for your pipes and fittings. Firstly, you’ll need some pipe cutters to cut the pipes to the required length.
Secondly, you’ll require some pipe deburring tools that smoothen the edges of the pipes after cutting. You’ll also need some Teflon tape to seal the threads of the pipes. This tape is a fast, easy and inexpensive way to prevent leaks.
Lastly, you’ll need a pipe wrench to tighten and loosen the pipes securely. These tools are a necessity and investment in your plumbing system. Without them, you may face leaks and plumbing problems that could be costly to repair.
So, it’s better to get these basic tools beforehand and be prepared for any upcoming plumbing issues.
4. Powerhead/Pump
A powerhead or pump is an essential piece of equipment that any saltwater aquarium enthusiast needs. It helps to keep the aquarium water moving and clean. The powerhead creates a current, which helps to circulate the water and distribute nutrients evenly throughout the tank.
This is necessary because, in a closed environment like an aquarium, the water can become stagnant, leading to the buildup of debris and waste products. Not only does this make your aquarium look unpleasant, but it can lead to the growth of dangerous bacteria and other harmful microorganisms that could harm your fish and other aquatic creatures. A good quality powerhead or pump will help to ensure that your aquarium remains healthy and thriving. (See Also: How to Put a Memorial into an Aquarium: A Step-by-Step Guide for Creating a Lasting Tribute)
Whether you are setting up a new saltwater aquarium or upgrading your existing setup, getting a powerhead or pump is a crucial step that should not be overlooked. So, invest in the best quality pump you can afford to ensure the longevity of your saltwater aquarium.
5. Plumbing Valves
When it comes to plumbing valves, there are several basic pieces of equipment that every homeowner should have on hand. The first is a shut-off valve, which is essential for turning off the water flow to a specific area of the house in the event of a leak or other problem. Ball valves are also necessary, as they allow for easy and quick shutoff when needed.
A pressure relief valve is another crucial piece of equipment that helps regulate water pressure and prevent damage to pipes, appliances, and other fixtures. Additionally, a backflow prevention device can help prevent contaminated water from flowing back into the home’s water supply, ensuring safe and clean water at all times. Overall, having these basic plumbing valves in your home can help you prevent costly water damage and ensure that your water supply is safe and clean.
So if you’re a homeowner, be sure to invest in the necessary equipment and keep it on hand for emergencies or routine maintenance. Your plumbing system will thank you for it in the long run!
Step-by-Step Guide to Plumb a Saltwater Aquarium
Are you looking to start your own saltwater aquarium at home? One of the most important steps in setting up your aquarium is plumbing. By properly plumbing your aquarium, you can ensure that water flows smoothly through the system, providing your fish and organisms with the necessary environment to thrive. To start, choose the right location for your aquarium and install a sump.
Next, connect your sump to your tank and install a protein skimmer. You’ll also need to install a return pump to circulate water in your system. Finally, add any additional equipment such as reactors and UV sterilizers and connect them to your plumbing system.
By following these steps, you can plumb your saltwater aquarium like a pro, ensuring that your fish and other organisms have a healthy and thriving environment to call home.
1. Drilling the Tank
Plumbing a saltwater aquarium can seem like a daunting task but with the right tools and guidance, it can be done easily. The first step in this process is drilling the tank to install the overflow system. When choosing the location for the overflow, it’s important to consider the water level and the height of the return pump.
Once the location has been determined, use a diamond hole saw with a drill to create the necessary holes. The size of the hole depends on the size of the overflow and the return pump. Make sure to wear protective gear to prevent any accidents.
After drilling, smooth out the edges of the holes and rinse the tank thoroughly to remove any debris. With this step complete, you’re one step closer to a fully functioning saltwater aquarium that will provide a beautiful home for your aquatic pets.
2. Installing the Overflow Box
One crucial step in plumbing a saltwater aquarium is installing the overflow box. An overflow box helps regulate water levels, preventing water from overflowing and causing damage to your home or tank. To install the overflow box, start by placing it on the back of your aquarium and marking where the holes need to be drilled.
Be sure to use the appropriate drill bit for your tank’s material and size. Once the holes are drilled, attach the box to your aquarium with the included brackets and silicone adhesive. Finally, connect the plumbing tubing to the overflow box and direct it to your sump or filtration system.
With the overflow box securely installed, you can focus on setting up the rest of your system, confident that your tank is protected from potential water damage. Remember, proper installation of the overflow box is critical for the success of your saltwater aquarium.
3. Setting up the Sump
Setting up the sump is an essential step in plumbing a saltwater aquarium. A sump is a separate tank where equipment such as heaters, skimmers, and filters can be placed, providing additional filtration and space for the aquarium inhabitants. The first thing to consider when setting up a sump is its size, which should be at least 10% of the total water volume in the aquarium.
Once you’ve decided on the size, position the sump below the aquarium and connect it to the overflow box. It’s important to use flexible tubing to ensure that any movements in the aquarium won’t cause the overflow box to dislodge. Make sure that the tubing runs downhill towards the sump to allow for water to flow down naturally into the sump.
Lastly, connect the necessary equipment to the sump, such as the protein skimmer and other filtration devices. With these steps, your sump will be successfully set up, providing an efficient and effective filtration system for your saltwater aquarium.
4. Installing the Return Pipe
Now that you have set up the bulkheads and overflow, it’s time to install the return pipe. This pipe is responsible for returning the water back to the tank after it has been filtered. You should measure the distance from the overflow to the sump, where the return pump is located.
Using a PVC pipe and fittings, create a line that will run from the pump to the overflow. Before glueing the fittings, make sure they are clean and dry. Use PVC cement to join the sections together and let it dry for at least 24 hours before testing. (See Also: How Thick is Georgia Aquarium Glass: A Comprehensive Guide to Aquarium Glass Thicknesses)
Once you have verified that there are no leaks, it’s time to prime the pump with water and turn it on. You should aim to have the return pipe output at least 10 times the water volume of your tank per hour for optimal water circulation. By following these simple steps, you can ensure that your return pipe is installed correctly and your saltwater aquarium runs smoothly.
5. Connecting Powerhead/Pump
Connecting a powerhead or pump to your saltwater aquarium is an essential step in setting up your tank for success. First, you need to determine the appropriate size and flow rate for your aquarium. Once you’ve found the right powerhead or pump, you can start the plumbing process.
You’ll need piping, adapters, and a check valve. Begin by attaching the adapter to the inlet and outlet of the powerhead, ensuring a secure fit. Next, connect the piping to the adapters and route it to the desired location in the aquarium.
Make sure to measure and cut the piping to fit perfectly. Don’t forget to add a check valve to ensure that water doesn’t flow back into the pump in case of a power outage. Finally, test the powerhead or pump by turning it on and checking for any leaks.
Proper installation and maintenance of your powerhead or pump can greatly improve the health and happiness of your saltwater aquarium inhabitants.
6. Adding the Plumbing Valves
When it comes to plumbing a saltwater aquarium, adding the proper valves is crucial to maintain a healthy and safe environment for your marine life. The first step is determining which type of valve you need for each connection in your system. Ball valves are commonly used to regulate water flow, while check valves prevent backflow and siphoning.
It’s important to ensure that all valves are made of durable materials, such as PVC or stainless steel, to withstand the corrosive effects of saltwater. Once you’ve selected your valves, it’s time to install them. This can be done by cutting your plumbing lines and attaching the valve using glue or threaded connections.
Be sure to test each valve before adding water to your aquarium to spot any leaks or malfunctions. Proper valve placement and maintenance can prevent costly and harmful equipment failures, so take the time to plan and install your plumbing system correctly from the start.
Tips and Tricks
If you’re considering setting up a saltwater aquarium, it’s important to know how to properly plumb it. Plumbing involves connecting all the necessary equipment, ensuring proper circulation, and managing overflow and return pumps. To start, you’ll need to assemble the necessary supplies and choose the right plumbing components, such as PVC pipes, fittings, and valves.
Next, you’ll need to plan your layout carefully and measure for precise cuts and fittings. Be sure to use appropriate adhesives and sealants to prevent leaks. It’s also important to consider factors such as flow rate, skimmer placement, and water level.
Finally, be sure to test your plumbing thoroughly before adding fish and other inhabitants to your aquarium. With the right approach, you can create a healthy, thriving saltwater environment for your aquatic pets.
1. Use Flexible Tubing
Flexible tubing is an excellent material to use for a wide range of applications, from plumbing to electrical work. One of the main benefits of flexible tubing is that it can bend and flex without breaking, making it ideal for use in tight spaces or areas where movement is required. When working with flexible tubing, it’s important to use the right tools and techniques to ensure a secure and leak-free installation.
One of the most important tips for using flexible tubing is to always use the right size and type of tubing for the job. This will ensure that it fits properly and can handle the pressure and flow rate of the system. Additionally, it’s important to use the right fittings and connectors to ensure a tight seal.
By following these tips and tricks, you can ensure a safe, reliable, and long-lasting installation using flexible tubing.
2. Use Unions and Thread Sealant
“unions and thread sealant” When it comes to plumbing, it’s important to make sure everything is tightly sealed to avoid leaks and potential water damage. One way to ensure a tight seal is by using unions and thread sealant. Unions are connectors that allow for easy disconnection and reconnection, while thread sealant creates a tight seal between threaded connections.
Together, they can provide an extra layer of protection against leaks. It’s important to choose the right type of thread sealant for your specific plumbing job, as different sealants are designed for different types of pipes and materials. By using unions and thread sealant, you can have peace of mind knowing your plumbing connections are secure and protected against leaks.
3. Test for Leaks
When it comes to testing for leaks, there are a few tips and tricks you can use to make sure you’re doing it right. First and foremost, it’s important to know what you’re looking for. Leaks can happen in a variety of places, from the roof to the pipes, so it’s essential to have a good understanding of what you need to test. (See Also: How Thick Should Glass Be for a 180 Gallon Aquarium: A Comprehensive Guide)
Once you know what you’re looking for, the next step is to gather the proper tools and materials. This might include a flashlight, ladder, and various types of sealant. One key trick to keep in mind is to be thorough in your testing.
Don’t just test one area and assume everything else is okay. Be sure to check multiple spots to make sure you catch any potential problems. And finally, don’t be afraid to call in a professional if you’re not comfortable testing for leaks on your own.
Sometimes it’s better to be safe than sorry and leave it to the experts. Remember, taking the time to test for leaks now could save you a lot of hassle and money down the road.
4. Keep a Maintenance Schedule
When it comes to maintaining your equipment, keeping a schedule is crucial to ensure everything runs smoothly. A maintenance schedule is key to avoiding unexpected breakdowns or costly repairs. It’s important to create a schedule, stick to it, and document when maintenance is performed.
This way, you have a clear record of what has been done and when. Your maintenance schedule should include tasks such as oil changes, filter replacements, and inspections. Keeping track of these activities can help identify potential problems before they become major issues.
Remember, a little bit of maintenance goes a long way in preventing costly repairs down the road. So, whether you’re working with machinery or your car, make sure to create a maintenance schedule and stick to it. Your wallet will thank you in the long run.
Conclusion
In conclusion, plumbing a saltwater aquarium can seem like a daunting task, but with careful planning and attention to detail, it can be a rewarding and satisfying experience. Building a functional and efficient plumbing system requires considering factors such as flow rates, filtration options, and the needs of your aquatic inhabitants. Remember, it’s not just about making the water look good, but also providing a healthy and stable environment for your fish and coral.
So, roll up your sleeves and dive into the world of plumbing a saltwater aquarium, because in the end, it’s all about creating a beautiful and thriving underwater oasis. Just don’t forget to wear gloves and avoid the “yellow snow” of the aquarium world!”
FAQs
What tools do I need to plumb a saltwater aquarium?
To plumb a saltwater aquarium, you will need PVC pipes, joints, valves, plumbing cement, a pipe cutter, and a wrench.
How do I determine the right size of PVC pipes for my saltwater aquarium plumbing?
The size of the PVC pipes for your saltwater aquarium plumbing will depend on the size of your tank and the flow rate you need. It is recommended to consult a professional or use an online calculator to determine the appropriate pipe size.
What is the best way to clean the PVC pipes before installation?
The PVC pipes should be cleaned with a solvent cleaner to remove any dirt, debris, or oil that may have collected on them. You can use a mixture of water and vinegar or a specialized PVC cleaner for this purpose.
How do I install an overflow box in my saltwater aquarium plumbing?
To install an overflow box, place it on the back of the aquarium and cut a hole in the tank to fit the box. Use silicone sealant to secure the box in place and connect the PVC pipes to it.
Can I use flexible tubing instead of PVC pipes for my saltwater aquarium plumbing?
While flexible tubing can be used for some parts of the aquarium plumbing, it is not recommended as it can easily kink and restrict the water flow. PVC pipes are a much more durable and stable option.
How do I prevent leaks in my saltwater aquarium plumbing?
To prevent leaks, make sure all the PVC joints are properly glued and sealed. It is also recommended to use high-quality PVC pipes and fittings and to test the plumbing system for leaks before adding water to the tank.
Can I plumb multiple tanks together in a saltwater aquarium system?
Yes, you can plumb multiple tanks together in a saltwater aquarium system. This requires a more complex plumbing setup with multiple overflow boxes, pumps, and sumps to ensure a steady water flow and filtration. It is recommended to consult a professional for this type of installation.

