If you’re new to the world of aquariums, setting up a sump system might seem daunting. But with a little bit of know-how, it can actually be quite simple! A sump is essentially an extra tank that houses your filtration equipment, allowing you to keep it out of sight while keeping your aquarium clean and clear. Properly plumbing your sump is crucial to its effectiveness, so let’s dive in and learn how to do it! By the end of this article, you’ll be equipped with the knowledge and confidence to set up your own sump system and take your aquarium game to the next level.
So grab a cup of coffee and let’s get started!
Overview of Aquarium Sumps
Plumbing an aquarium sump might seem like a daunting task, but it’s actually a straightforward process that can help maintain a clean and healthy aquarium. A sump is a secondary tank that is connected to the main aquarium and is designed to provide additional filtration, protein skimming, and water flow. To plumb a sump, you’ll need to have a basic understanding of the aquarium systems and the equipment required.
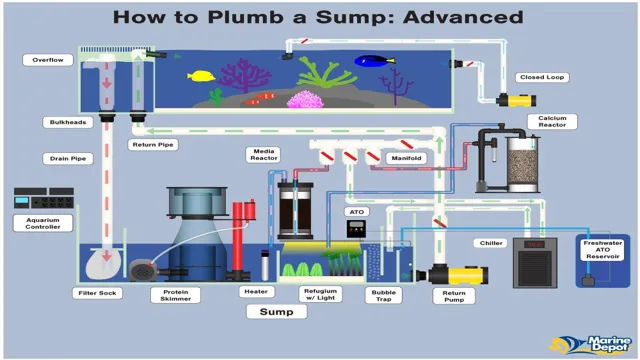
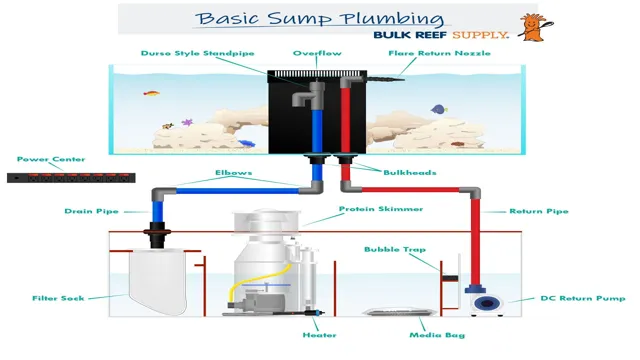
First, position the sump under your aquarium and connect the overflow to the bulkhead. Then, connect the sump’s return pump to the return line and adjust the water flow. To ensure optimal water flow, use a ball valve to regulate the water level in the aquarium.
With the right equipment and a bit of patience, you can easily plumb your aquarium sump for better water quality and healthy aquatic life.
What is an Aquarium Sump?
Aquarium sumps are essential components to achieving a healthy and thriving aquatic environment for your fish tank. Essentially, a sump is a supplemental filtration system that works in conjunction with your aquarium’s built-in filtration. The sump is designed to provide additional filtration for the water in your tank, removing any excess debris, waste, or bacteria.
Sumps are typically located beneath the aquarium and are connected to your tank with a series of pipes or hoses. The water from your aquarium is then gravity-fed into the sump, where it passes through various filtration media such as protein skimmers, filter socks, activated carbon, and mechanical filters, before returning back to the tank. Aquarium sumps are a great way to increase the amount of water in your aquarium system, improve water quality, and create an overall healthier environment for your aquatic pets.
Why Use an Aquarium Sump?
Aquarium Sump Aquarium sumps are an essential piece of equipment for any serious fish keeper. They are designed to provide a centralized location for filtration equipment, such as heaters, skimmers, and pumps, and can help to improve the overall health of your aquarium ecosystem. A sump is essentially a tank located beneath the main aquarium, which receives water via an overflow system.
The water is then filtered through various means, such as mechanical, biological and chemical, before returning to the main tank. The use of a sump can help to reduce clutter within the main tank, making it easier to maintain and clean. Additionally, it allows for the installation of larger and more powerful filtration equipment, which can provide more effective filtration and a healthier environment for your fish.
Overall, aquarium sumps are a great investment for any serious fish keeper, helping to improve water quality and reduce maintenance time.
Parts of an Aquarium Sump
An aquarium sump is a vital element for any aquarium filtration system. It is typically a separate container that is positioned underneath the main aquarium and is designed to provide mechanical, chemical, and biological filtration. The many different parts that make up an aquarium sump include an overflow box, filter sock, protein skimmer, return pump, baffles, and a refugium.
The overflow box serves as the initial stage where debris and larger particles are removed from the water, then the filter sock is used to trap smaller particles. The protein skimmer uses air bubbles to extract organic waste, and then the baffle system is used to introduce oxygen and further filtering. The refugium is typically used for growing beneficial bacteria and microorganisms that assist in nutrient reduction in the aquarium water.
Understanding the different parts of an aquarium sump is essential when assembling and maintaining a healthy, balanced aquatic environment.
Preparing to Plumb Your Aquarium Sump
If you’re considering setting up an aquarium sump system, it’s crucial to prepare before you start the plumbing process. The first step is to choose the appropriate size and type of sump for your aquarium; it should be large enough to accommodate your tank’s volume and have the necessary compartments for filtration equipment. Next, ensure that you have all the required plumbing components, such as PVC pipes, unions, and valves.
Having a diagram of your sump layout and plumbing system can also simplify the process. Before you begin, double-check that your aquarium and sump are level, and the plumbing lines are correctly measured and cut according to your layout diagram. Taking these precautions can make a huge difference in the efficiency and effectiveness of your aquarium system.
With the right preparation, the plumbing process can be simple and straightforward, and you can enjoy a healthy and thriving aquarium in no time.
Choosing the Right Plumbing Materials
When it comes to plumbing an aquarium sump, it’s important to select the right materials to ensure longevity and functionality. PVC piping is a popular material choice for its durability and affordability. Make sure to select PVC that is designated for water use, as regular plumbing PVC can contain harmful chemicals that may harm your aquatic life.
Another important aspect to consider is the size of your aquarium and your sump system. Larger aquariums may require larger piping to maintain adequate water flow. Additionally, don’t forget to invest in quality adhesive to secure your pipes together and prevent any leaks. (See Also: How to Do Aquarium Nails with Gel: A Step-by-Step Guide for Stunning Results)
Proper preparation and attention to detail can ensure a reliable and long-lasting plumbing system for your aquarium sump.
Creating a Plumbing Plan
Preparing to plumb your aquarium sump can be a daunting task, but with the right plan and tools, it can be a breeze. The first step is to gather all the necessary materials, such as PVC pipes, valves, unions, and fittings. Once you have all the materials, you can start designing your plumbing plan.
The most important thing to keep in mind while designing your plan is to ensure that the water flows smoothly and has enough pressure to reach your sump. One useful tip is to measure the distance between your aquarium and sump and calculate the ideal pipe diameter for your setup. This will prevent any backflow or overflow issues in the future.
Another thing to consider is the placement and angle of your pipes. Make sure they are properly secured and angled downwards to avoid any air pockets that could disrupt water flow. Overall, the key to a successful sump plumbing setup is to take your time, plan carefully, and ensure that everything is properly secured and sealed to avoid any leaks and potential disasters.
How to Cut Plumbing Pipes
Cutting plumbing pipes for your aquarium sump can be a daunting task, but it is crucial to ensure that your tank remains functional and debris-free. Before starting the process, make sure to gather all necessary tools such as a pipe cutter, hacksaw, or reciprocating saw, and safety equipment such as gloves and goggles. Start by measuring and marking the pipes to be cut with a pipe marker or pencil.
Next, use your chosen tool to cut through the pipe cleanly and smoothly. Be mindful of the burrs or rough edges left behind, using a deburring tool to remove any irregularities. It’s important to note that proper measurement and precision are integral to ensuring accurate cuts and preventing leaks.
Taking the time to prepare and cut your plumbing pipes correctly will save you time, money, and potential headaches in the future.
Plumbing Your Aquarium Sump
If you’re looking to set up an aquarium sump system, it’s crucial to understand the basics of plumbing. First, you’ll need to decide which type of plumbing method is best suited for your setup. PVC pipes are a popular choice due to their durability, but flexible tubing can also be used as a more cost-effective option.
Next, you’ll need to determine the size and placement of your pipes and valves. The size of your pipes should be based on the flow rate you want to achieve, and the placement of your valves should allow for easy access for maintenance. It’s also important to consider the placement of your return pump and how it will be connected to your sump.
Lastly, don’t forget to test your plumbing system for leaks before adding any water to your sump. With the right setup and a little bit of planning and research, you’ll be able to successfully plumb your aquarium sump in no time.
Attaching Pipes to Your Aquarium Sump
Plumbing your aquarium sump can be a daunting task, especially when it comes to attaching pipes. However, with the right tools and a bit of patience, it can be done successfully. The first step is to determine the correct size of your pipes and fittings.
It’s important to have the right size as it affects the water flow rate and pressure. Once you have the right size, you can begin attaching the pipes to your aquarium sump. Firstly, you need to ensure that the pipes are clean and free from debris.
Then, apply a generous amount of the appropriate adhesive to the ends of the pipes and fittings before connecting them. Be sure to connect them tightly, without over-tightening, to avoid leaks. Once the pipes are connected, check for leaks by filling your sump with water.
If there are no leaks, congratulations! You have successfully attached the pipes to your aquarium sump. Remember to maintain and clean your sump regularly to ensure optimal performance and health for your aquatic pets.
Connecting the Drain Pipe
When setting up your aquarium sump, one important step that you shouldn’t overlook is properly plumbing the drain pipe. The drain pipe is responsible for carrying water from your aquarium to your sump, so it’s vital to make sure it’s connected correctly. One common mistake is not ensuring a tight seal between the pipe and the bulkhead fitting.
To prevent leaks, it’s recommended to use a silicone sealant around the fitting. It’s also essential to make sure the drain pipe is at the correct height and angle to allow for efficient water flow. Poorly installed drain pipes can cause water to overflow or create a loud, gurgling noise.
With proper set up and maintenance, the drain pipe will keep your aquarium running smoothly and keep your fish happy and healthy.
Connecting the Return Pipe
Plumbing your aquarium sump can seem daunting, but with the right steps, it can be straightforward. When connecting the return pipe, it’s essential to consider a few factors. Firstly, the size of the pipe should be proportional to the return pump’s size to prevent overflow in the sump. (See Also: How to Lower KH Aquarium: 5 Easy Ways to Reduce Carbonate Hardness)
Additionally, it’s best to use flexible piping or PVC piping to allow for adjustments, making it easier to clean and maintain the system. When connecting the return pipe, ensure it is secure and tight to prevent leaks that could damage the surrounding area. Keep in mind that the return pipe’s placement should discharge the water into the aquarium to maintain proper water flow and filtration.
By following these simple steps, you will have effectively connected your return pipe, ensuring proper water flow in your aquarium sump.
Testing Your Plumbing
When it comes to plumbing an aquarium sump, testing your plumbing is an essential step in ensuring a successful setup. Before adding water and introducing fish and other aquatic creatures to your aquarium, it is crucial to make sure that your plumbing system is leak-free and functioning correctly. A leak in your plumbing can lead to a flood in your home, and faulty plumbing can harm your fish, invertebrates, and plants.
To test your plumbing, fill your sump with water and watch for leaks in the plumbing connections and the sump itself. If there are no leaks, turn on your pump and check again for any leaks or water spills. It is also crucial to monitor the water flow rate, as inadequate water flow can negatively affect your aquarium’s water quality.
By testing your plumbing before adding water and aquatic life to your aquarium, you can ensure that your sump is working efficiently and avoid any potential disasters.
How to Test for Leaks
Testing for leaks in your plumbing is an essential part of home maintenance. Water leaks can cause significant damage and costly repairs if left unchecked. Luckily, there are several easy and effective ways to test for leaks in your plumbing system.
One of the simplest methods is to look for visible signs of water damage, such as water stains or wet spots on ceilings, walls, or floors. Another way to test for leaks is to turn off all water fixtures and monitor your water meter for any fluctuations. If you notice a change in your meter readings, it may indicate a leak in your plumbing system.
Lastly, you can conduct a dye test, which involves adding food coloring to your toilet tank and waiting to see if the color appears in your bowl without flushing. By testing for leaks regularly, you can prevent significant damage to your home and save money on costly repairs in the long run.
Troubleshooting Leaks
When it comes to troubleshooting leaks in your plumbing, testing is important. The first step is to check for visible signs of water damage or puddles around your fixtures or pipes. However, sometimes leaks can go undetected even without any visible signs.
This is where testing comes in. You can perform a simple test by turning off all the faucets in your home, including the main shut off valve, and monitoring your water meter for any usage. If there is no usage but your meter is still running, it’s a sign of a leak.
Another test is the “dye test” where you add food coloring to your toilet tank. If the color appears in your bowl without flushing, it indicates a leak. Taking these simple steps to test your plumbing can help you identify leaks early on and prevent costly repairs down the line.
Don’t let a small leak turn into a big problem – test your plumbing regularly to ensure everything is working as it should.
Maintenance of Your Aquarium Sump
If you are a proud owner of an aquarium, then you know that maintaining your aquarium sump is extremely important to ensure that your aquatic environment remains clean and healthy. One of the first things to consider when setting up your aquarium sump is how to plumb it properly. A sump is simply a separate tank located underneath your aquarium that connects to the main tank with the use of plumbing.
There are several different options available for plumbing your sump, including a standpipe, overflow box, and a siphon. Each of these solutions has its own unique benefits and drawbacks, so it’s important to research and consider all options before making a final decision. Regular maintenance of your aquarium sump is vital to keeping your tank clean and healthy.
It’s recommended to clean your sump filter regularly, replace the filter media, and perform water changes at least once a week. By keeping up with these maintenance tasks, you’ll be able to enjoy your aquarium for years to come!
Regular Cleaning Schedule
As an aquarium enthusiast, keeping your sump in good working condition is crucial. Maintaining your aquarium sump is essential for the health and longevity of your aquatic pets. A thorough cleaning schedule should be implemented to prevent the accumulation of debris and other contaminants in the sump.
Ideally, a weekly cleaning is recommended, but the frequency of cleaning may vary depending on the size of your aquarium, the number of fish, and the amount of food being fed. A good rule of thumb is to check your sump every three to four days, and clean it as needed. When cleaning your aquarium sump, make sure to turn off all equipment and unplug it from the power source. (See Also: How to Safely Lower Aquarium pH: Tips and Tricks)
Begin by removing all the water from the sump and thoroughly scrubbing the interior with a sump cleaning brush, removing any build-up of algae or other debris. Rinse the sump with fresh water and use a paper towel to wipe down the sides, ensuring it is clean and free from any residue. Once completed, it’s important to fill the sump with fresh water and adjust the salinity, pH, and temperature as needed before turning the equipment back on.
Keeping up with a weekly cleaning schedule will keep your aquarium sump running smoothly and ensure the health and wellbeing of your aquatic inhabitants. Remember, maintenance is key to the longevity of your aquarium sump. So be proactive, stay alert, and keep your aquarium in top condition for years to come!
Checking for Potential Blockages
Maintaining your aquarium sump is an essential part of ensuring a healthy aquatic environment for your fish. Checking for potential blockages is an important task that should be done regularly. A blocked sump can cause the water to overflow, leading to potential flooding and damage to your home.
It can also lead to poor water quality, which can be harmful to your fish. To check for blockages, start by turning off the pump and unplugging any electrical equipment. Next, inspect the sump for any debris or foreign objects that may be obstructing the water flow.
Look for any build-up in the pipes or hoses that lead to and from the sump. If you notice any blockages, remove them and clean the affected area thoroughly before turning the pump back on. By keeping an eye on potential blockages, you can prevent potential problems and keep your aquarium running smoothly.
Conclusion
And there you have it, folks! Plumbing an aquarium sump may seem like a daunting task, but with a little bit of patience, elbow grease, and some helpful tips from your friendly assistant, it’s a task that can be easily accomplished. So go forth and create a thriving aquatic ecosystem that will have your fishy friends feeling right at home. Now, if only we could teach them to say thank you.
“
FAQs
What is an aquarium sump system and why do I need it for my aquarium?
An aquarium sump system is a filtration system that is installed below your main aquarium. It helps to filter and circulate water, while also providing additional space for heater, protein skimmer, and other equipment. It is beneficial for larger aquariums as it can improve overall water quality and reduce maintenance.
How do I plumb an aquarium sump system?
The first step is to plan the layout of your sump system and determine where you want to position it. Then, you will need to measure and cut the PVC pipes and attach them to the aquarium, pump, and sump system. It is essential to ensure that the plumbing is leak-proof and properly sealed to prevent water damage or flooding.
What size sump system do I need for my aquarium?
The size of your sump system will depend on your specific aquarium setup, including the size of your main tank, the fish species, and the amount of water flow needed. As a general rule of thumb, your sump system should be at least 10-20% of your total aquarium volume.
Can I use a sump system with a freshwater aquarium?
Yes, a sump system can be used with both freshwater and saltwater aquariums. It is especially helpful for large planted tanks as it can provide additional space for equipment and help maintain stable water parameters.
How often should I clean my sump system?
It is recommended to clean your sump system every 3-6 months, depending on the amount of debris and buildup. You should also inspect and clean the protein skimmer, filter socks, and other equipment regularly to ensure proper function.
Is it necessary to use a protein skimmer with an aquarium sump system?
While it is not necessary to use a protein skimmer, it is highly recommended as it helps to remove organic waste and other impurities from the water. This can improve water quality and reduce the risk of diseases and algae growth.
Can I add additional equipment to my sump system?
Yes, you can add additional equipment to your sump system such as a refugium for growing algae or live plants, a calcium reactor, or an automatic top-off system. However, it is important to ensure that your sump system has enough space and proper flow to accommodate the additional equipment.

