Have you ever dreamt of having an aquarium in your home, but space is limited? Consider installing one in the wall! Not only will it save space, but it will also add an eye-catching feature to your decor. Installing an aquarium in a wall may seem like a daunting task, but with the right materials and a little bit of patience, it can be easily achieved. In this blog, we’ll guide you through the process of installing an aquarium in a wall step-by-step.
By the end, you’ll have a stunning addition to your wall that you can sit and admire for hours on end. So, let’s dive into it!
Assess the Wall Strength
When it comes to installing an aquarium in a wall, assessing the wall strength is crucial. You don’t want the weight of the aquarium to overload the wall and cause damage. You should take note of the wall’s material and its load-bearing capacity.
Brick, concrete, and cinder block walls are ideal for supporting an aquarium. Drywall, on the other hand, is not recommended as it is more susceptible to damage. Furthermore, you should determine the weight of the aquarium when filled with water and fish.
Once you have this information, you can consult with a structural engineer or contractor to determine if the wall can handle the weight. It’s always better to be safe than sorry, and taking the time to assess the wall strength can save you from costly and potentially dangerous consequences down the road. By taking this step, you can ensure that your aquarium will be safe and secure in the wall for years to come.
Check for Studs or Support Beams
When it comes to hanging items on a wall, it’s crucial to assess the wall strength before drilling any holes. One important thing to check is whether there are any studs or support beams behind the drywall. These structural elements provide a sturdy base for hanging items and can prevent damage to the wall.
To find studs, you can use a stud finder tool or simply tap the wall until you hear a solid, rather than hollow, sound. If you can’t locate studs, it’s best to use drywall anchors or toggle bolts to distribute the weight of whatever you’re hanging across a larger area of the wall. By taking the time to properly assess your wall strength and use the appropriate hanging hardware, you can avoid the frustration of items falling down or damaging your walls.

Consider the Weight of the Aquarium
When considering setting up an aquarium in your home, it’s important to assess the strength of the walls where you plan on placing it. The weight of an aquarium can be incredibly heavy, and the last thing you want is for it to come crashing down due to inadequate support. There are a few things to consider when assessing a wall’s strength, such as its construction, the materials it’s made from, and its age.
It’s also important to take into account any wall-mounted features, such as electrical outlets or light switches, that could affect the weight-bearing capacity of the wall. Additionally, you may want to enlist the help of a professional to ensure that the wall is strong enough to hold the weight of the aquarium. By taking the time to assess the wall’s strength beforehand, you can ensure the safety and stability of your aquarium, as well as the surrounding area.
Cut a Hole in the Wall
If you’re looking to add a unique touch to your home decor, installing an aquarium in the wall could be just the thing! While the process might seem daunting, it’s actually quite straightforward with a bit of planning and patience. The first step is to choose a suitable location for your aquarium. It should be away from direct sunlight and heat sources, and have access to electrical outlets and plumbing if necessary.
Once you’ve chosen the spot, it’s time to cut a hole in the wall. Depending on the size of your aquarium, you may need to hire a professional for this step. It’s essential that the hole is the right size and positioned correctly, so take measurements carefully.
Once the hole is cut, you can install a frame to support the aquarium, which can be made from wood or metal. Finally, it’s time to add the aquarium itself, fill it with water and add your fish and decorations. With a little bit of DIY skill, you can have a beautiful and unique aquarium that’s sure to impress your guests!
Determine the Location of the Hole
Cut a Hole in the Wall When it comes to cutting a hole in the wall, the first thing you need to determine is the location. This may seem like an obvious step, but it’s essential to get it right to avoid damaging any electrical or plumbing components within the wall. One way to determine the location is to use a stud finder, which will locate any studs or wall plates that may be in the way.
Once you have found a suitable location, use a level to ensure that the hole will be straight and draw a guideline with a pencil. Next, use a drywall saw or reciprocating saw to cut along the guideline, taking care to avoid cutting through any wires or pipes. After cutting the hole, be sure to clean up any debris and patch any holes or cracks in the surrounding wall.
Remember to always wear protective gear when cutting through walls and take your time to ensure a clean and straight cut.
Use a Stud Finder to Avoid Structural Damage
When it comes to home improvement projects that require cutting into your walls, it’s essential to use a stud finder to avoid any potential structural damage. Cutting holes in your walls blindly can lead to disastrous consequences, which can be both costly and time-consuming to repair. With a stud finder, you can quickly locate the studs in your walls, allowing you to cut into the wall with confidence, knowing that you won’t accidentally damage any vital structural elements. (See Also: How to Make Trees in Planted Aquarium: A Step-by-Step Guide)
It’s crucial always to use a stud finder when performing any work that requires cutting into your walls, whether you’re installing a new light fixture or just hanging a heavy picture. Investing in a stud finder can save you from costly repairs down the road.
Mark and Cut the Hole Carefully
When cutting a hole in the wall, it’s important to be careful and precise to avoid any mistakes. Start by marking the area where you want to make the cut. Use a pencil and a level to ensure your lines are straight.
Next, use a stud finder to identify any electrical wires or pipes that may be inside the wall. Mark them out so you don’t cut through them. Now, put on safety goggles and begin cutting the hole with a drywall saw or a reciprocating saw.
Take your time and cut slowly, using light pressure. If you rush, you risk damaging the surrounding area or injuring yourself. Once you’ve made the hole, use sandpaper or a utility knife to smooth out any rough edges.
Be sure to vacuum up any dust or debris before moving on to the next step. Remember, cutting a hole in the wall can be a complicated process, but with careful attention and patience, you can get the job done right.
Install the Support Frame
If you’re planning on putting an aquarium in the wall, one of the first steps you’ll need to take is installing the support frame. This is an important aspect of the project, as you’ll need to ensure that the weight of the aquarium is distributed evenly and that the frame is securely attached to the wall. To begin, you’ll want to measure the dimensions of the aquarium and cut your support beams to fit.
These beams should be made of sturdy, durable material that can handle the weight of the aquarium. Once you’ve cut your beams, you’ll attach them to the wall using brackets and screws. Be sure to use a level during this process to ensure that the frame is even and straight.
Once your frame is securely in place, you can move on to the next steps of the installation process. By taking the time to properly install your support frame, you can ensure that your aquarium will be safely and securely mounted on your wall for years to come.
Design and Build a Wooden Frame for the Aquarium
To ensure a sturdy support frame for your aquarium, it’s essential to install it properly. Begin by aligning the vertical support posts in the desired location, making sure they are plumb with a level. Once you have confirmed the posts are straight, it’s time to secure them to the base.
Use strong bolts and wood screws to fasten the posts to the floor joists, ensuring they are firmly anchored. After securing the vertical posts, add horizontal support beams to strengthen the frame. Cut the beams to the appropriate length and attach them to the vertical posts with lag screws.
Double-check that the frame is level and square before proceeding. Installing the support frame securely will ensure the weight of the aquarium is evenly distributed and prevent any accidents from occurring. Remember to use treated wood or apply a waterproof sealant to prevent moisture damage.
With a solid support frame, you can now proceed with the next steps to set up your aquarium and enjoy your aquatic pets.
Attach the Frame to the Wall and Secure It
One of the final steps in installing a support frame for your project is to attach it to the wall and secure it properly. This step is crucial to ensure the stability and safety of your project. Start by positioning the frame against the wall in the desired location.
Use a level to make sure it is straight, and then mark the locations where you will attach it to the wall. Depending on the type of wall, you may need to use anchors or screws to secure the frame in place. Make sure that all screws are tight and the frame is firmly attached.
It’s essential to follow the manufacturer’s instructions when securing the frame to the wall to avoid any mistakes. Once the support frame is attached and secured correctly, you can move on to the final steps of your project. Remember, safety should always come first when installing any kind of support structure. (See Also: How to Clean Fish Aquarium Decorations: A Step-by-Step Guide)
Install the Aquarium
Putting an aquarium in the wall is a great way to incorporate a unique design element in your home. But, before you start installing one, there are a few things to consider. First, determine the size of the aquarium you want to install and make sure it will fit in the wall space.
Second, choose a location in your home where it will be easily visible, yet not in direct sunlight. Once you have chosen a location, it is time to cut a hole in the wall and frame it for support. After framing, reinforce the wall with a wooden base before installing the tank.
Make sure to fill the tank with water and let it sit for a few days to ensure there are no leaks or issues. Once it is set up, decorate the aquarium with plants, rocks, and other décor elements to create a beautiful underwater landscape. Putting an aquarium in the wall can be a complex project, so it is advisable to hire a professional to help ensure it is done correctly and safely.
Clean and Prepare the Space for the Tank
Now that you’ve prepared the space for your aquarium, it’s time to get to the fun part – installing it! The first step is to determine where you want to place the tank. Make sure you choose a spot that remains relatively stable in temperature and receives enough light, but not too much direct sunlight. Once you’ve picked the perfect location, it’s time to start unpacking.
Set up the base of the tank, making sure it’s level, and then place the aquarium on top of it. Be sure to use an appropriate amount of supports under the base, especially if it is a larger tank. Next, fill the aquarium with water, being careful not to disturb the substrate or any decorations.
At this point, you can start adding your equipment – heater, filter, and air pump – and let everything run for at least 24 hours before adding any fish. This will allow the water to circulate and the temperature to stabilize. With a little bit of patience, you’ll soon have a beautiful, thriving aquarium to enjoy!
Place the Tank Carefully in the Support Frame
When it comes to installing your aquarium, one of the most crucial steps is placing the tank carefully in the support frame. This ensures that your fish and aquatic plants have a stable and secure environment to thrive in. You don’t want the tank to wobble or be uneven, as it can be harmful to your aquatic life and also risk damage to your property.
Start by making sure that the support frame is level and sturdy. You can use a spirit level to ensure it’s perfectly straight. Once you confirm that the frame is secure, you can then place the tank onto it.
Be careful not to slide the tank or drag it, as this can cause scratches on the glass. Instead, lift the tank and place it gently onto the frame, making sure it’s centered and level. If your tank has an overflow, make sure it’s lined up with the hole in the frame, and also check that the electrical cords and hoses have enough slack and aren’t under any tension.
Take your time and double-check everything to ensure a smooth and successful installation. With the tank carefully placed in the support frame, you can move on to the next steps of setting up your aquarium.
Fill the Tank with Water and Check for Leaks
Now that you’ve gathered all the necessary equipment for your aquarium, it’s time to install it. The first step is to fill the tank with water and check for leaks. To do so, place the tank in its final location and ensure the surface is level.
Then, add water slowly and stop when it reaches the recommended level. Take a close look at the seams and corners to ensure no water is leaking out. If you notice any leaks, it’s best to empty the tank and start over.
It’s essential to double-check for leaks as they can cause damage to your floors and furniture. Once you’ve confirmed that there are no leaks, it’s time to add equipment such as a filter, heater, and thermometer to the tank. Make sure everything is set up correctly and powered on before adding any live aquatic plants or animals.
Keep in mind that the type of fish or plants you want to keep will determine the amount of filtration and lighting necessary. Research the specific requirements for your desired species to ensure they thrive in their new environment. Also, remember to cycle the tank before adding any fish to establish beneficial bacteria and remove any harmful toxins.
Overall, installing an aquarium requires patience and attention to detail. Take your time to ensure there are no leaks and set up all equipment correctly before adding any living creatures. By doing so, you’ll have a thriving and beautiful underwater world to enjoy. (See Also: How to Landscape a Planted Aquarium: Tips and Tricks for a Stunning Underwater Garden)
Decorate and Enjoy Your New Wall-Mounted Aquarium
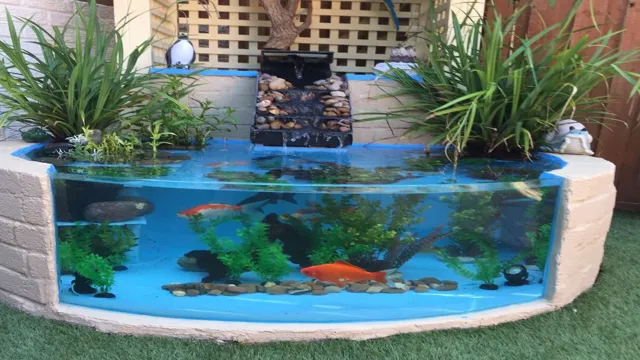
Are you looking to add an aquarium to your home, but don’t have much space available? Consider a wall-mounted aquarium! While it may seem daunting to install, with some careful planning, it can be a simple process. First, determine the desired size and location of the aquarium. Make sure the wall is sturdy enough to support the weight of both the tank and water.
Next, cut a hole in the wall and install a frame to support the tank. Ensure that the frame is level and secure before placing the aquarium in it. Once the aquarium is in place, fill it with water and decorate it to your liking with plants, rocks, and fish.
Just remember to perform regular maintenance, such as water changes and filter cleaning, to keep your fish happy and healthy. With a bit of effort and creativity, your wall-mounted aquarium can provide a beautiful and calming addition to your home decor. So what are you waiting for? Hit the nearest hardware store and get started on your new aquatic adventure!
Conclusion
In conclusion, putting an aquarium in your wall is no small feat, but with careful planning and execution, it can be a stunning addition to your home. Remember, patience is key. Don’t rush the process and make sure to properly seal the tank and reinforce the wall.
And who knows, maybe your fish will enjoy their new “wall-to-wall” view!”
FAQs
What are the advantages of having an aquarium in a wall?
Having an aquarium in a wall can save space and also serve as a beautiful decoration. It can also provide a calming atmosphere and enhance the aesthetics of any room.
What type of aquarium is best for placing in a wall?
An aquarium with a slim profile and a built-in filtration system is ideal for placing in a wall. It should also have appropriate lighting and heating to maintain a healthy environment for the fish.
Is it difficult to install an aquarium in a wall?
Installing an aquarium in a wall can be a bit challenging but it is possible with the help of professional installation services. It involves cutting a hole in the wall, ensuring proper support and reinforcement, and properly sealing the aquarium to prevent leaks.
Can any wall in a house be used to install an aquarium?
Only certain walls in a house can be used to support the weight and size of an aquarium. Load-bearing walls and walls without electrical or plumbing lines are typically the best options.
What type of fish are best suited for an aquarium in a wall?
In general, small and peaceful fish are best suited for an aquarium in a wall. Fish that are too large or aggressive may not thrive in such a small environment.
How do you maintain an aquarium installed in a wall?
Regular maintenance and cleaning is essential to keep an aquarium in a wall healthy and clean. This includes monitoring water quality, changing filter media, cleaning the glass, and keeping the fish fed and healthy.
Can an aquarium in a wall be moved or relocated?
It is not advisable to move or relocate an aquarium in a wall after it has been installed. This can be a complicated and risky process that may result in damage to the wall and the aquarium. It is best to plan the installation carefully and ensure that it is in a permanent location.

