How to Build a Mini Aquarium Sump: A Step-by-Step Guide for Beginner Hobbyists
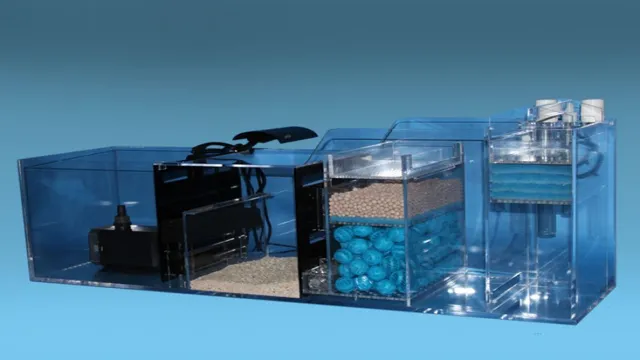
Do you have a small aquarium that needs a reliable filtration system? A mini aquarium sump might be just what you need. This DIY project can save you money and offer extra space for biological and mechanical filtration. But where do you start? Building a mini aquarium sump requires some knowledge of plumbing and aquarium equipment.
It’s essential to plan the design and measure the available space in advance. You’ll also need a few tools, such as a drill, a saw, and PVC pipes. But don’t worry, crafting a mini sump is not rocket science.
With a bit of patience and attention to detail, you can create a functioning sump that improves water quality and keeps your fish healthy and happy. Plus, it’s a rewarding experience to see your aquarium flourish with your handcrafted masterpiece. In this blog post, we’ll guide you step-by-step through the process of building a mini aquarium sump.
We’ll explain the benefits of using a sump, the materials you need, and the techniques you should follow to build a sturdy and efficient sump. You don’t have to be a professional plumber to succeed in this project. Follow our guidelines, unleash your creativity, and enjoy the journey.
What is a Sump?
If you’re a fish-keeping enthusiast, you’ve likely heard of a sump. But what exactly is it, and why might you want one for your aquarium? Simply put, a sump is an overflow container that’s positioned beneath your aquarium and connected to it by piping. Its primary function is to hold extra water, providing extra filtration and storage capacity that helps create a more stable environment for your aquatic pets.
While purchasing a commercial sump may be costly, building your own mini aquarium sump is a cost-effective alternative. By using a few readily available materials, you can quickly create a functional sump at home and enjoy the benefits of a cleaner, healthier aquarium for your finned friends. So why not give it a try and see the difference a sump can make in your aquarium?
Definition and Purpose
A sump is essentially a pit that is designed to collect water, usually found in basements or other subterranean areas. The purpose of a sump is to prevent flooding by collecting excess water and then pumping it out of the area to a place where it can safely drain away. Sumps are typically installed in buildings that are located in areas prone to heavy rain or flooding.
They can also be used in industrial settings to collect and treat wastewater. The word “sump” may not be familiar to everyone, but most people are likely to have encountered one at some point, whether in their own home or elsewhere. In short, a sump is an essential tool for keeping water out of places where it doesn’t belong.
Materials Needed
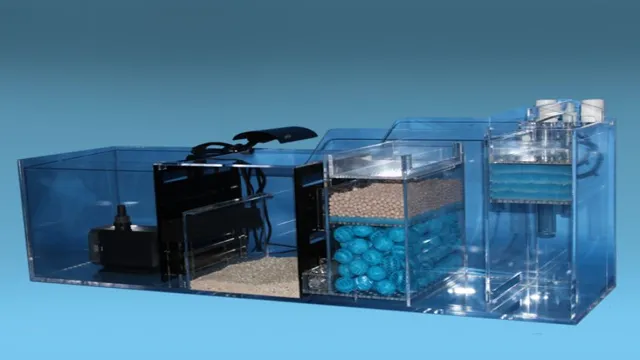
Building a mini aquarium sump can be a fun and rewarding project, but it requires some specific materials to ensure success. You will need a glass or acrylic tank to use as your sump, a bulkhead fitting to create an overflow, filter media like sponges or ceramic rings, a return pump, tubing, and a way to control water flow. It’s important to choose high-quality materials that will stand up to the saltwater environment and keep your tank healthy.
When selecting a tank, look for one that is at least 10% of your display tank volume to ensure adequate filtration. The bulkhead fitting should be appropriately sized to create the right amount of water flow without overwhelming your pump. Choose filter media that is suitable for your specific fish and coral species and consider adding a protein skimmer or refugium for even better filtration.
With the right materials, you can build a mini aquarium sump that will help keep your tank thriving for years to come.
Tank, Pump, Baffles, and Filter
When it comes to setting up a tank, pump, baffles, and filter system, there are a few crucial materials you’ll need to get started. First, you’ll need a high-quality tank that can hold the volume of water you need for your particular application. Depending on your needs, this could range from a small plastic tank to a large metal one.
Next, you’ll need a reliable pump that can handle the flow rate you require. Look for one with a durable motor, and consider factors like noise level and energy efficiency. Baffles are also important to prevent water from swirling around too much and to ensure proper filtration.
These can be purchased or homemade, depending on your skill level. Finally, a quality filter is essential for removing impurities and keeping your water clean and healthy. Make sure to choose one that is compatible with your pump and tank, and consider the maintenance and replacement costs over time.
By investing in these materials, you can set up a tank system that functions as efficiently and effectively as possible.
Setting Up the Sump
If you’re looking to build a mini aquarium sump, the first step is setting it up properly. A sump is a necessary component of many saltwater aquarium setups, as it provides a place to hide equipment and a place for biological filtration to take place. To begin setting up the sump, you will need to choose a sump tank that is the appropriate size for your aquarium setup.
Typically, a sump tank should be able to hold at least 10% of the total water volume of your aquarium. Once you have your sump tank, you will need to install an overflow box or a drilled overflow in your main tank to allow water to flow into the sump. Next, you will want to install the necessary equipment into the sump, such as a protein skimmer, return pump, and any other filtration equipment.
Once all the equipment is installed and secure, fill the sump with water, and then test the water flow and make adjustments as necessary. Finally, add the desired substrate and live rock, and your mini aquarium sump is ready to go!
Positioning, Drilling Holes, and Attaching Components
Setting up the sump can be a tricky process, but it’s essential to ensure that your aquarium is running smoothly. When positioning the sump, make sure that it’s easily accessible for regular maintenance and cleaning. It’s also important to consider the noise that the sump may create, so be mindful of where you put it.
Once the sump is in place, it’s time to drill holes for the overflow and return pipes. Precision is crucial when drilling, as you don’t want to damage the tank or create leaks. Take your time and use the right tools for the job.
After drilling, attach the overflows, return lines, and any other necessary components. Double-check everything before turning on the pump to avoid any water leaks. The success of your aquarium depends on a well-set-up sump, so take the time to do it right.
Adding Water and Testing
Now that you’ve built your mini aquarium sump, it’s time to add water and test it out! Before you fill up your sump, make sure you have a few things on hand. You’ll need a bucket for the water, a heater to keep the water at a consistent temperature, and a powerhead to help circulate the water through the sump. Once you’ve got everything ready, add the water slowly to avoid any spills or splashes.
As the water fills up the sump, check for any leaks or drips. It’s important to make sure that the sump is watertight before you start using it! Once the sump is full, turn on the powerhead and heater and let it run for a few hours. Check the temperature and water flow to make sure everything is working as it should be.
Congratulations, you’ve successfully built and tested your mini aquarium sump! It’s ready to use for your tank and will help keep it clean and healthy.
Filling the Sump and Checking for Leaks
Once you’ve installed a sump pump, it’s crucial to fill the tank with water and check for leaks. Begin by locating the pump’s intake valve and opening it to allow water to flow into the sump. Fill the tank to a level that covers the pump’s impeller, usually about two-thirds of the way full.
Take care not to overfill the tank, as this can cause the pump to run continuously, leading to damage or burnout. Once the tank is filled, it’s time to check for leaks. Inspect the pump’s discharge pipe and all connections for signs of water leakage.
If you notice any water around the pump, tightening the connections or replacing them may be necessary. Remember, a leaky sump pump can be a recipe for disaster, leading to water damage and potential flooding. Take the time to ensure your sump pump is working correctly and without any leaks, and you’ll have greater peace of mind knowing your basement is protected from water damage.
Maintaining the Sump
Maintaining the sump is a crucial part of owning a mini aquarium with a sump. It’s important to regularly clean and maintain your sump to ensure the system is functioning properly. The first step is to check the water level in the sump and adjust it if necessary.
Next, you should clean the protein skimmer, removing any buildup or debris that may have accumulated. It’s also a good idea to clean the mechanical filter, such as a filter sock or sponge, to prevent clogs or blockages. Finally, it’s important to check the water parameters, such as temperature, salinity, and pH, to ensure they are within the proper range.
By maintaining your sump regularly, you can ensure your mini aquarium stays healthy and vibrant.
Cleaning and Replacing Filter Media
Maintaining the sump is crucial in ensuring the overall health and longevity of your aquarium. One key aspect of sump maintenance is cleaning and replacing filter media. Over time, filter media can become clogged with debris and particles, reducing its effectiveness in filtering out harmful toxins and waste.
To prevent this, it’s recommended to clean the filter media every 2-3 weeks, depending on the level of waste in your aquarium. Start by turning off the pump and removing the filter media from the sump. Rinse it gently in a bucket of tank water, avoiding tap water as it may contain chlorine that can harm the beneficial bacteria in the filter.
If the media is excessively clogged, it may be time to replace it. Remember that maintaining the sump is just one aspect of aquarium care. A healthy and thriving aquarium requires regular monitoring of water parameters, adjusting lighting, and providing proper nutrition for your aquatic pets.
But by staying on top of sump maintenance, you’ll be on your way to providing a safe and clean environment for your aquarium’s inhabitants to thrive.
Conclusion
In conclusion, building a mini aquarium sump is like creating a tiny ecosystem within your aquatic oasis. With a few simple steps, you can create a clever filtering system to keep your fish happy and healthy. It’s all about finding the perfect balance between function and aesthetics, just like art or fashion.
So get your DIY on and have some fun crafting your mini masterpiece!”
FAQs
What is a mini aquarium sump?
A mini aquarium sump is a filtration system that is used to maintain the water quality and clarity in a small fish tank.
What materials do I need to build a mini aquarium sump?
You will need a small aquarium, a filter pump, filter media, piping, and a return pump.
How do I set up a mini aquarium sump?
First, drill holes in the aquarium to connect the piping. Then, install the filter pump and filter media, and connect the piping to the sump. Finally, add the return pump and fill the aquarium with water.
What are the benefits of using a mini aquarium sump?
Using a mini aquarium sump can help maintain the water quality and clarity, provide additional space for aquatic life, and increase overall filtration efficiency.
Can I customize my mini aquarium sump?
Yes, you can customize your mini aquarium sump by choosing different filter media and adjusting the flow rate of the filter and return pumps.
How often do I need to clean my mini aquarium sump?
It is recommended to clean the mini aquarium sump once every 1-2 months to maintain optimal filtration performance.
What should I do if my mini aquarium sump is not working properly?
If your mini aquarium sump is not working properly, first check the filter media and replace if necessary. Then, check the pump and tubing for any blockages or malfunctions.

