How to Build a Steel Aquarium Stand in 7 Simple Steps – DIY Guide
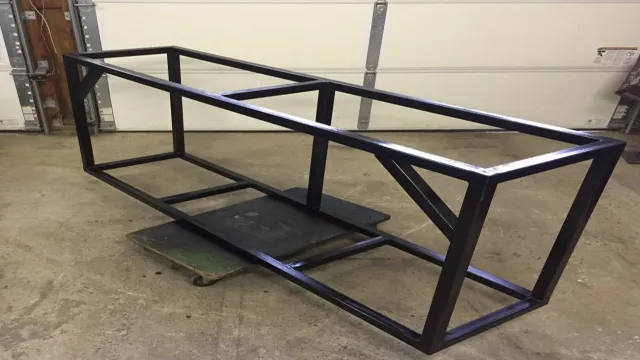
Are you ready to take your aquarium hobby to the next level? Building a steel aquarium stand may sound like a daunting task, but with the right materials and a step-by-step guide, it can be a rewarding DIY project that will not only support your precious fish but also enhance the aesthetics of your home. Unlike wooden stands, steel aquarium stands offer more durability, stability, and a sleek appearance that complements modern and minimalist styles. Plus, steel is resistant to water damage, pests, and warping, making it an ideal material for aquariums that require constant moisture.
In this guide, we will walk you through the process of building a steel aquarium stand from scratch, including the materials you need, the measurements you should take, and the tools you’ll use. We’ll also provide tips on how to choose the right steel for your stand, how to weld pieces together, and how to assemble the stand into a sturdy structure that will support your aquarium for years to come. With this guide, you’ll be able to save money and customize your stand according to your aquarium’s size and your home’s décor.
Plus, you’ll have the satisfaction of creating a functional and beautiful piece of furniture with your own hands. So, let’s dive into the world of steel aquarium stands and start building!
Materials and Tools Required
When it comes to building a steel aquarium stand, there are a few essential materials and tools you will need. First and foremost, you will need steel rods or poles, as well as angle iron to create the frame of the stand. You will also need welding equipment, such as a welder and safety gear like gloves and a mask, to bond the metal pieces together securely.
Additionally, you will need a saw or angle grinder to cut the metal to the correct measurements, as well as a drill to create holes for screws or other connecting materials. A tape measure and level will also come in handy for ensuring the stand is level and properly aligned. When it comes to the materials, it is essential to choose high-quality steel to ensure your aquarium stand is strong, durable, and can support the weight of your tank for years to come.
– Steel Tubes
Steel tubes are essential in many industries, including construction, engineering, and manufacturing. To work with steel tubes, you’ll need several materials and tools. Firstly, you need the right type of steel tube for your project, whether it’s plain or galvanized, round or square, and the necessary size.
You can source these from steel suppliers, industrial supply shops, or online. Next, you’ll need a metal saw to cut the tubes. Depending on the size and thickness of the tube, you can use a hacksaw or power saw.
Ensure that the blade is sharp to make efficient and accurate cuts while minimizing errors or damage. Other essential tools include a deburring tool for smoothing the edges after cutting, a vise for holding the tubes in place while cutting, a drill, and appropriate drill bits for drilling holes in the steel. Remember to use adequate personal protective equipment, such as gloves and safety goggles, when handling and cutting steel tubes, to avoid injuries.
By having the necessary materials and tools, you can work with steel tubes in a safe and effective manner.
– Angle Grinder
When it comes to using an angle grinder, it’s important to have the right materials and tools on hand to ensure a safe and successful project. First and foremost, you’ll need the angle grinder itself, which is a handheld power tool used for grinding, cutting, and polishing a variety of materials. Equally important is the grinding wheel, which attaches to the grinder and comes in a variety of shapes and sizes depending on the type of material you’ll be working with.
Other materials you may need include safety goggles, ear protection, and a dust mask to protect yourself from debris and noise pollution. Additionally, having a workbench, clamps, and a vice may make your project easier to manage. Remember to always read the owner’s manual and follow all safety precautions when using an angle grinder to ensure a successful and accident-free project.
– Welding Machine
If you want to start welding, you’ll need to have some specific materials and tools at your disposal before you begin. For starters, you’ll need to have a welding machine, which will be crucial to your welding work. The type of welding machine you choose will depend on the project you’re working on and your personal preference.
MIG welding machines are great for beginners since they’re easy to use and offer great versatility. You’ll also need a welding helmet to protect your eyes and face, as well as welding gloves to protect your hands. Other tools you should have on hand include a wire brush, pliers, and steel-toed boots.
Finally, you’ll need to purchase the right kind of welding rods and welding wire, as this will also depend on the type of project you’re working on. By having all of the necessary materials and tools on hand, you’ll be ready to start welding and taking on new projects in no time.
– Measuring Tape
When it comes to woodworking, an essential tool that you will need is a measuring tape. This tool comes in handy when taking precise and accurate measurements, which is critical to achieving a high-quality final product. The measuring tape is a flexible ruler that is used to measure the length, width, and depth of different materials.
There are different sizes and styles of measuring tape available, but the most common ones used for woodworking range from 12 to 25 feet in length. Additionally, you will need to consider the material of the measuring tape, with options including cloth, steel, or fiberglass. Remember that the type of material you choose will impact the durability and accuracy of the tape.
In addition to a measuring tape, you will also need other tools like a square, pencil, and saw when working on a woodworking project. By having the necessary materials and tools on hand, you will be well-equipped to produce woodwork with the precision and accuracy that it deserves.
Design and Planning
If you’re into aquariums, you know how important it is to have a sturdy stand to hold your tank. Building a steel aquarium stand is a great option if you want something durable and customizable. Before starting, you need to consider the size and weight of your aquarium.
You don’t want your stand to buckle under the pressure. After measuring the tank, you can start planning the design and materials needed. Steel tubing is a great choice as it’s strong, sturdy, and won’t warp over time.
You can purchase pre-cut pieces or cut them yourself to fit your specific design. To join the pieces, welding or bolting can be used depending on your preference and skill level. Once the stand is built, it’s essential to add a protective layer such as paint or powder coating to prevent rust.
With a little planning and effort, building a steel aquarium stand can be a rewarding and practical project for any aquarium enthusiast.
– Sketching the Design
Sketching the Design is an important part of the design and planning process. It involves putting down ideas in a visual format and exploring how they could be developed further. Sketching is a quick and easy way to brainstorm ideas and test out different concepts before committing to a final design.
This stage is crucial because it allows the designer to identify potential issues before they become a problem later on. Sketching also helps to communicate ideas with team members and clients, making it easier to receive feedback and iterate on the design. By using sketches, designers can create a rough draft of the final product, which will help them to stay on track and make any necessary changes.
Overall, sketching is an essential part of the design process, and should not be overlooked. It allows designers to be creative, explore different options, and ultimately create a design that meets the needs of their client. So next time you have a design project in mind, be sure to start off by sketching your ideas!
– Taking Accurate Measurements
Accurate Measurements When it comes to designing and planning a project, taking accurate measurements is essential. It ensures that your plans are precise, and everything fits perfectly in the end. The first step in taking accurate measurements is to choose the right tools.
Use a measuring tape or a laser measuring device to get accurate readings. Make sure that the measuring tape or device is properly calibrated to ensure that your measurements are correct. The next step is to take measurements in multiples and record them.
Taking multiple measurements allows you to verify that your measurements are accurate and minimize errors. It’s important to measure from two or more reference points to ensure accuracy. For example, when measuring a room’s dimensions, measure both the height and the length of the room to ensure that the measurements are consistent.
In addition, it is critical to take measurements before starting any work, not after. For example, if you plan to install new flooring, take measurements of the room and plan accordingly before ordering the materials. Failing to do this can result in costly mistakes and delays.
In conclusion, taking accurate measurements is a crucial step in any design and planning process. The right tools, multiple measurements, and measuring before starting any work contribute to getting the best results. By taking accurate measurements, you will undoubtedly reduce errors and produce the desired result.
– Calculating the Load Capacity
Calculating the load capacity of a structure is an essential step in the design and planning process. The load-bearing capacity of a structure determines how much weight it can support without collapsing. To calculate the load capacity, engineers consider various factors that can affect the strength of the structure, such as the materials used, dimensions, and design.
For instance, the load capacity of a steel beam will depend on its size, shape, and length. Similarly, the load capacity of a concrete slab will be determined by its thickness, reinforcement, and curing time. Engineers also take into account the type of load the structure will bear, whether it’s a dead load (the weight of the structure itself) or a live load (the weight of people, equipment, or other objects).
By carefully calculating the load capacity, engineers ensure that the structure can withstand the expected load without failure. Ultimately, determining the load capacity is crucial to ensure the safety and longevity of any structure.
Cutting and Welding the Steel Tubes
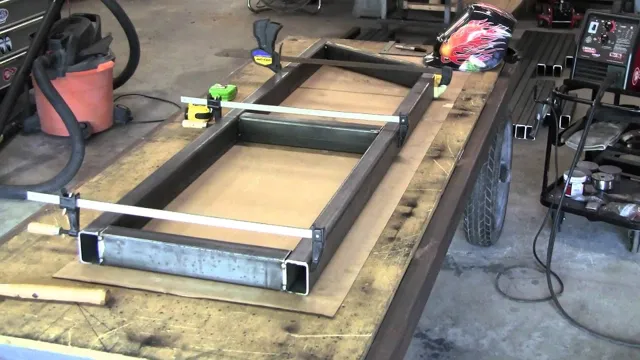
Now that we have all our materials and tools ready, it’s time to get down to the nitty-gritty of building a steel aquarium stand. One of the crucial steps is cutting and welding the steel tubes to create the frame of the stand. It’s essential to measure the tubes precisely and cut them using a metal saw or angle grinder.
The cut ends should be cleaned and smoothed using a metal file or sandpaper to ensure a smooth joint. Once the pieces are cut, they need to be welded together using a MIG welder or TIG welder. It’s essential to use the right welding technique and to make sure the welds are strong and secure.
Welding requires skill and experience, so if you’re unsure, it’s best to seek professional help. By following these steps, we can create a sturdy and durable steel frame for our aquarium stand that can withstand the weight of the tank and other equipment.
– Cutting the Tubes to Size
Cutting and Welding the Steel Tubes When it comes to creating steel structures or pipelines, cutting and welding the steel tubes is a crucial step. But before the cutting and welding begins, the tubes need to be measured and cut to size. Accurate measurements are important to ensure the steel tubes fit together and form a secure weld.
There are several methods used to cut steel tubes, including using a saw, a plasma cutter, or a torch. Once the tubes are cut to size, they can be welded to form the desired shape or structure. Welding requires precision and skill to ensure a strong and durable weld.
The weld can be made using a variety of techniques, including MIG, TIG, or Stick welding. It is important to choose the right welding method for the project to ensure a high-quality weld. Overall, cutting and welding steel tubes is a crucial step in the construction process that requires skill and precision to create strong, durable structures.
– Welding the Base and Supporting Columns
Cutting and welding the steel tubes is a fundamental step to start the project of building a base and supporting columns for any structure. These steel tubes serve as the backbone of the structure, and they must be carefully cut and welded to ensure a secure and sturdy base. The first step is to measure the steel tubes and cut them according to the required length using a metal cutting saw.
The next step is to prepare the ends of the tubes by grinding them to ensure a smooth surface for welding. The ends of the tubes should be clean and free from rust or debris to ensure strong welds. Welding the tubes requires precision and skill, as the base and supporting columns must withstand significant weight and stress.
Therefore, it is essential to use the right welding technique and equipment to achieve the desired result. Once the base and supporting columns are welded together, they provide a strong foundation for any structure, ensuring durability and stability.
– Adding Reinforcements
If you’re looking to reinforce your steel structure, cutting and welding steel tubes can be a great solution. This process involves cutting steel tubes to size and welding them onto the existing structure, creating a strong and durable bond. It’s important to ensure that the tubes are cut precisely and fit tightly against the original structure, as any gaps or inconsistencies can weaken the overall strength of the reinforcement.
Additionally, proper welding techniques are crucial for creating a strong weld that will hold up to stress and pressure over time. Overall, adding reinforcements to your steel structure can greatly enhance its strength and durability, ensuring that it can withstand even the toughest conditions. So if you’re looking to boost the structural integrity of your steel building or other structure, consider cutting and welding steel tubes as a reliable and effective option.
Assembly and Finishing
Now that we’ve gone over the materials needed to build a sturdy steel aquarium stand, it’s time to move on to the assembly and finishing steps. First, gather all the pieces you’ll need to build the stand according to your design plans. Lay out the frame on a flat and level surface, and use nuts, bolts, and washers to fasten the steel tubing together.
Make sure all connections are tight and secure before moving on. Once the frame is assembled, you can add any internal supports or braces as needed. Sand down any rough edges or spots, and apply a coat of rust-resistant primer to protect the steel from moisture and corrosion.
Once the primer is dry, finish with a coat of paint or another protective finish. Your steel aquarium stand is now complete and ready to support your aquatic pets and their habitat with confidence and style.
– Assembling the Stand
When it comes to assembling your stand, it’s important to follow the instructions carefully and take your time. First, lay out all the pieces so you can easily identify each one. Start by attaching the vertical supports to the base, making sure they are securely fastened.
Then, attach the horizontal supports, checking for any wobbling or instability. Once you have the frame assembled, it’s time to add any shelves or holders that come with your stand. Take your time and make sure everything is securely attached and level.
Finally, take a step back and admire your work! If there are any finishing touches you want to add, such as paint or stain, now is the time to do it before you start using your new stand. Remember, an assembled stand will not only look great but it will also provide functionality and convenience to your space.
– Painting the Stand
When it comes to finishing your DIY stand, one of the essential steps is painting it. Choosing the right paint is crucial for a long-lasting, durable finish. Look for paint that is specifically designed for the material of your stand.
Make sure to clean the surface thoroughly before painting to remove any dirt, grime, or residue. Sand the surface lightly to create a smooth texture that will allow the paint to adhere easily. Apply a primer before the paint to prevent the wood from soaking up the paint, which can cause unevenness.
Once the primer is dry, apply the paint in thin layers using a brush or roller, allowing each layer to dry completely before applying the next. It’s best to apply at least two coats of paint to ensure full coverage. After the last coat, let the paint dry thoroughly before handling the stand.
A well-painted stand not only adds a professional touch but also protects it from the elements and everyday wear and tear.
– Adding the Shelving and Tank Supports
After constructing the basic framework of your fish tank stand, the next crucial step is to add the necessary shelving and tank supports. The shelves will provide you with the required storage space for your aquarium accessories and equipment. Moreover, they also ensure the stability of the stand, preventing it from wobbling.
When it comes to tank supports, they protect your aquarium from any unexpected accidents, such as falling from the stand. Therefore, it’s crucial to choose high-quality materials for both the shelves and supports. You can opt for sturdy metal frames, robust wooden planks, or thick acrylic sheets, depending on your preference.
After finishing the assembly, you can polish the stand and paint it with a waterproofing stain or varnish to protect it from humidity and water damage. Remember that for any aquarium stand to function effectively, it must be both sturdy and moisture-resistant. Simultaneously, make sure to avoid overloading the shelves, which can compromise their strength and stability.
Conclusion
In conclusion, building a steel aquarium stand may seem like a daunting task, but with the right tools and techniques, it can be a rewarding and enjoyable experience. As with any DIY project, take your time and pay attention to details to ensure a sturdy and functional final product. Whether you’re a seasoned handyman or a novice DIY enthusiast, building a steel aquarium stand is a great way to add some underwater flair to your home decor.
So why settle for a plain old wooden stand when you can create a sleek and stylish steel masterpiece? Let your creativity flow and dive into your next DIY adventure!”
FAQs
What materials do I need to build a steel aquarium stand?
You will need steel tubing, angle iron, bolts, nuts, washers, and a welding machine.
Can beginner welders build a steel aquarium stand?
It is not recommended for beginner welders to attempt building a steel aquarium stand as it requires a proficient level of welding skills.
What is the weight-bearing capacity of a steel aquarium stand?
The weight-bearing capacity of a steel aquarium stand would depend on the dimensions and thickness of the steel used. It is recommended to consult with a professional or engineer to ensure the stand can support the weight of the aquarium.
How long will it take to build a steel aquarium stand?
The time it takes to build a steel aquarium stand will depend on the complexity and size of the stand. It can take anywhere between a day to a week to complete.
Do I need to paint or coat the steel aquarium stand?
Yes, it is recommended to paint or coat the steel aquarium stand to prevent rust and corrosion.
What are the pros of a steel aquarium stand compared to a wooden one?
Steel aquarium stands are more durable, resistant to warping and rotting, have a longer lifespan, and can support more weight than wooden stands.
Where can I find plans for building a steel aquarium stand?
There are various online resources and guides available for building a steel aquarium stand. It is recommended to consult with a professional and follow accurate plans and instructions to ensure safety and stability.


