How to Build an Aquarium Overflow: A Step-by-Step Guide
Looking to build an aquarium in your home? One of the essential components of your setup is the overflow system. An aquarium overflow helps to regulate water levels and ensure that the tank does not overflow or run dry. But how do you go about building one? In this article, we will explore the ins and outs of building an aquarium overflow.
We will discuss the different types of overflows available, the materials you will need, and the steps involved in constructing one. By the end of this article, you will be equipped with the knowledge and skills you need to build an efficient and effective overflow system for your aquarium. So, whether you’re a seasoned aquarist or a beginner, this article is for you.
We will guide you through the process of building an aquarium overflow, step-by-step, so that you can create a thriving aquatic environment for your fish and other aquatic creatures to call home. Are you ready to dive in and get started? Let’s go!
Introduction
If you’re interested in building your own aquarium overflow, it’s important to understand the components and steps involved. An aquarium overflow is a device that allows water to flow from the aquarium into a separate container, typically a sump, which can then be filtered and returned to the main tank. This process helps maintain a constant water level and improves overall water quality.
The first step is to determine the appropriate size and placement for the overflow based on tank size and other factors. Next, gather the necessary materials, including PVC pipes and connectors, and assemble the overflow according to the design plan. Once completed, test the overflow for leaks and adjust as necessary.
With a little patience and effort, building an aquarium overflow can be a rewarding and cost-effective solution for improving your aquatic habitat.
What is an Aquarium Overflow?
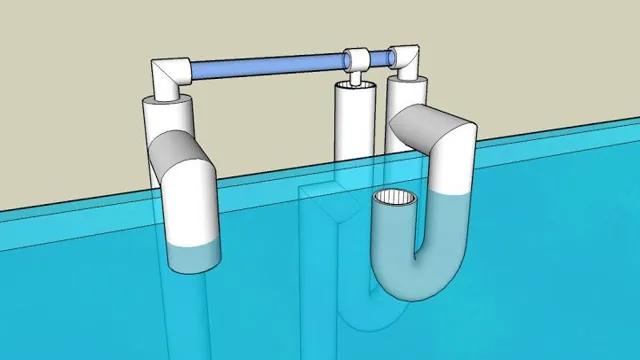
An aquarium overflow is an essential part of any aquarium setup, especially for those with large or heavily stocked tanks. Essentially, an aquarium overflow consists of a box or chamber attached to the side of the tank that allows excess water to flow out of the tank and into a sump or external filtration system. This ensures that the water level in the main tank stays constant and prevents overflow, which can be disastrous for both the aquarium and the surrounding area.
The overflow box typically has a series of holes or slots on the top or sides that allow water to enter while keeping fish and debris out. By using an aquarium overflow, hobbyists can maintain a healthy and stable ecosystem for their aquatic pets while also keeping their homes safe from water damage.
Gathering Supplies
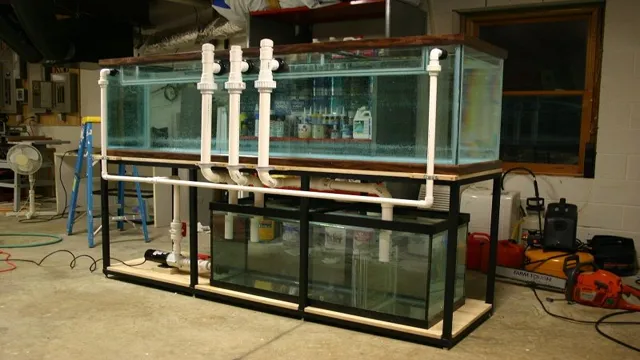
When it comes to building an aquarium overflow, gathering the right supplies is essential. First and foremost, you will need the overflow box itself, which can be purchased or built from scratch using acrylic sheets. You will also need a bulkhead fitting, which attaches to the overflow box and allows water to flow into the sump.
Silicone sealant is required to secure the bulkhead and overflow box together, as well as create a watertight seal. Additionally, you will need PVC piping and fittings to connect the bulkhead to the sump and create the necessary plumbing system. It’s important to ensure that all supplies are of high quality and designed specifically for use in an aquarium setting.
By gathering the right supplies, you can ensure that your aquarium overflow is both functional and safe for your aquatic pets.
Tools Needed
If you’re starting a new project or hobby, it’s important to have the right tools. You don’t want to get stuck mid-way through because you’re missing something essential! So, before you get started, it’s important to gather all the supplies you need. The tools you need will depend on the project, but there are some basics that apply to most hobbies.
For example, if you’re starting a painting project, you’ll need brushes, paints, canvases, and an easel. If you’re starting a woodworking project, you’ll need saws, drills, sanders, and clamps. It’s important to make a list of everything you need before you start purchasing items, so you can ensure you have everything you need.
That way, you’ll be able to dive into your project without any delays, fully equipped to take on the task at hand.
Materials Needed
If you’re planning a project, it’s important to know what materials you’ll need in advance so that you can gather everything before you get started. The first step in gathering your supplies is to make a list of everything you’ll need. This will help you stay organized and ensure that you have everything you need before you begin.
Once you have your list, you can start gathering your supplies. The best way to do this is to visit a hardware store or craft store where you’ll find a wide variety of materials. You can also order supplies online if you prefer.
Be sure to get quality materials that are suitable for your project. This will ensure that your finished product is durable and looks great. Don’t forget to get any tools you’ll need as well, such as hammers, saws, and glue guns.
With careful planning and a little bit of effort, you’ll have everything you need to get your project off the ground.
Step-by-Step Guide
If you’re looking to build an aquarium overflow, you’ve come to the right place! With a few necessary materials and some careful planning, you can create an efficient overflow setup that will keep your tank running smoothly. First, you’ll need to choose the type of overflow you want, such as a surface skimming overflow or a drilled overflow. Once you’ve made your choice, you’ll need to gather materials such as PVC pipes, bulkheads, and a sump.
Next, you’ll need to drill holes in your tank or use a pre-drilled tank for the overflow setup. After installing the overflow and connecting it to your sump, it’s important to test the setup for leaks and ensure that it’s functioning properly before adding any fish or other aquatic life. With these steps, you’ll be well on your way to building a successful aquarium overflow.
Preparing the Tank
Preparing the tank is a crucial step when it comes to setting up your fish tank. The first step is to clean the tank thoroughly before you start filling it with water. You can use a mixture of vinegar and water and a non-toxic scrubber to clean the interior of the tank.
Once you have cleaned the tank, rinse it properly and set it up in its designated location. Before you add any water, ensure that the tank is level and stable. Fill the tank with water, and add a water conditioner as per the instructions on the product label.
Once the water is conditioned, install your filters, heaters, and any decorations that you want to add. Test your equipment to ensure it is functioning correctly before you introduce any fish. Remember, the key to a successful aquarium is to ensure the tank’s environment mimics the natural habitat of the fish you intend to house.
With proper preparation, you can create a thriving and healthy environment for your fish to flourish in.
Cutting the PVC Pipes
If you are planning a PVC pipe project, cutting the pipes may seem like a daunting task, but with the right tools and technique, you can do it in no time. The first step is to measure the length you need and mark the pipe with a pencil. Next, secure the pipe firmly in place using a vice or clamp.
One of the best tools for cutting PVC pipes is a pipe cutter, which is specifically designed for this purpose. Simply place the cutter around the pipe where you made your mark and tighten it until it cuts through. Alternatively, you can use a hacksaw, but make sure to use a blade specifically designed for cutting PVC pipes and cut carefully to prevent the pipe from cracking.
Once you have cut the pipe, be sure to smooth the edges with sandpaper or a deburring tool to prevent any rough edges that could damage fittings or cause leaks. Cutting PVC pipes can seem intimidating, but with the right tools and technique, it can be done quickly and easily.
Assembling the Overflow Box
When it comes to creating an efficient aquarium system, a crucial component is the overflow box. If you’re interested in creating your own aquarium, or upgrading your current one, assembling an overflow box is an important step. Here’s a step-by-step guide to make the assembly process simple for you.
Firstly, ensure that you have all the necessary components for the overflow box, including a bulkhead fitting, a siphon tube, PVC pipe, and silicone sealant. Begin by drilling a hole in your aquarium and install the bulkhead fitting. Next, connect the siphon tube to the bulkhead fitting and make sure it extends below the surface of the water.
Install the PVC pipe inside the aquarium and connect it to the siphon. Lastly, seal all the joints with silicone sealant and let it dry before testing to ensure there are no leaks. Remember to follow all safety precautions when working with glass and power tools.
With these simple steps, you can assemble your own overflow box and create an efficient aquarium system.
Installing the Overflow Box
Installing an overflow box may seem daunting, but it’s actually quite simple! First, gather all the necessary tools and materials including an overflow box, silicone sealant, razor blade, and a measuring tape. Begin by measuring the width of the aquarium and marking the center point. Next, apply silicone sealant on the bottom of the overflow box and carefully place it on top of the center mark.
Make sure the overflow box is level and adjust if needed. Once in place, use the razor blade to remove any excess sealant. It’s important to allow the silicone to dry for at least 24 hours before any water is added.
Once dried, test the overflow box by filling the aquarium with water. If all is well, go ahead and add your filtration system to the overflow box. With a bit of patience and attention to detail, installing an overflow box can be a breeze!
Testing the Aquarium Overflow
When it comes to setting up an aquarium, one important component you’ll need is an overflow system. An aquarium overflow allows water to flow out of the tank and into a sump, where it can be filtered and returned back to the tank. However, before you start using your new overflow system, it’s crucial to test it thoroughly.
To do this, fill up your aquarium with water and let it run for a few days. Monitor the overflow system closely to ensure that it’s working as it should be. Check for any leaks or blockages, and make sure the water level remains consistent in both the tank and the sump.
By properly testing your aquarium overflow, you can ensure it’s working effectively and prevent any potential disasters down the line.
Checking for Leaks
When setting up a new aquarium, it’s important to check for leaks before adding water and fish to the tank. One crucial area to test is the aquarium overflow system. This is the part of the tank where water flows out into a sump or filter system to be cleaned and returned to the main tank.
To test for leaks in the overflow, you’ll need to fill the main tank with water and let it run for a while. Keep an eye on the overflow box and the plumbing leading to and from it. Look for any drips, leaks, or signs of moisture that could indicate a problem.
You may also want to inspect the seals and connections of the overflow box to ensure they are tight and secure. If you do find a leak, it’s best to fix it before adding any fish to the tank to prevent potential damage and safety hazards. Remember, a little extra time spent testing for leaks can save you a lot of hassle down the road!
Adjusting the Water Level
When setting up an aquarium, ensuring that the water level is just right is crucial. One way to do this is by testing the aquarium overflow. An overflow system is installed to keep the water level in the tank stable.
To test the overflow, start by filling the aquarium with water and wait for it to reach the overflow level. Turn off the power supply to the pump and observe the water level. If the water level maintains its height and doesn’t overflow, then the overflow system is working correctly.
If the water continues to overflow, adjust the overflow valve until it stops. It’s important to monitor the water level regularly to ensure it’s at the appropriate level. Too much water can cause damage to the equipment while too little water can lead to stress to aquatic life.
By testing and adjusting the aquarium overflow, you can ensure that your tank stays healthy and thriving.
Conclusion
In conclusion, building an aquarium overflow may seem like a daunting task, but with the right tools and knowledge, it can be a fun and rewarding experience. Remember to take your time and stay focused, as even the smallest mistake can cause major issues. And just like every aquarium needs a little overflow to keep things in check, every project needs a little overflow of creativity to make it truly stand out.
So go ahead and let your creative juices flow, and before you know it, you’ll have a beautiful and functional aquarium overflow that will impress all your fish-keeping friends!”
FAQs
What is an aquarium overflow and why is it important to have one?
An aquarium overflow is a device that helps to maintain proper water levels in your aquarium. It allows excess water to flow out of the tank and into a sump or other filtration system where it can be cleaned and returned to the tank.
What are the different types of aquarium overflows?
Some of the most common types of aquarium overflows include hang-on-back, drilled, and overflow boxes. Each type has its own advantages and disadvantages, depending on the size and design of your tank.
How do you install an aquarium overflow?
The installation process for an aquarium overflow will vary depending on the type of overflow you choose and the size of your tank. Generally, you will need to drill holes in your tank or attach the overflow to the back of your tank, connect it to a sump or other filtration system, and adjust the water levels to ensure proper overflow.
What size aquarium overflow do I need?
The size of your aquarium overflow will depend on the size of your tank and the amount of water you need to overflow. As a general rule, you should aim for an overflow that can handle at least 10% of your tank’s water volume.
How do you maintain an aquarium overflow?
Regular maintenance of your aquarium overflow is important to ensure that it continues to function properly. This may include cleaning the overflow box, checking for leaks, and adjusting the water level periodically.
Can you build your own aquarium overflow?
Yes, it is possible to build your own aquarium overflow using materials like PVC pipes and bulkhead fittings. However, it is important to ensure that your DIY overflow is properly designed and installed to avoid any leaks or other issues.
What are some common problems with aquarium overflows and how do you fix them?
Some common problems with aquarium overflows include clogs, leaks, and water level fluctuations. To fix these issues, you may need to clean the overflow, adjust the water level, or replace faulty components. It is always best to consult with a professional if you are unsure how to address a problem with your aquarium overflow.

