How to Drill Aquarium Acrylic – A Complete Guide for Beginners
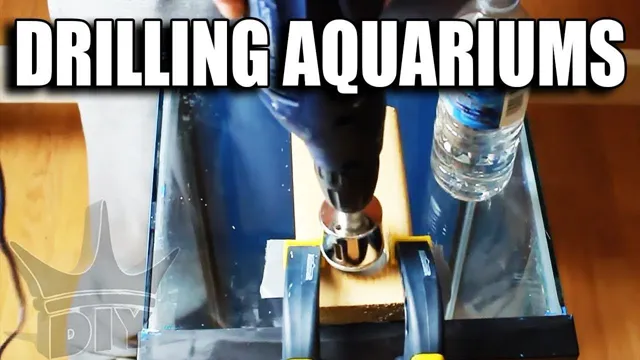
If you’re wondering how to drill aquarium acrylic, we’ve got you covered! Drilling holes in acrylic can be intimidating, especially if you’re new to DIY aquarium projects. However, with the right tools and techniques, drilling acrylic can be a breeze. Whether you’re adding a new filtration system or creating a custom overflow, drilling holes in your aquarium can help improve your setup in a variety of ways.
In this post, we’ll go over all the steps you need to know to safely and effectively drill holes in your aquarium acrylic. So sit back, relax, and let’s get started!
Introduction
Drilling holes on acrylic sheets can be a bit tricky, especially when you’re working with materials that are relatively thick like those used in aquariums. If you’re reading this, chances are you’re probably looking for a simple guide on how to drill aquarium acrylic. Well, worry not because we’ve got you covered! Before we dive into the process of drilling, it’s essential to know that acrylic sheets are very different from glass and require a different approach when drilling.
The primary rule of drilling acrylic sheets is to do it as slow as possible and with a steady hand. This is critical as a high speed can generate too much heat, which can cause the acrylic to melt and leave a rough or jagged-looking hole. To make the drilling process easier, you’ll need the right equipment and tools such as a cordless drill, a diamond bit, and a featherboard.
By following the proper steps and applying the right technique, drilling holes through aquarium acrylic should be a breeze.
What is Aquarium Acrylic?
Aquarium acrylic is a transparent thermoplastic material that is commonly used in the construction of aquariums. It is made from a type of plastic called polymethyl methacrylate (PMMA), which is known for its clarity, strength, and resistance to yellowing. Unlike glass, acrylic is lightweight and shatter-resistant, making it a popular alternative for aquarium enthusiasts who prefer a safer and more durable option.
It also allows for greater flexibility when it comes to design and customization, as it can be easily shaped and bonded together without the need for special tools or techniques. Overall, aquarium acrylic offers several benefits over traditional glass aquariums and is a preferred choice for those looking for a high-quality and long-lasting aquarium.
Why do You Need to Drill Acrylic?
Acrylic is a versatile and popular material used for a variety of purposes, from crafting to industrial manufacturing. However, drilling acrylic can be a challenge for those who don’t have experience with it. If you want to make a hole in acrylic, it’s important to drill it correctly to avoid cracking or damaging the material.
One of the main reasons why you need to drill acrylic is to create holes for mounting or fastening purposes. In this article, we’ll discuss the importance of drilling acrylic and why you should take extra precautions when working with this material. So, let’s dive in and explore the fascinating world of acrylic drilling.
Materials Needed
When it comes to drilling aquarium acrylic, there are a few materials that are essential to have on hand. First and foremost, you’ll need a drill with a diamond tipped or carbide tipped bit capable of drilling through acrylic without cracking or damaging it. It’s also important to have a ruler or measuring tape to ensure accuracy in your hole placement, as well as masking tape to mark off the area you’ll be drilling.
Additionally, you’ll want to have a spray bottle filled with water to keep the acrylic cool during the drilling process in order to prevent any melting or warping. Finally, it’s important to have safety equipment on hand such as safety glasses, gloves, and a dust mask to protect yourself from any debris. By having these materials on hand, you’ll be well-equipped to successfully and safely drill holes in your aquarium acrylic.
Drill Bits
Drill Bits If you’re planning on doing some drilling, then you’ll want to make sure you have the right materials to get the job done effectively. First and foremost, you’ll need the right drill bit. There are many different types of drill bits, each suited to specific types of materials and applications.
For instance, wood drill bits are typically designed to create larger holes and are not as sharp as metal drill bits, which are meant for drilling into harder materials. When selecting drill bits, it’s important to consider the type of material you’ll be drilling into and the size of the hole you need to create. You’ll also want to make sure that the shank of the drill bit fits the chuck of your drill.
If the shank is too large or too small, you won’t be able to use it in your drill. In addition to drill bits, you may also need a drill bit sharpener to keep your bits in good condition and ensure that they remain sharp and effective over time. This can help to extend the life of your drill bits and save you money in the long run.
Overall, when it comes to drilling, having the right materials is essential for achieving the best results. So take the time to choose the right drill bits and other accessories to make sure your drilling projects are successful every time.
Clamps
When it comes to clamps, there are a few materials that come to mind. First, you’ll want to consider the type of clamp you need. If you need a woodworking clamp, you’ll likely want one made of hardwood or aluminum, as they are both strong and lightweight.
For metalworking, a steel clamp is often the go-to choice due to its durability and strength. Additionally, some clamps may have rubber or plastic components for added grip or to prevent scratching of the workpiece. Of course, the material of the clamp itself isn’t the only consideration.
You’ll also want to choose a clamp of the appropriate size and shape for your project, as well as one with the right type of grip mechanism. Whether you’re a beginner or a seasoned pro, selecting the right materials for your clamps can make all the difference in the success of your project.
Water or Lubricant
When it comes to industrial machinery, it’s important to know what type of lubrication is appropriate for your equipment. If you use water instead of lubricant, you risk damaging your machinery and causing it to break down prematurely. So, what materials do you need to ensure you’re using the right lubricant for your machinery? Firstly, you need to know the specific type of lubricant recommended for your equipment.
This information should be readily available in the owner’s manual or from the manufacturer. Additionally, you’ll need to purchase the proper lubrication equipment such as dispensers, applicators, storage, and transfer pumps. It’s also important to make sure you have the right amount of lubricant for your equipment, as too little or too much can cause issues.
By investing in the right materials, you can ensure that your machinery is running smoothly and efficiently, without risking damage or downtime. So, next time you’re maintaining your equipment, remember to prioritize proper lubrication and invest in the materials you need for success.
Preparing the Acrylic
Before you start drilling your aquarium acrylic, you need to make sure that it is properly prepared. First, gather all the necessary drilling equipment, including a drill bit that is designed for use on acrylic surfaces. Next, clean the acrylic surface using a mild soap and water solution to remove any dirt or debris.
Then, use a soft cloth to dry the surface. Make sure that the area where you will be drilling is marked with a pencil so that there is no guessing involved. The markings will guide you during the drilling process, helping you to create precise holes.
Once you have marked the area, you can apply masking tape to the surface to help prevent cracking or chipping. Take your time and be patient during the preparation process to ensure a smooth and successful drilling experience. Remember, with the right tools and preparation, drilling aquarium acrylic can be a breeze!
Measuring and Marking
As you begin to work with acrylic, it’s important to prepare the material properly in order to ensure a successful project. First, measure and mark your acrylic sheet according to the specific dimensions you need for your project. To do this, use a measuring tape and a permanent marker to make straight lines on the sheet.
You can also use a straight edge to ensure accuracy. Once your acrylic is properly measured and marked, it’s time to prepare the surface for cutting, sanding, or drilling. Use a gentle soap and water solution to clean off any dirt or debris, and make sure the acrylic is completely dry before proceeding.
Taking the time to properly prepare your acrylic will result in a smoother, more professional looking finished product.
Clamping the Acrylic
When it comes to working with acrylic, preparation is key. Before you start clamping, make sure that your acrylic is completely clean from any debris or dirt. You can wipe it down with a soft cloth or use a specialized acrylic cleaner.
Once you have a clean surface, it’s time to clamp it down to prevent any movement during cutting or drilling. Make sure to choose a clamp that is strong enough to hold the acrylic in place without causing any damage. Avoid using too much force as this can cause cracking or breaking.
Additionally, ensure that the clamp is placed evenly on the surface of the acrylic to maintain its shape. By taking the necessary steps to prepare and clamp the acrylic, you can ensure a successful project without any mishaps.
Drilling the Acrylic
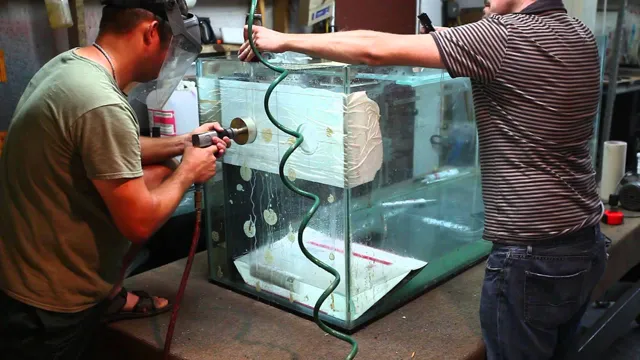
Drilling aquarium acrylic can be quite easy if done correctly. It is important to have the right equipment, patience, and a steady hand while drilling. To begin, make sure to have a specialized drill bit for acrylic as regular drill bits can cause the acrylic to crack or shatter.
When drilling, place the acrylic on a flat surface and use a clamp to secure it in place. Apply a small amount of pressure while drilling, being careful not to apply too much force as this can also cause the acrylic to crack. It is also recommended to use a drill bit lubricant to maintain a smooth and even drilling process.
Taking these precautions can ensure a successful drilling experience and a properly functioning aquarium. Happy drilling!
Choosing the Right Speed
When it comes to drilling acrylic, one of the most important things to consider is the right speed. Using the wrong speed can cause the acrylic to crack or even shatter, ruining your project. So how do you choose the right speed? It all depends on the thickness of the acrylic you’re drilling.
For thinner pieces, a faster speed may be more appropriate, while thicker pieces require a slower speed. It’s important to start at a lower speed and gradually increase it until you find the right balance. As you drill, keep an eye on the acrylic and adjust the speed accordingly.
By taking the time to choose the right speed, you’ll ensure a clean, professional-looking hole every time.
Starting the Hole
Starting the Hole: Drilling the Acrylic When it comes to drilling acrylic, the first thing you’ll want to consider is the diameter of the hole you need. This will determine the appropriate drill bit to use. Once you have your bit, you’ll want to clamp the acrylic securely into place to prevent any movement during drilling.
It’s also important to use a moderate speed and constant pressure while drilling to avoid cracks or shattering. To ensure a clean and smooth hole, start with a smaller bit size and gradually work your way up to the desired diameter. It’s important to note that lubrication can also help prevent overheating and cracking of the acrylic.
With these tips in mind, drilling acrylic can be a successful and effective process for your project needs.
Drilling Through the Acrylic
Acrylic sheets are widely used for various DIY projects, and drilling through them can seem daunting. However, with the right tools and techniques, drilling acrylic can be effortless and enjoyable. To start, make sure to use a drill bit specifically designed for acrylic, as regular bits can cause the material to crack or shatter.
Additionally, be sure to clamp the acrylic sheet securely to a work surface to prevent it from moving during drilling. When drilling, use a slow speed and avoid pushing too hard, as this can cause the bit to grab the material and crack it. Finally, it’s essential to keep the acrylic sheet lubricated with a coolant, such as water or drilling lubricant, to prevent the material from overheating and melting.
Always remember to wear eye protection and work in a well-ventilated area. With these tips, drilling through acrylic can be a breeze, making your DIY projects a success.
Finishing Touches
Drilling holes into acrylic can be a daunting experience for those unfamiliar with the process. However, it is a necessary step for aquarium enthusiasts who want to add filters or create unique designs within their tanks. When it comes to drilling aquarium acrylic, it’s essential to have the right tools.
Not just any drill bit will do as using the wrong one can cause damage to your acrylic, which will result in leaks over time. It’s best to look for a specialized acrylic drill bit that has been designed to withstand the material’s toughness without any breaks or cracks. Additionally, to prevent damage, it’s crucial to mark the drilling spot accurately and provide ample support for the acrylic, such as clamping it down or using a drilling press.
With a steady hand, patience, and the right equipment, drilling aquarium acrylic becomes an easy task, and you can enjoy the finished, customized look of your aquarium.
Removing Burrs
Removing burrs is one of the final stages in the metalworking process. It is an essential step in creating a polished and smooth surface on the metal. These burrs can form during the cutting or grinding process and can be quite sharp and jagged.
They can be a nuisance and cause safety concerns if not removed. There are several methods to remove burrs, including filing, sanding, deburring tools, and chemical solutions. Filing is a commonly used method, and it involves using a metal file to grind down the burr.
Sanding is another effective option, and it involves using sandpaper to smooth out the surface. Deburring tools are also commonly used and come in various shapes, sizes, and types. However, chemical solutions are not recommended as they can cause damage or weaken the metal.
In summary, removing burrs is a crucial step towards creating a polished and smooth surface on the metal and should not be overlooked.
Cleaning Up
As you’re wrapping up your cleaning, don’t forget about the finishing touches that can really make your space shine. Start by wiping down all surfaces with a gentle cleaner to remove any remaining grime or dust. Then, take a close look at your floors.
Do they need a quick sweep or a thorough scrub? Depending on the type of flooring you have, you may want to use a specialized cleaner to get them looking their best. Don’t forget about accessories such as curtains, pillows, and decorative objects, which can accumulate dust over time. Give them a good shake or wash so they look fresh and clean.
Finally, consider adding a fresh scent to your space by using a diffuser, candles, or room spray. Not only will it leave your space smelling great, but it will also create a sense of calm and relaxation. With these finishing touches, your space will feel like brand new!
Conclusion
In conclusion, drilling aquarium acrylic may seem daunting, but with the right tools and techniques, it can be a piece of cake. Remember to take your time, go slow and steady, and use plenty of water to keep the material from melting and cracking. And just like a finely crafted fish tank, a well-drilled hole is both functional and beautiful.
So go forth, fellow aquarists, and unleash your inner handyman (or woman) – your fish will thank you for it!”
FAQs
What type of drill bit is best for drilling acrylic?
A drill bit with a 60-degree angle and a point angle of 118 degrees is best for drilling aquarium acrylic.
Do I need to use water when drilling acrylic?
Yes, using water during the drilling process helps to prevent the acrylic from cracking or melting due to high friction from the drill bit.
What is the recommended speed for drilling acrylic?
The recommended drill speed for acrylic is between 2000-3000 RPM. It is important to start slowly to avoid overheating the acrylic and then gradually increase the speed.
Should I use a drill press or a hand-held drill when drilling acrylic?
It is recommended to use a drill press when drilling acrylic as it provides better stability and control over the drilling process.
What precautions should I take when drilling acrylic?
Always wear protective eyewear and gloves, make sure the acrylic is securely clamped in place, and do not apply too much pressure while drilling as it can cause the acrylic to crack.
Can I use a regular drill bit for acrylic or do I need a special one?
It is recommended to use a special drill bit designed for drilling acrylic to prevent the material from cracking or melting.
How do I ensure that the drilled holes are clean and smooth?
Use a deburring tool or sandpaper to smooth out the edges around the hole after drilling to ensure that it is clean and smooth.

